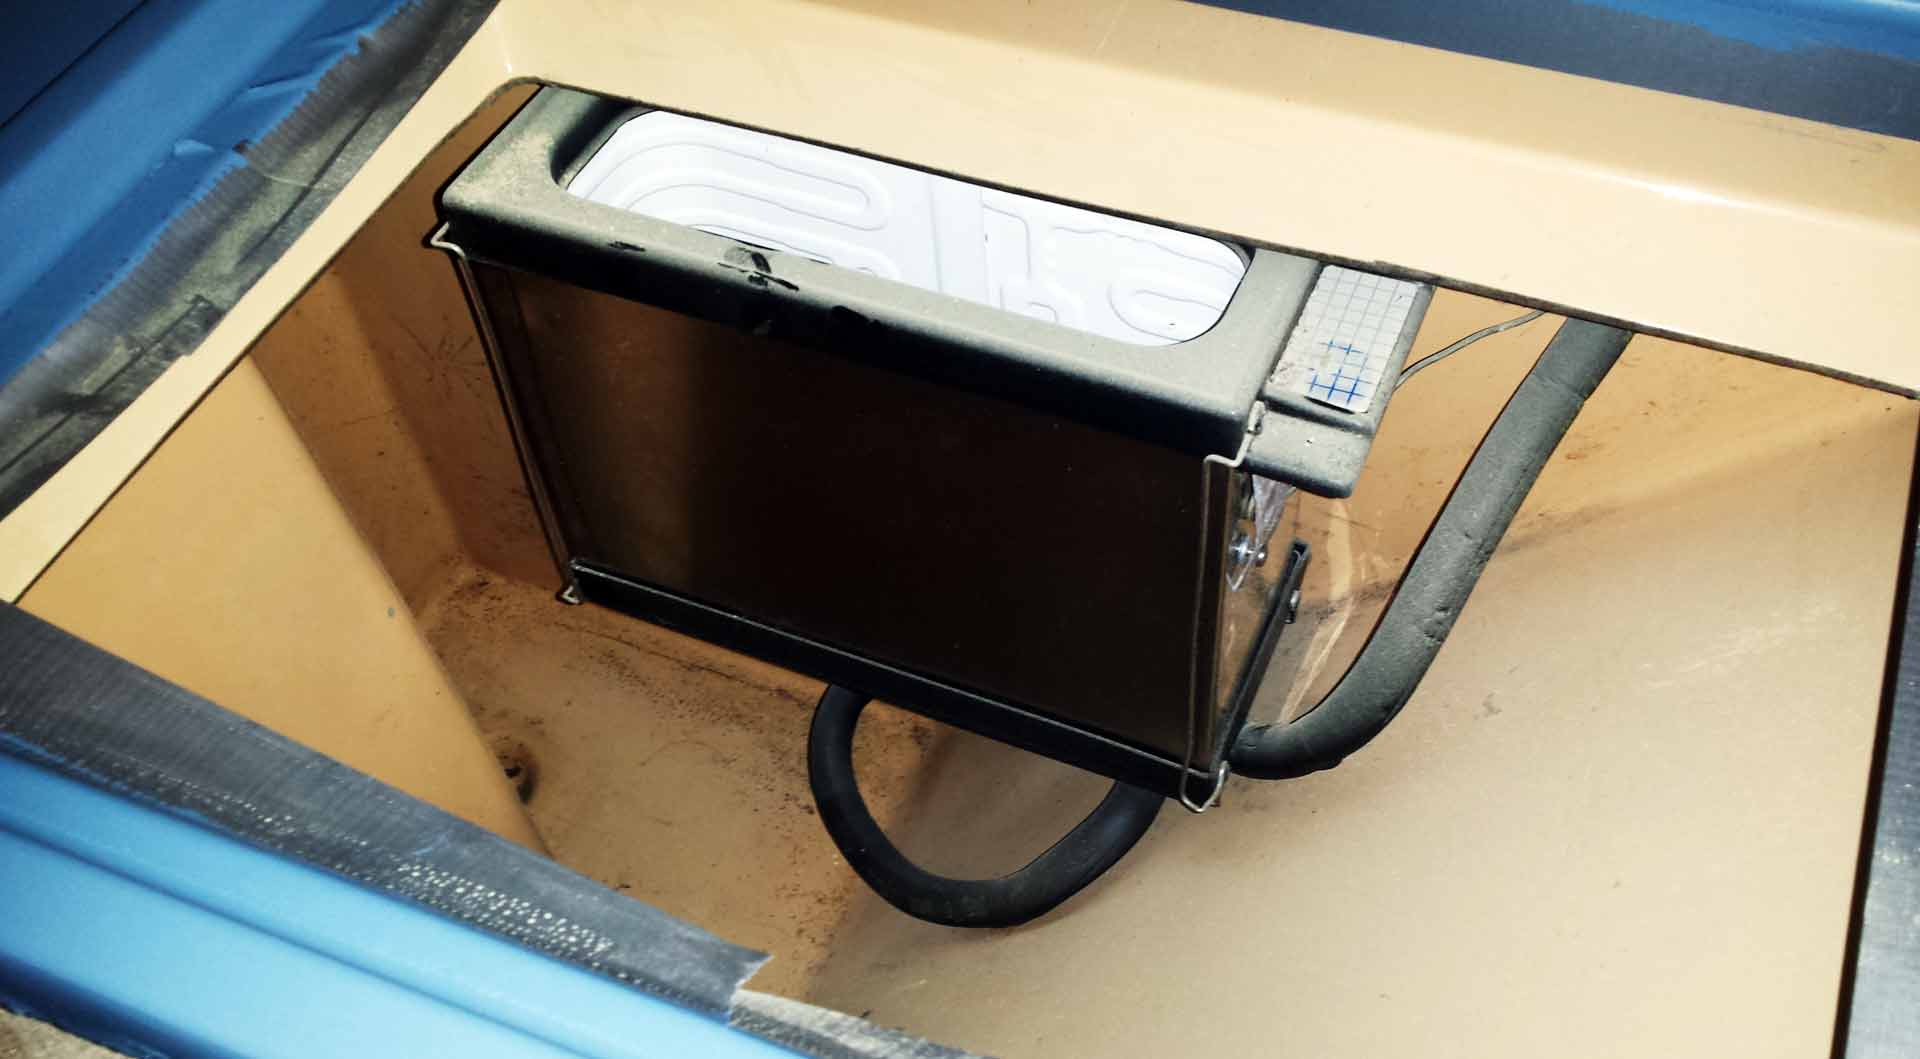
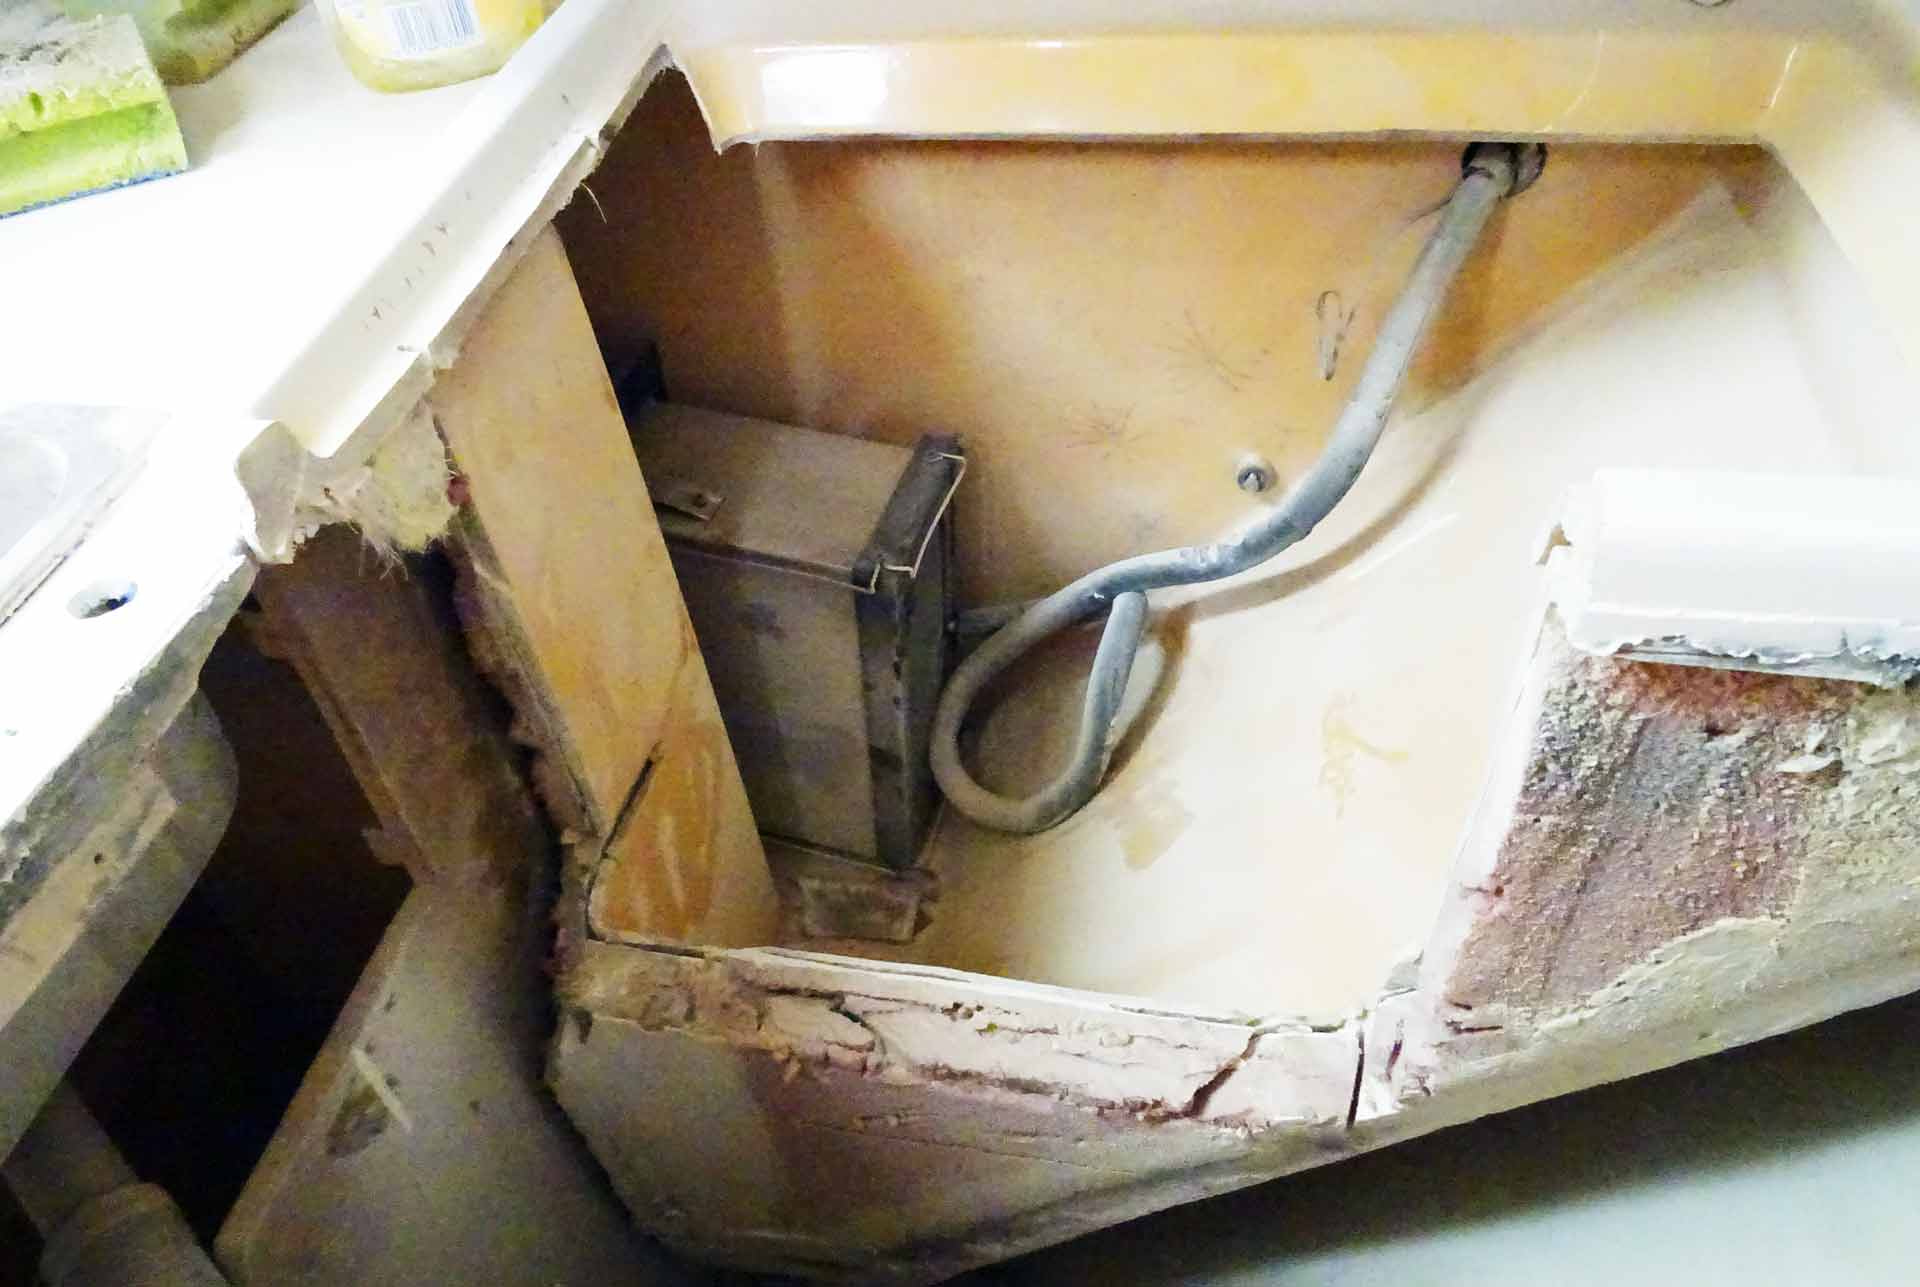
My 40 year old King´s Cruiser 33 does have a pre-installed fridge already. This fridge has a very large storage container right at the most rearward place in the pantry. It´s really huge. By raising the large cover – thick by the insulation – one can reach, I would guess, 30 to 40 liters of ice cold storage facility. But there´s a downside to it.
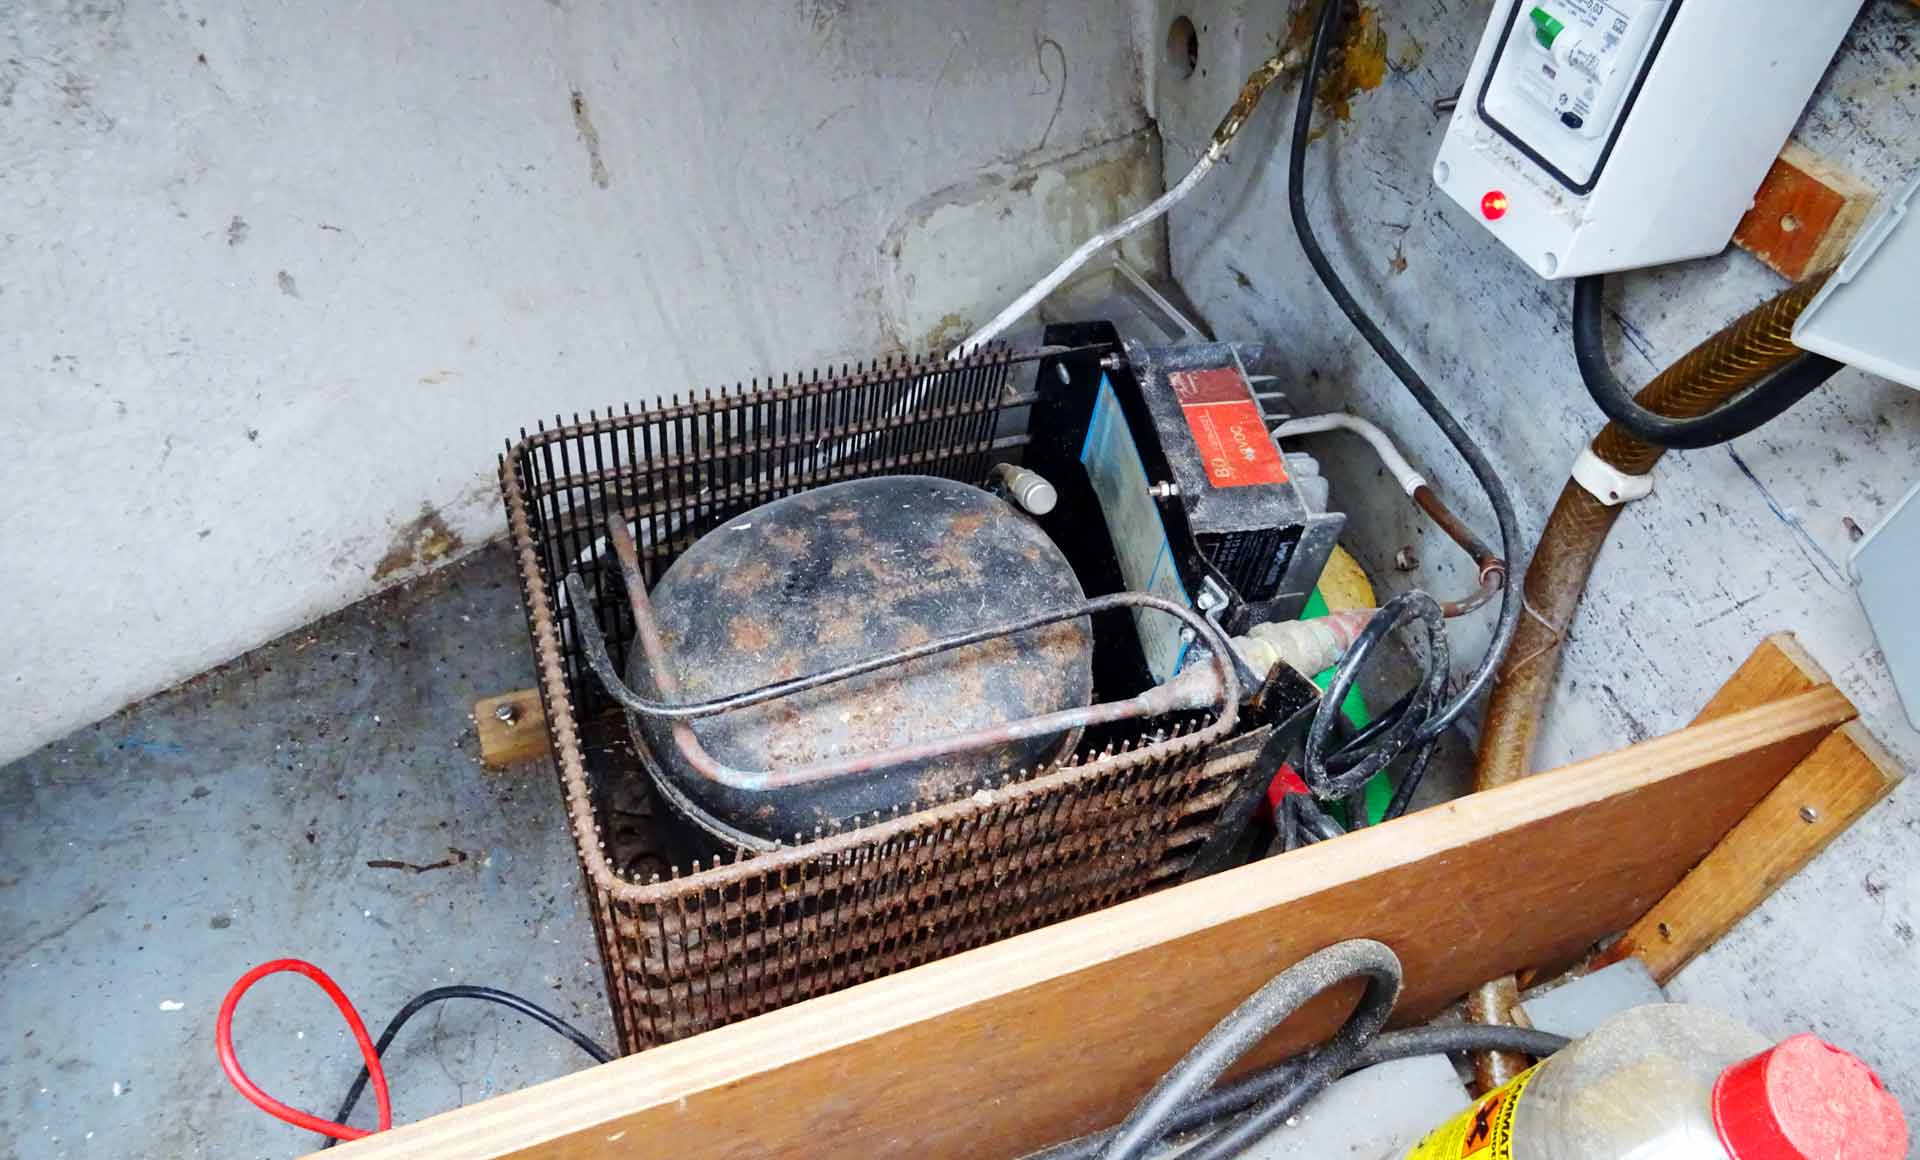
On my boat this fridge is powered by a large cooling unit installed outside of the boat in the port locker. This unit is … well, also some 40 years old. It probably works with environmentally critical CFC and that´s another factor pushing me towards finding an alternative solution to the cooling problem here. So, what to do?
Fridge versus Cooling Box
Power consumption of this freezing unit is high, no doubt. Besides, there´s simply no need to have such a huge fridge installed on SY OLIVIA since most of our future cruises will take place over a course of two or three days, a weekend. Maybe one or two times a year we will be able to have a multi-week cruise. And these again won´t take place in the hot Caribbean. So, to be honest, there´s simply no need for such a big fridge: A bit of milk for the children, some meat or sausage. That´s really it. No need for ice cold beer or Champaign, I´m not a fancy Saint Tropez pier side cruiser.
I was originally opting for the least complicated solution: What about a thermos-electric cooling box? It´s simple, it´s convenient and it´s really no frills. Well, is it really? I´ve asked a friend of mine who is a crack in terms of outdoor equipment and camping stuff. And he was heavily shaking his head: “Don’t ever go for thermos-electric cooling!”, he was warning: “They are loud as hell, will eat away battery power and worst of all cannot cool efficiently anyway.” His recommendation was to get a compressor cooling box which should be far more energy-saving and would have way better cooling abilities. And so I opted for the Dometic Coolfreeze CFX-line. Dometic (in Germany known as Waeco) is world market leader when it comes to electric outdoor equipment: Lately European yachting magazine Yacht had a test of cooling units which was won by the Dometic Coolfreeze as well.
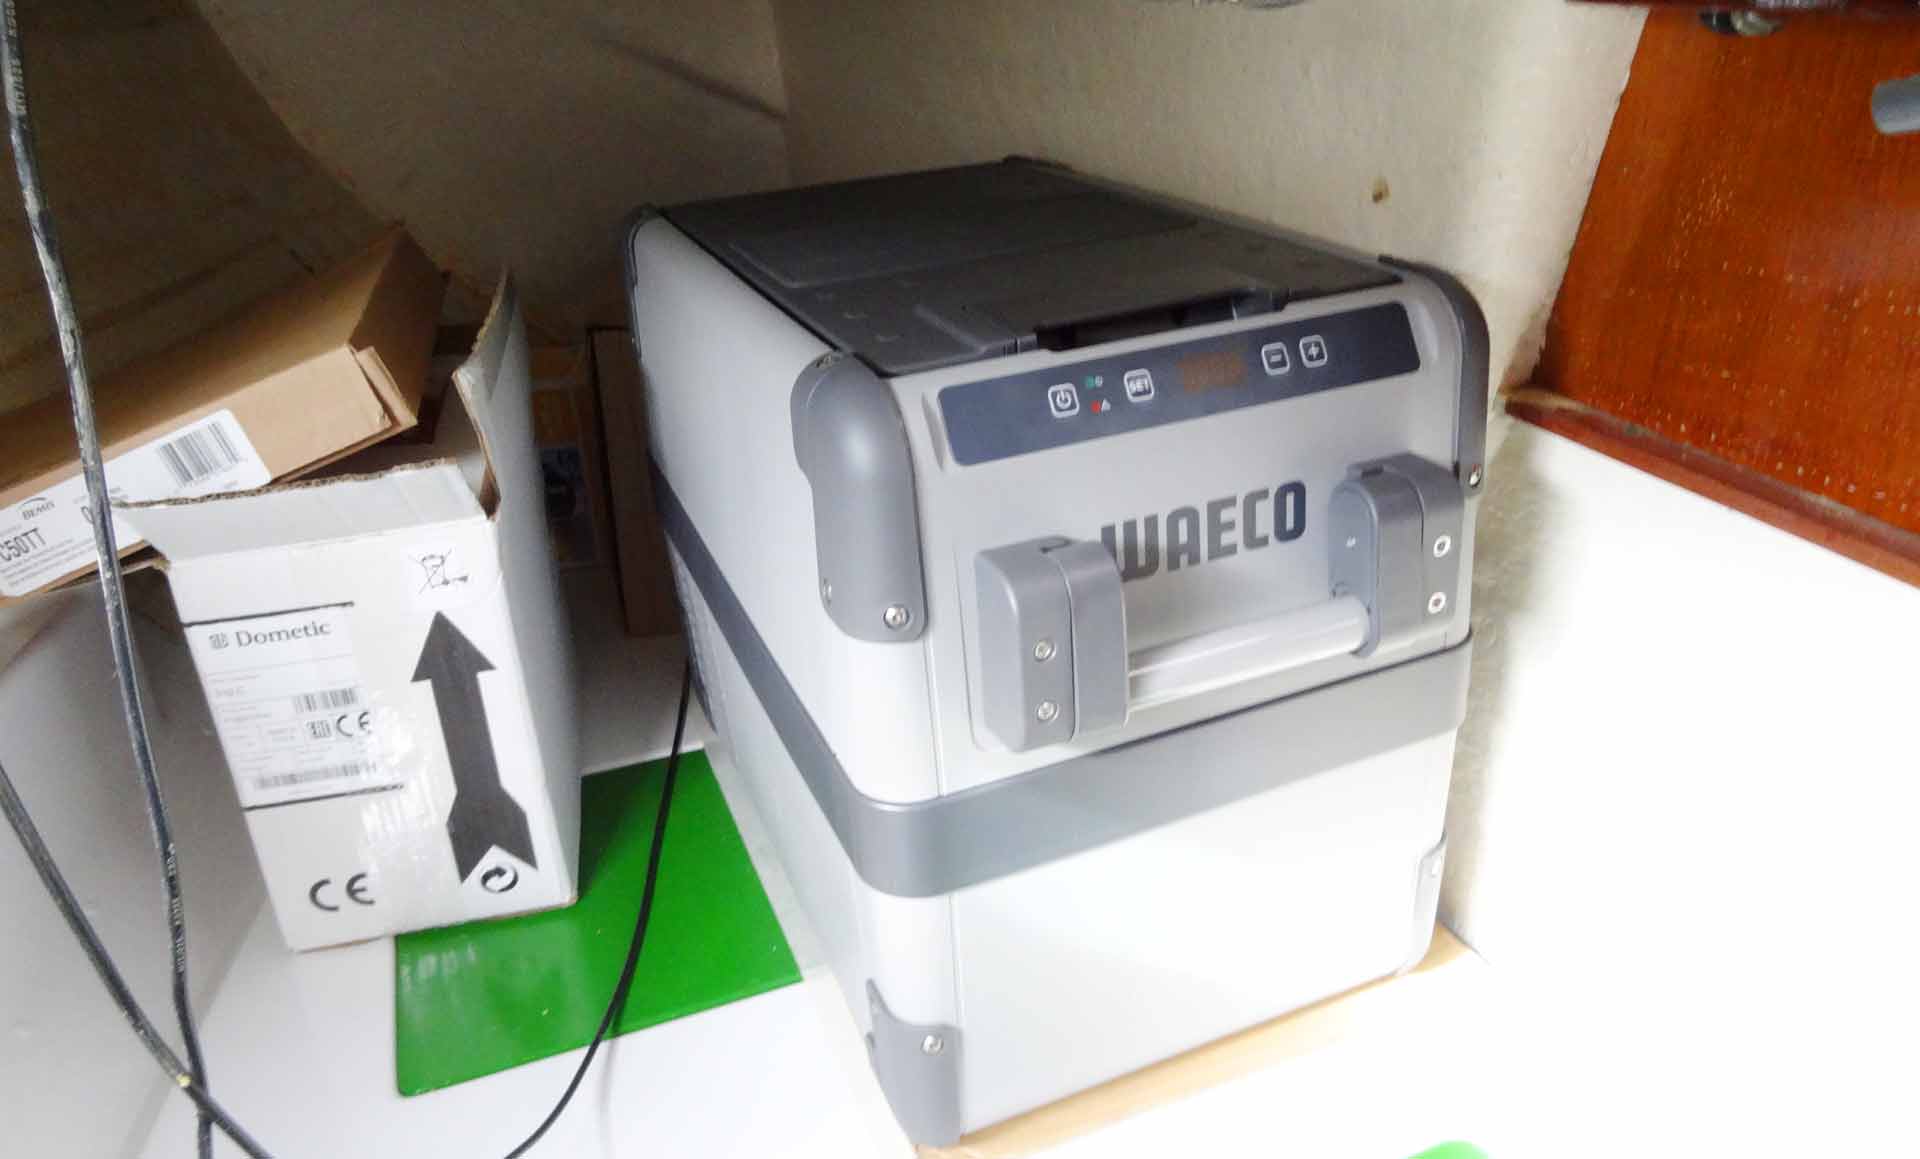
I chose the smallest of the available compressor units from Dometic Coolfreeze CFX-line with 28 liters of stowage. I think that will do perfectly. (Read here what I´ve bought along when shopping time at Dometic hit me) In one of the last articles I was playing around with an idea of closing the quarter berth of my boat by installing a new bulkhead (read this particuluar article here). The concept was to have a place for “hiding” my spare sails, the life-raft and – here we go – the new cooling unit, my Dometic compressor box.
I finally rejected execution of this idea because it would change too much of my King´s Cruiser 33 appearance and besides, it wasn´t practical: The new cooling box indeed had a nice place to stand, but couldn´t be opened wide enough to be useful. Anyway, opting for the Dometic Coolfreeze CFX was the right choice and I was roaming about the boat to find an alternative place for the new cooling unit. Taking measurements of the Coolfreeze and making a simple template I tried the forepeak V between the berths (too small), somewhere in the saloon between the stands of the dining table (no space at all) or somewhere else. But I ended up having to put the cooler where it belongs: In the pantry.
Re-inventing the Yacht´s Pantry
So at first I placed the Cooler in the worktop in the pantry to see where and if yes how it would fit. I did in terms of length of the appliance, but when I took the actual cooler and put it in the pantry I quickly realized that this wouldn´t be an option: I wished it could be mounted facing midship to be able to open the box whilst standing in front of the pantry but overall even this smallest of the available Dometics wouldn´t fit mounted this way because the pantry wouldn´t be deep enough to have it sunk to be leveled with the worktop. Oh yeah, that could work, I thought.
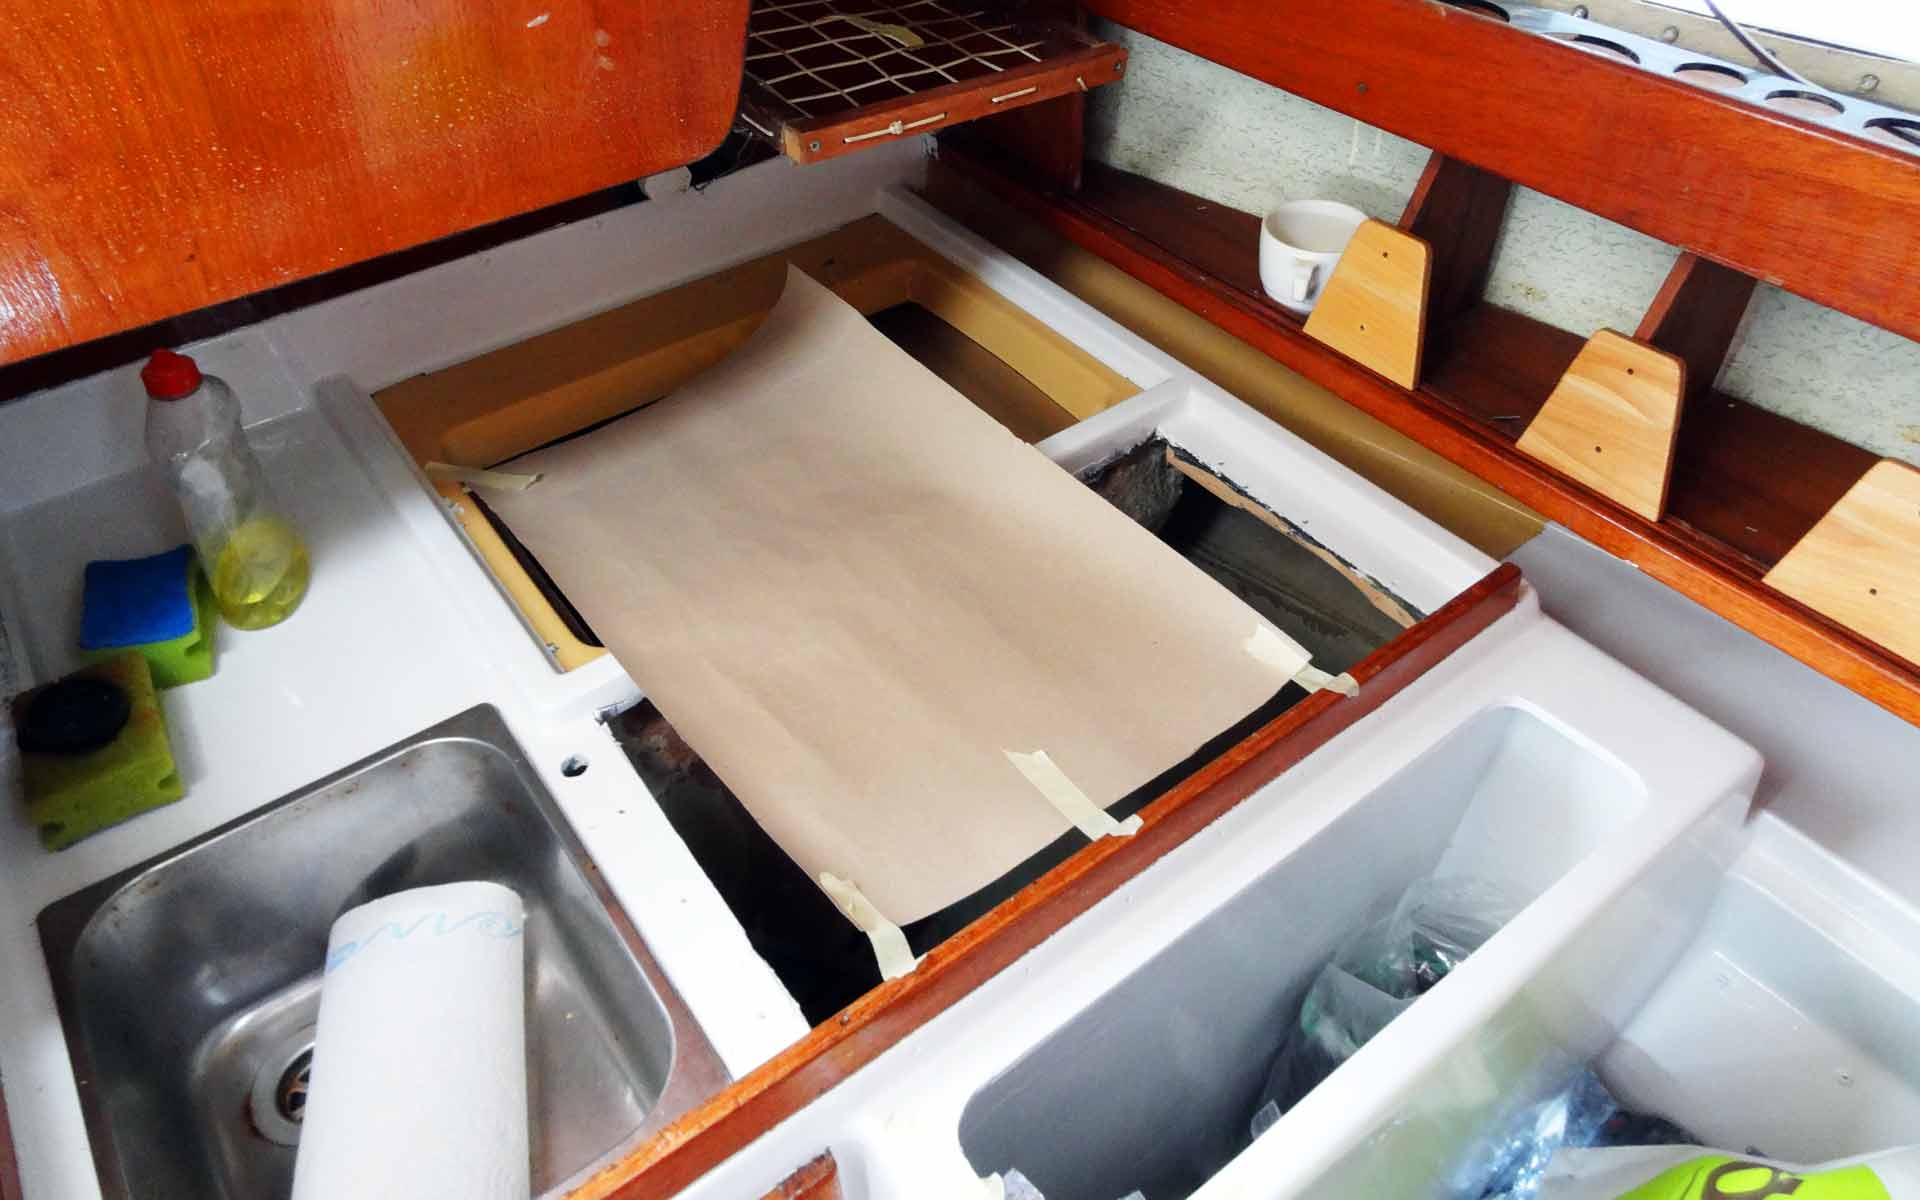
So I put the small cardboard piece virtually everywhere in the pantry to find the perfect spot. I flipped it and turned it just to be sure of having found a spot where to finally mount the freezer. I was keen on not just finding a place to have it installed but also to find a place where it was convenient to have the freezer at all. And I finally found it.
Right next to the sink, alongside the longitudinal axis of the boat. The fridge should fit right there, left hand side of the sink, in a comfortable reaching distance from the stove. But there was a snag in it: I would have to cut away a bigger chunk of GRP since none of the existing cutouts were big enough to support the big cooling box. Again, it was time to get out the cutter and fit it with the right cutting wheel. And action!
Cutting GRP – major Refit work going on
Working on a sailing yacht refit will put us more often than we want into contact with hazardous material. And even if GRP is often considered mere “plastic”, cutting glass reinforced fiber and topcoat is dangerous work indeed: By cutting through the hardened resin the fibers will be destroyed to the smallest particles which are considered carcinogenic at worst – surely harmful to one´s health. So working with a breathing mask is the least one should do! (Here´s an article on the breathing masks).
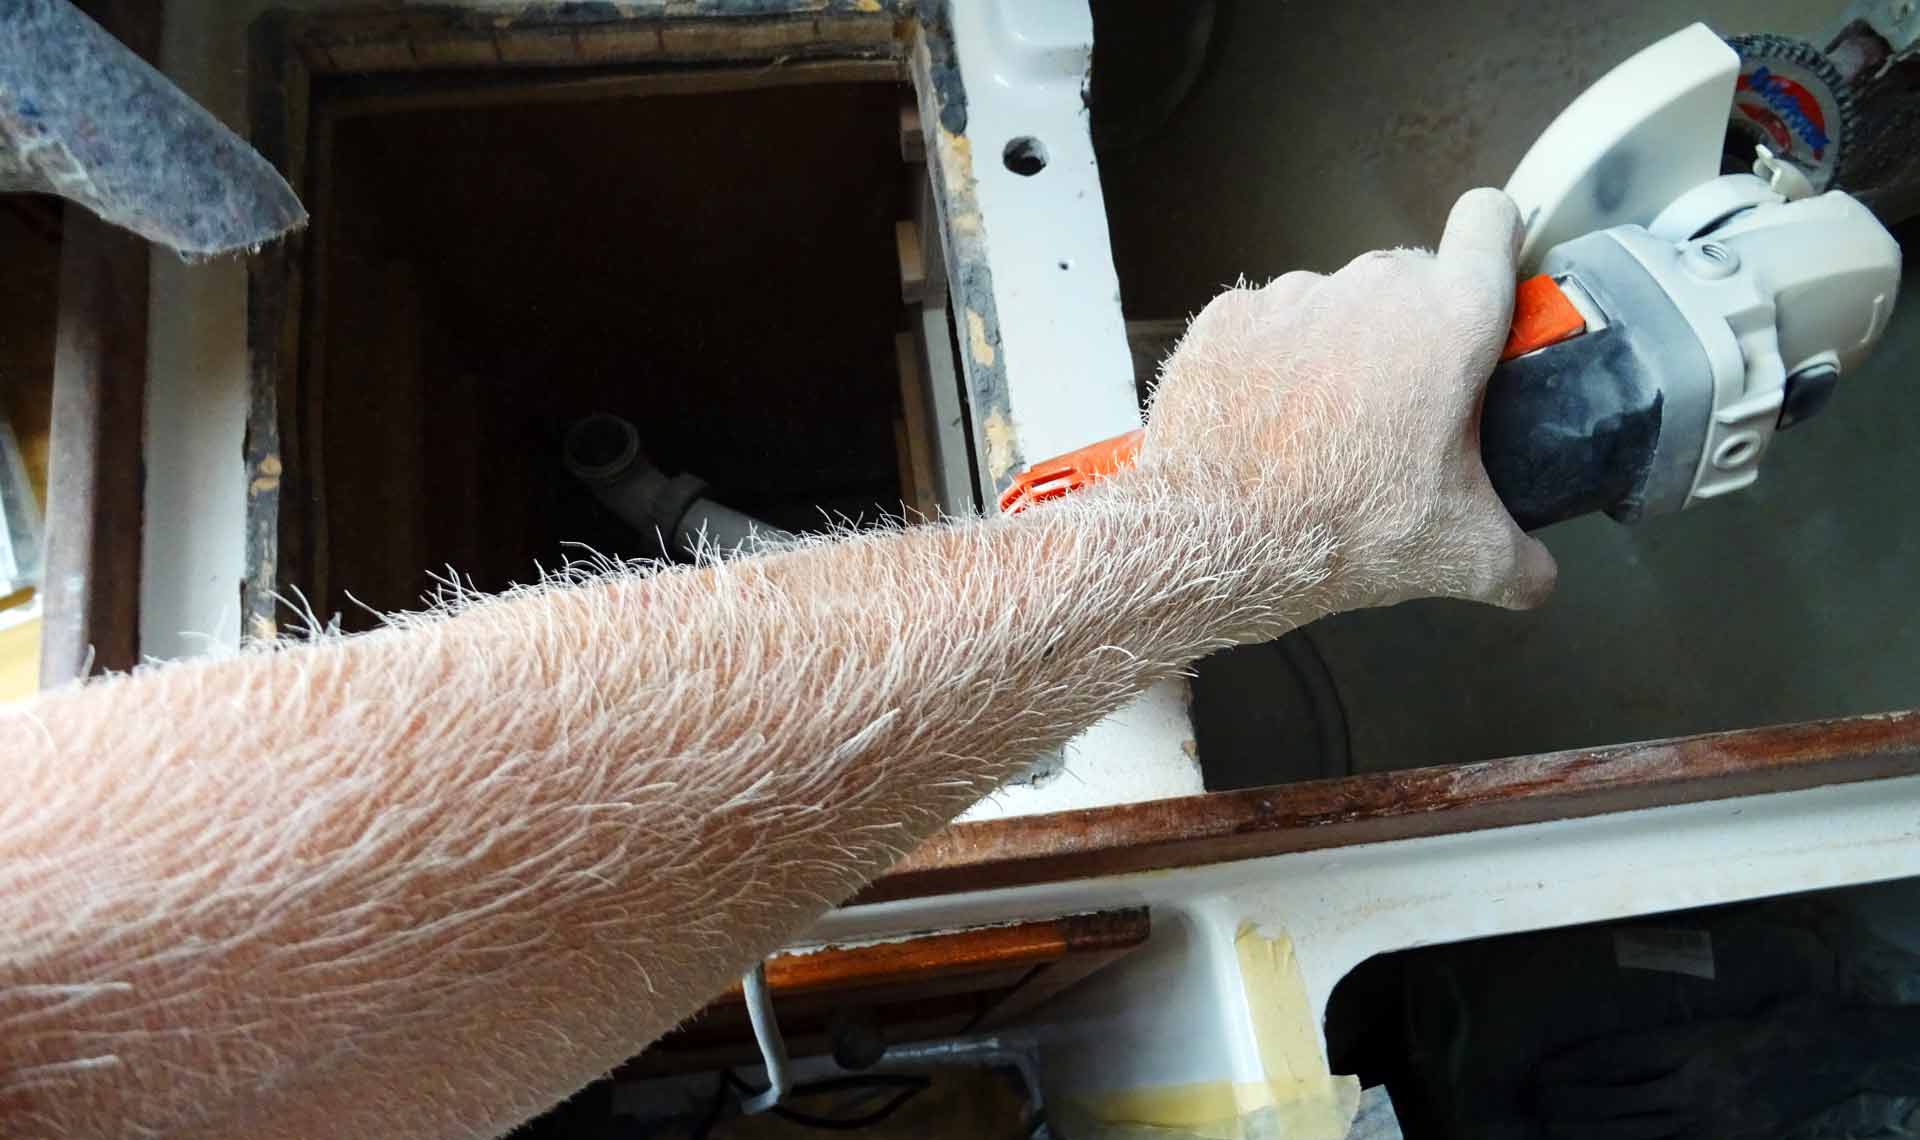
Having put on the mask and a special suit it was really hard to put myself into the right position to place the cuts. The pantry area is cramped and normally one is not able to see the actual cutting going on. But with that screamingly loud rotating hellish machine in my hands I had to see where the wheel was eating its way through the GRP. It took me some 30 minutes to have the two cuts placed and the piece of GRP taken out of the hull. When it was finally done sweat was running out of my pores, covered in dust and my ears vibrating in the cutter´s clangor.

It took just seconds to fill the boat with a thick white dust. Though breathing through a mask, I could smell this very characteristic odor of glass reinforced fiber, old topcat sanded down into fine particles. It reminded me of one of the very first milestones of this refit project when I was sanding down the yellow worn out topcoat to have it painted in yacht white (you may read it here). After it was done, I was covered with thick layer of fine dust – and went outside to have a thorough wash with fresh water to take it off. Allowing the dust to settle, I entered the boat´s saloon some 15 minutes later.
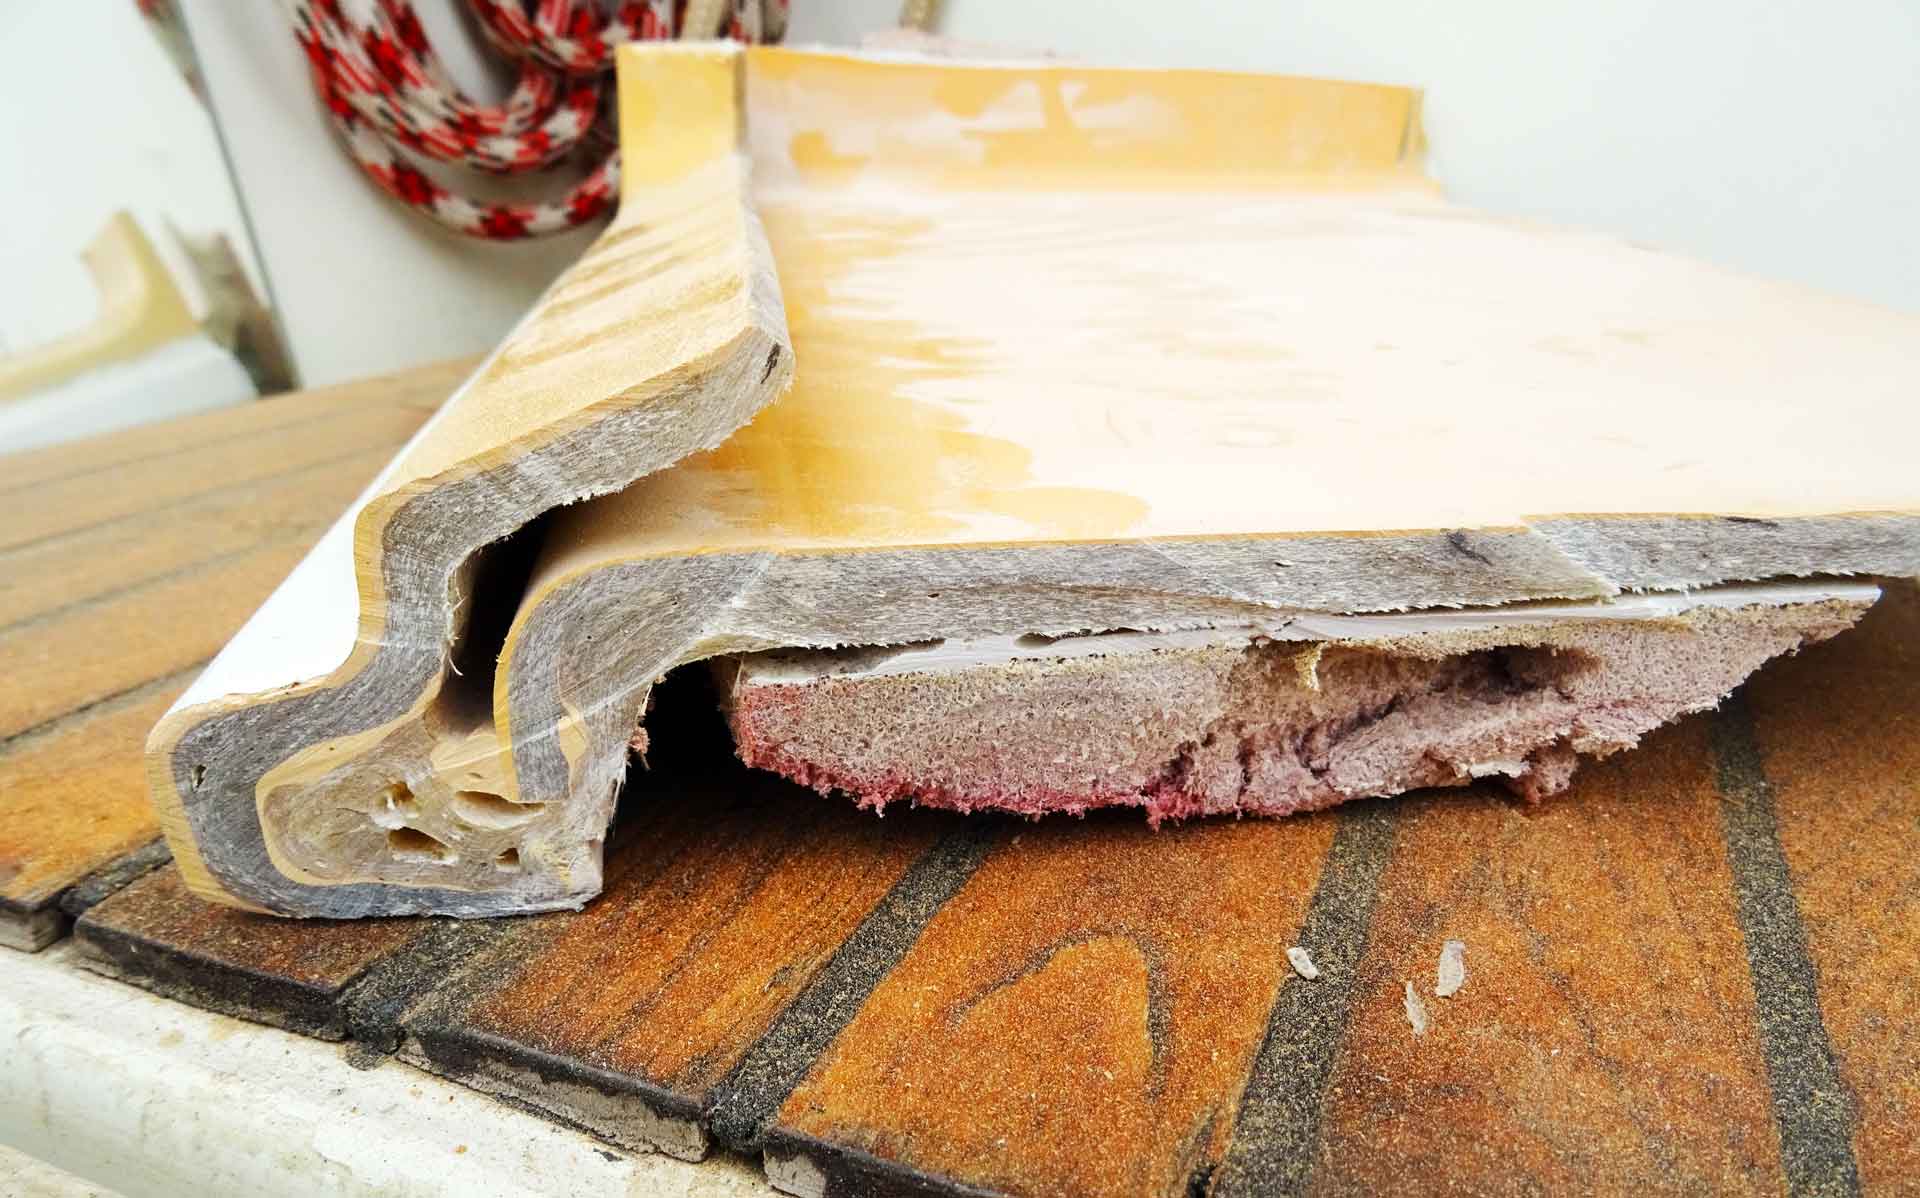
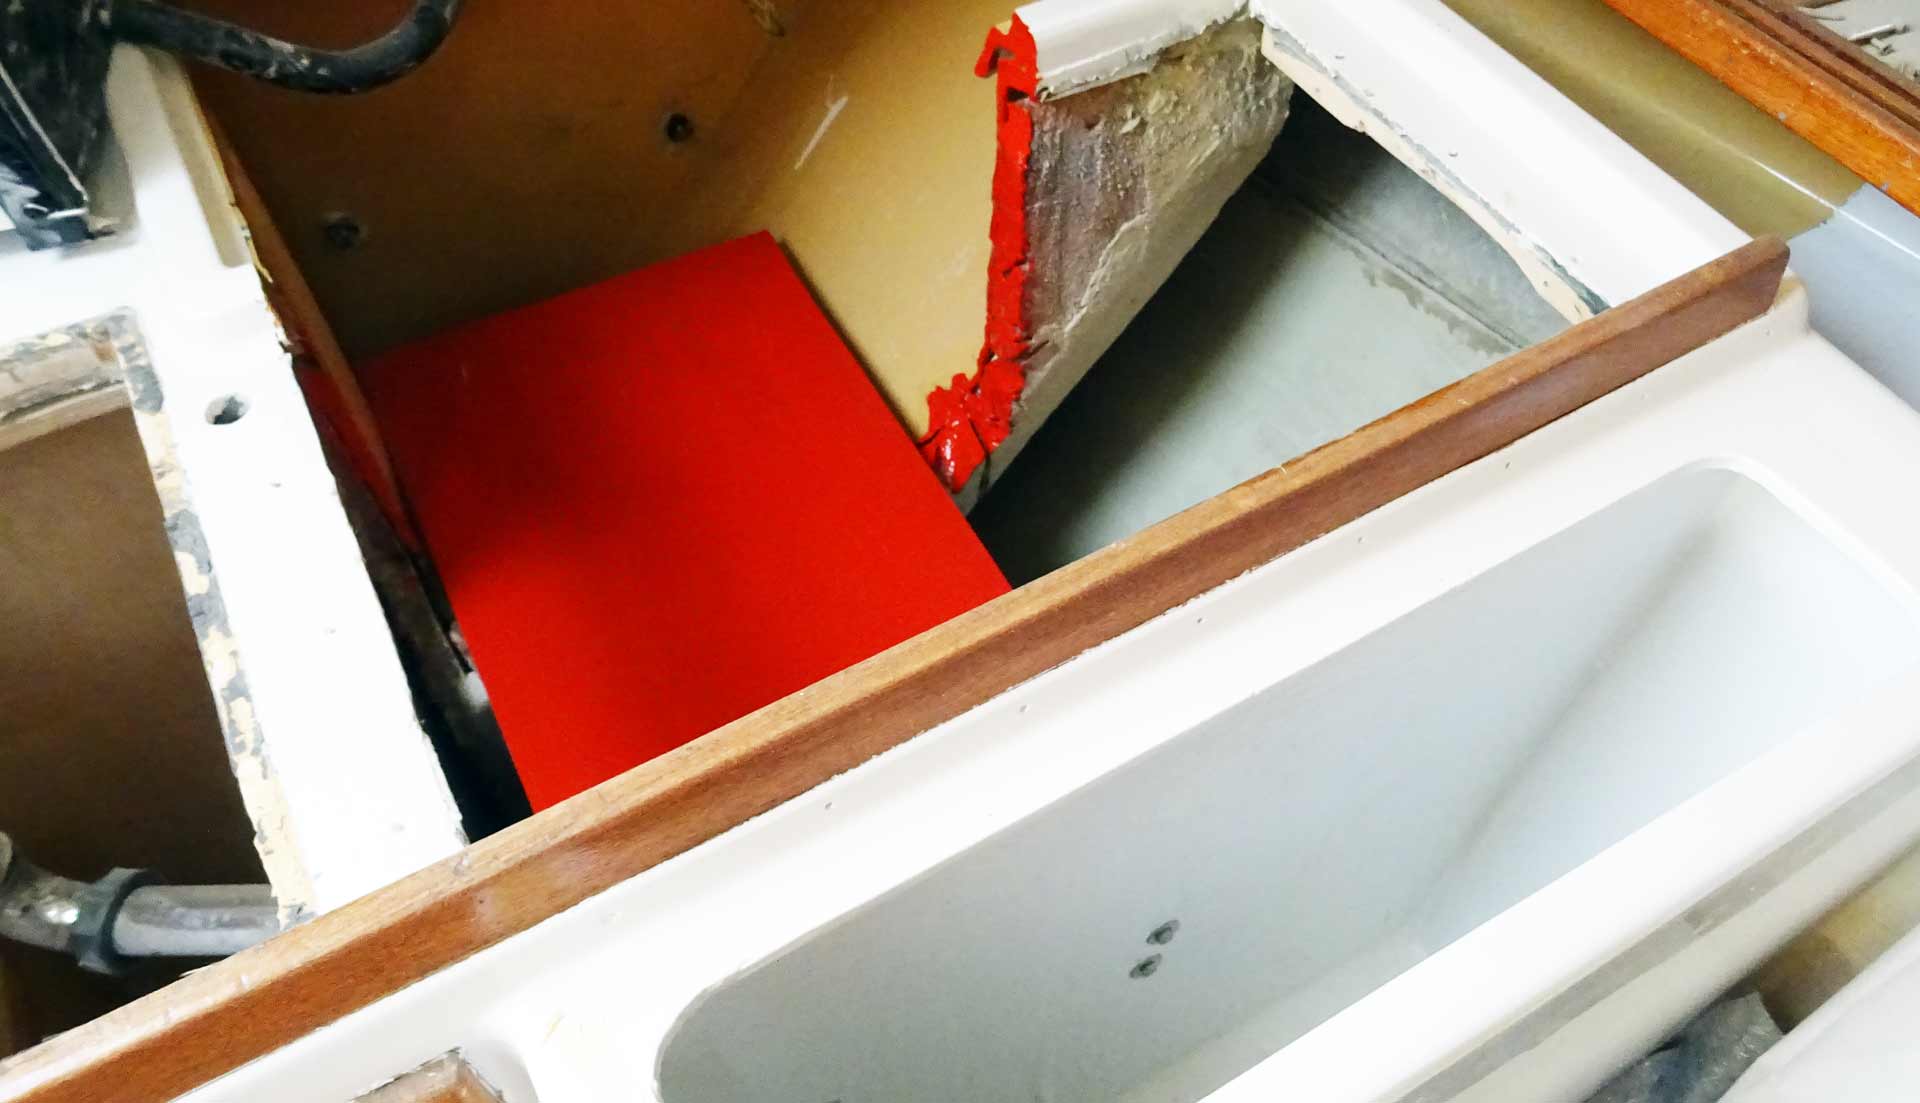
Anyway, it was done and after some 20 minutes as most of the dust had been settled down I went into the ship to see if it was right: There was now a gaping hole where once has been the fridge and a large stowage. Looking at the cut away piece of GRP I again admired the solid construction of this King´s Cruiser 33 sailing yacht – even this inner shell, though having no structural function at all, has been done in a thick layup of GRP and topcoat. Nice.
The perfect Pantry for my Yacht?
Looking down into the gaping whole I must admit my heart was bleeding some drops of blood. Like a disemboweled animal or a wounded whale. But I could clearly see what the next steps would be: First I will have to mount a ground plate onto which the Dometic Coolfreeze would find it´s safe stand. With holes in it to support the electric wiring and at the same time posing no obstacle for the pantry´s sink fresh water pipe.
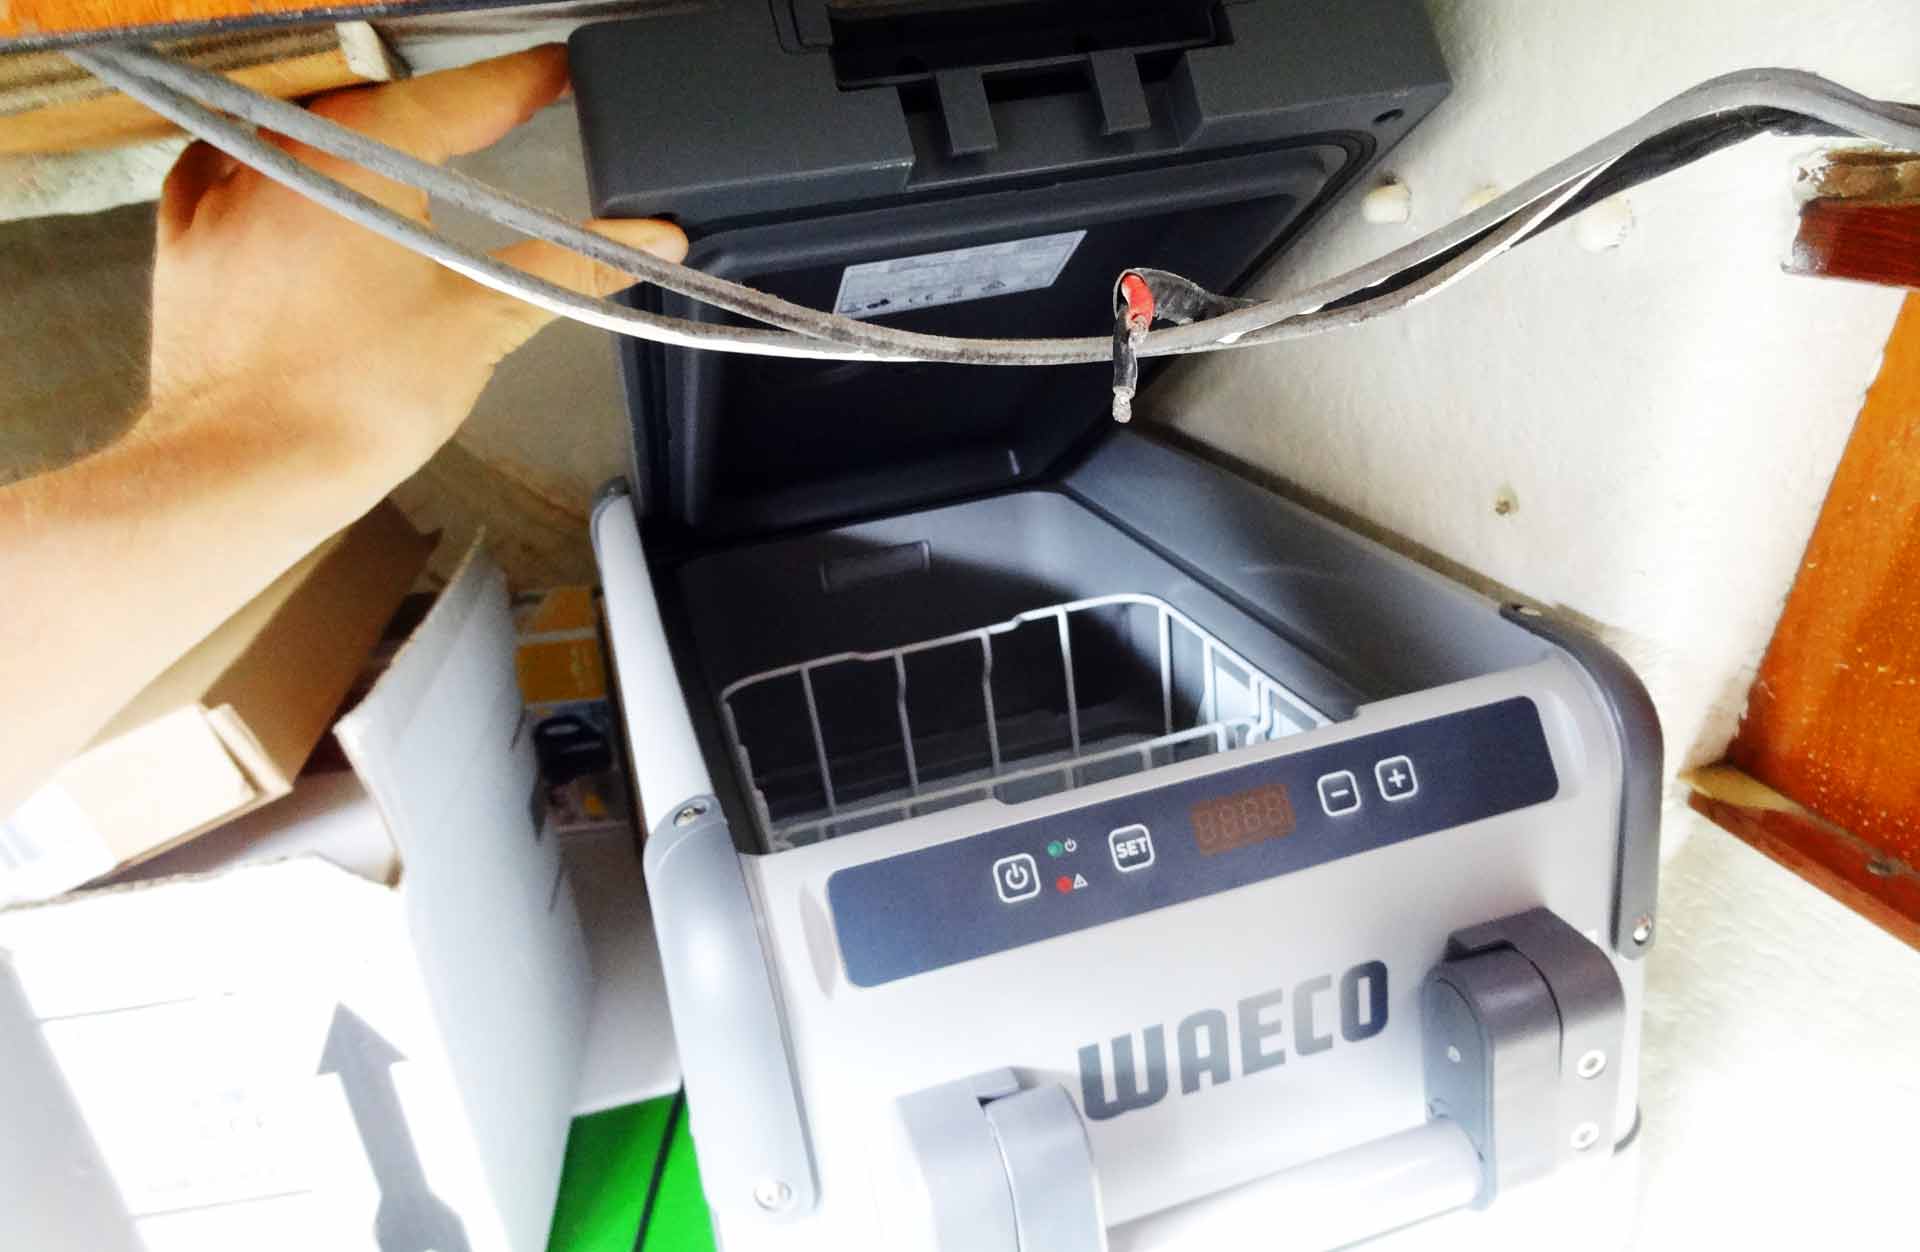
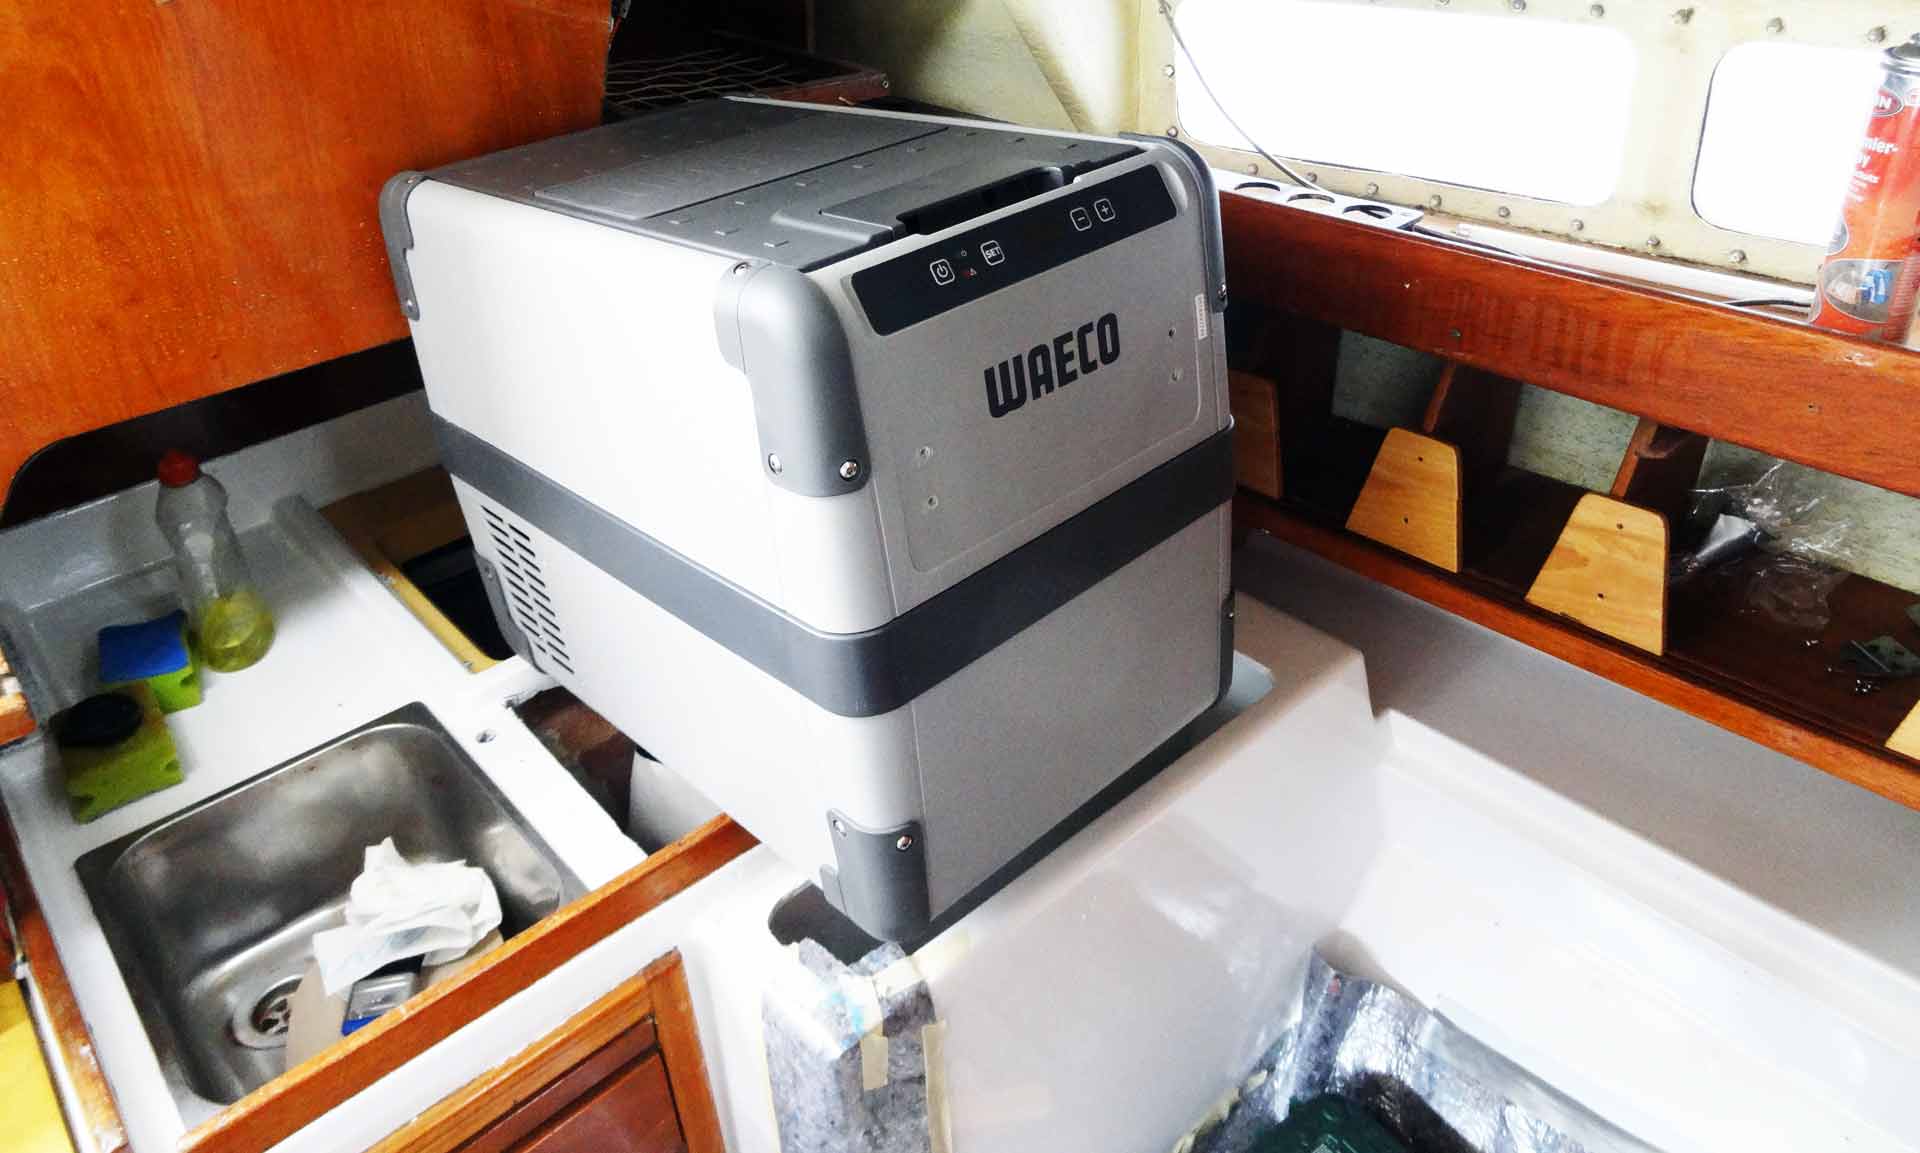
Now it was time to see if the hole did really hold what the pattern had been promising. I knew that at the bottom there was not enough space to have the Coolfreeze mounted evenly with the worktop-level. But that´s okay since the control level of the cooling box is situated right at the front of the Coolfreeze. So having it raised some 10 centimeters would be perfect in this case. I took out the Coolfreeze …
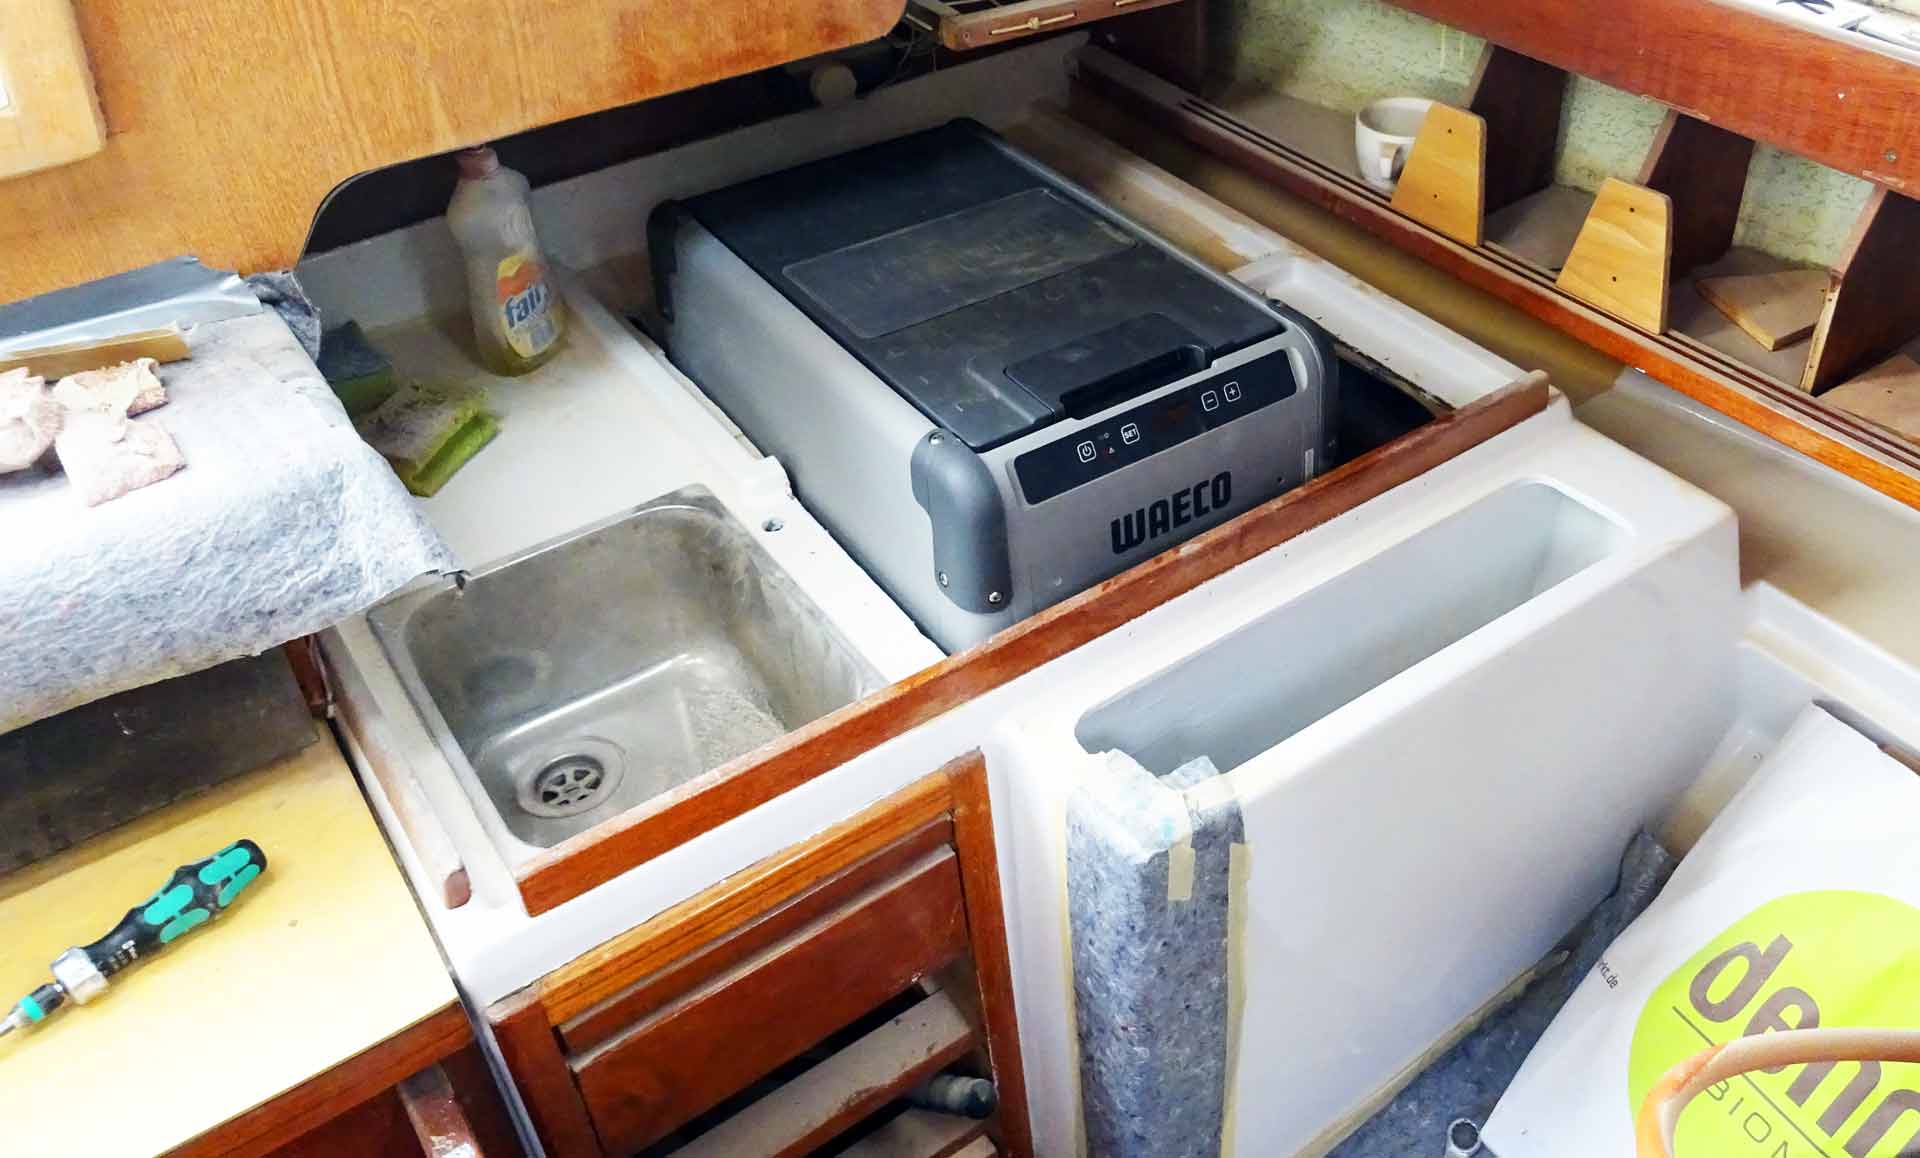
… and it fitted exactly in the whole. Wow, that was close! Unfortunately, opening the top hatch of the Coolfreeze won´t open the fridge too much, that´s not a real gain over the initial plan to have the quarter berth sealed, so next time at the boat I am going to try to sand off maybe one or two centimeters more to have the Coolfreeze mounted a bit deeper. All in all I am very pleased: The fridge is now where it belongs – in the pantry. But there´s still a lot to do! I installed a base plate onto which I will set the Dometic Coolfreeze. Of course, I painted it red, as it is done with all covers of my yacht on the port side.
Thinking about the perfect sailing yacht´s pantry, I do some sketching back home: First of all a safe mount for the Dometic Coolfreeze and electric wiring support. I will also pull the old sink (developing some ugly rusty spots) and have it replaced with a new – rounded – one, same with the tap. In the end, as I´ve had very pleasing experiences with working with massive Teak in constructing parts for the head (read it here) and especially with building the perfect chart table (read it here) I am going to have a custom made new worktop sealing the hole made of Teak as well. So, a lot to do again, but it´s worth it, I know.
Here´s an article on the SY ZIRKON refit project: They also did put a great emphasis on refurbishing their pantry
All refit related articles of my King´s Cruiser 33 can be browsed here
Here´s an article on my shopping session at Dometic: Coolfreeze, Stove and much more brand new stuff for my yacht