Synthetic teak deck flooring is a best-selling product on the sailboat-market: Since it has become morally and also legally difficult to fit a yacht with real teak timber, several synthetic substitutes are available in manifold designs, colors and flavors. But before any new deck flooring can be fitted, it needs an accurate pattern, a gauge model, from which the professionals can derive the new deck. This article shows how such a gauge model is produced.
Before we start, please let me re-iterate my statements from the last articles: Since the building process of the new Omega 42 is speeding up or, let´s say, is in the final spurt, the cadence of new articles tackling the various points is now significantly higher! Expect a minimum of two new work-in-progress articles from yacht electronics to furniture, from boat infrastructure to comforts per week now. So, if you haven´t already – please subscribe to the newsletter!
This way you won´t miss any of those new articles. The newsletter is of course free and I send it at the end of each month. You just go down the list of the articles and click on the content that is of interest for you. Just a suggestion to make you life easier … but now, let´s delve into the deck of my new yacht, I am sure you´ll find this detailed depiction of how a gauge pattern of the deck area that is to be covered with new synthetic flooring most interesting.
Where should the new deck go? And where not?
Advertisement
The decision that my new sailboat should receive a proper deck is an old one. You know that I love hull #001 WINDFAENGER and especially her cool owner, but there are two, three things which I want to do different in hull #002, my yacht. One of which is the deck. I just think that such a classy yacht, such an icon of boat design as the Omega 42 of course needs to have a nice looking deck! It just suits her overall looks. And so, it was clear from almost the first day on for me, that I won´t sail her “naked”.
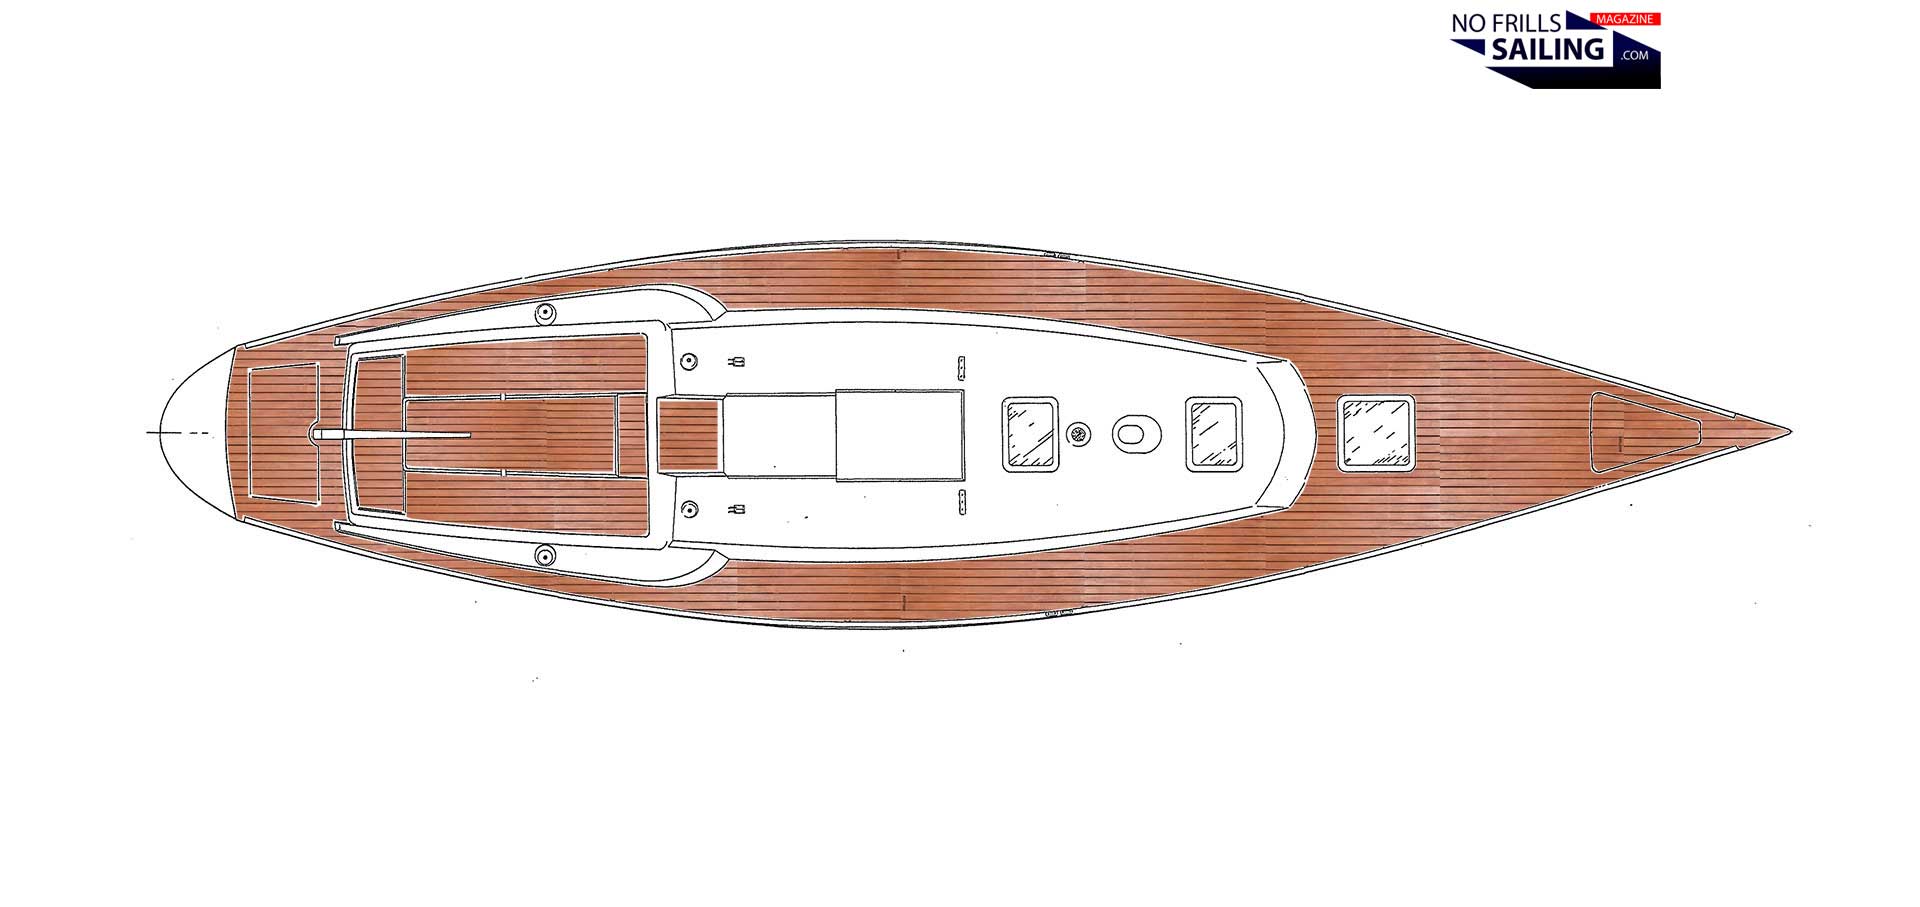
My initial electronic sketch …
Since real, natural teak, delivered by Myanmar, is under embargo (at least here in Europe), there´s only teak from plantations legally “clean” to buy. Fast grown plantation teak does not have the properties as the harder, natural forest teak. Apart from durability issues, of course, real wooden timber is much, much more expensive than synthetic decking. And lastly, from a moral standpoint, living in the 21st Century I guess there is no need anymore to cut down forests for boat´s decks. A nice looking faux material can have a similar (not the same, though) visual effect. That said, it was a no-brainer to opt for synthetic teak material.
Discussing some details before the start
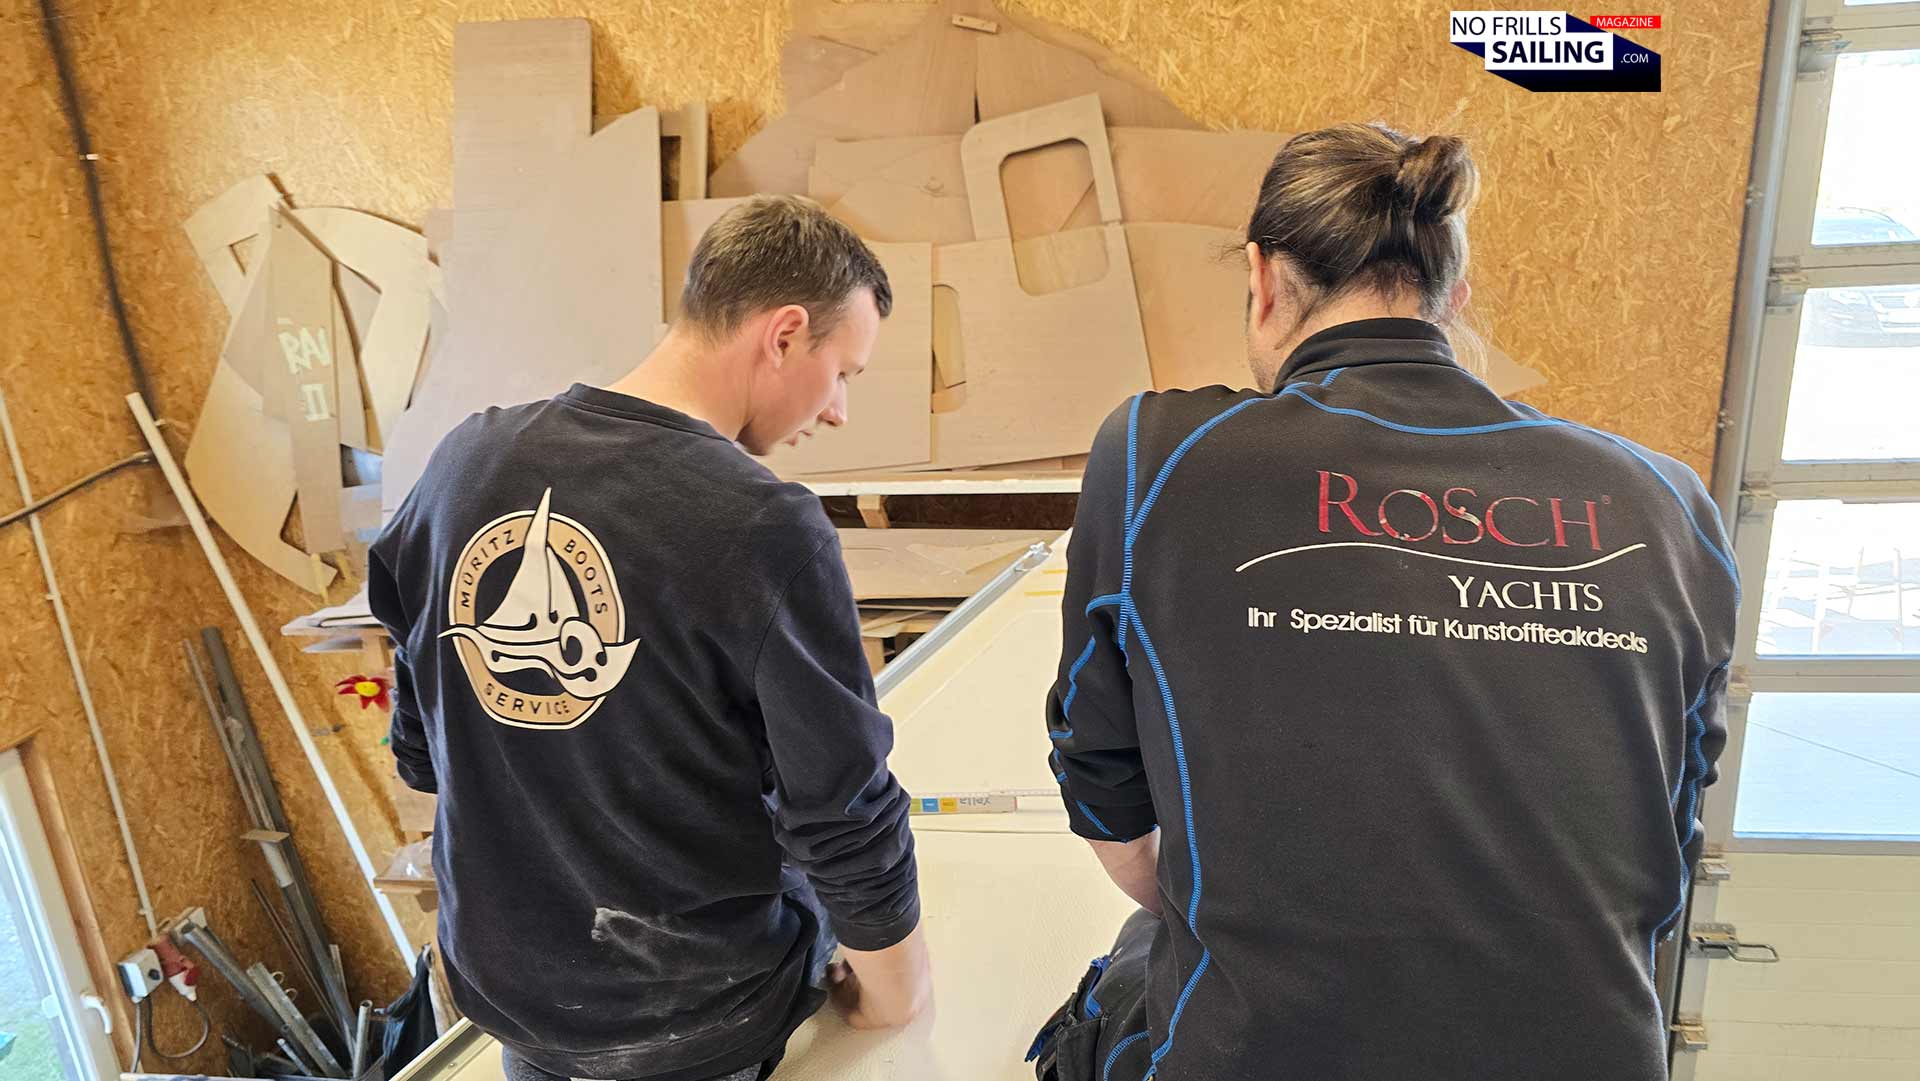
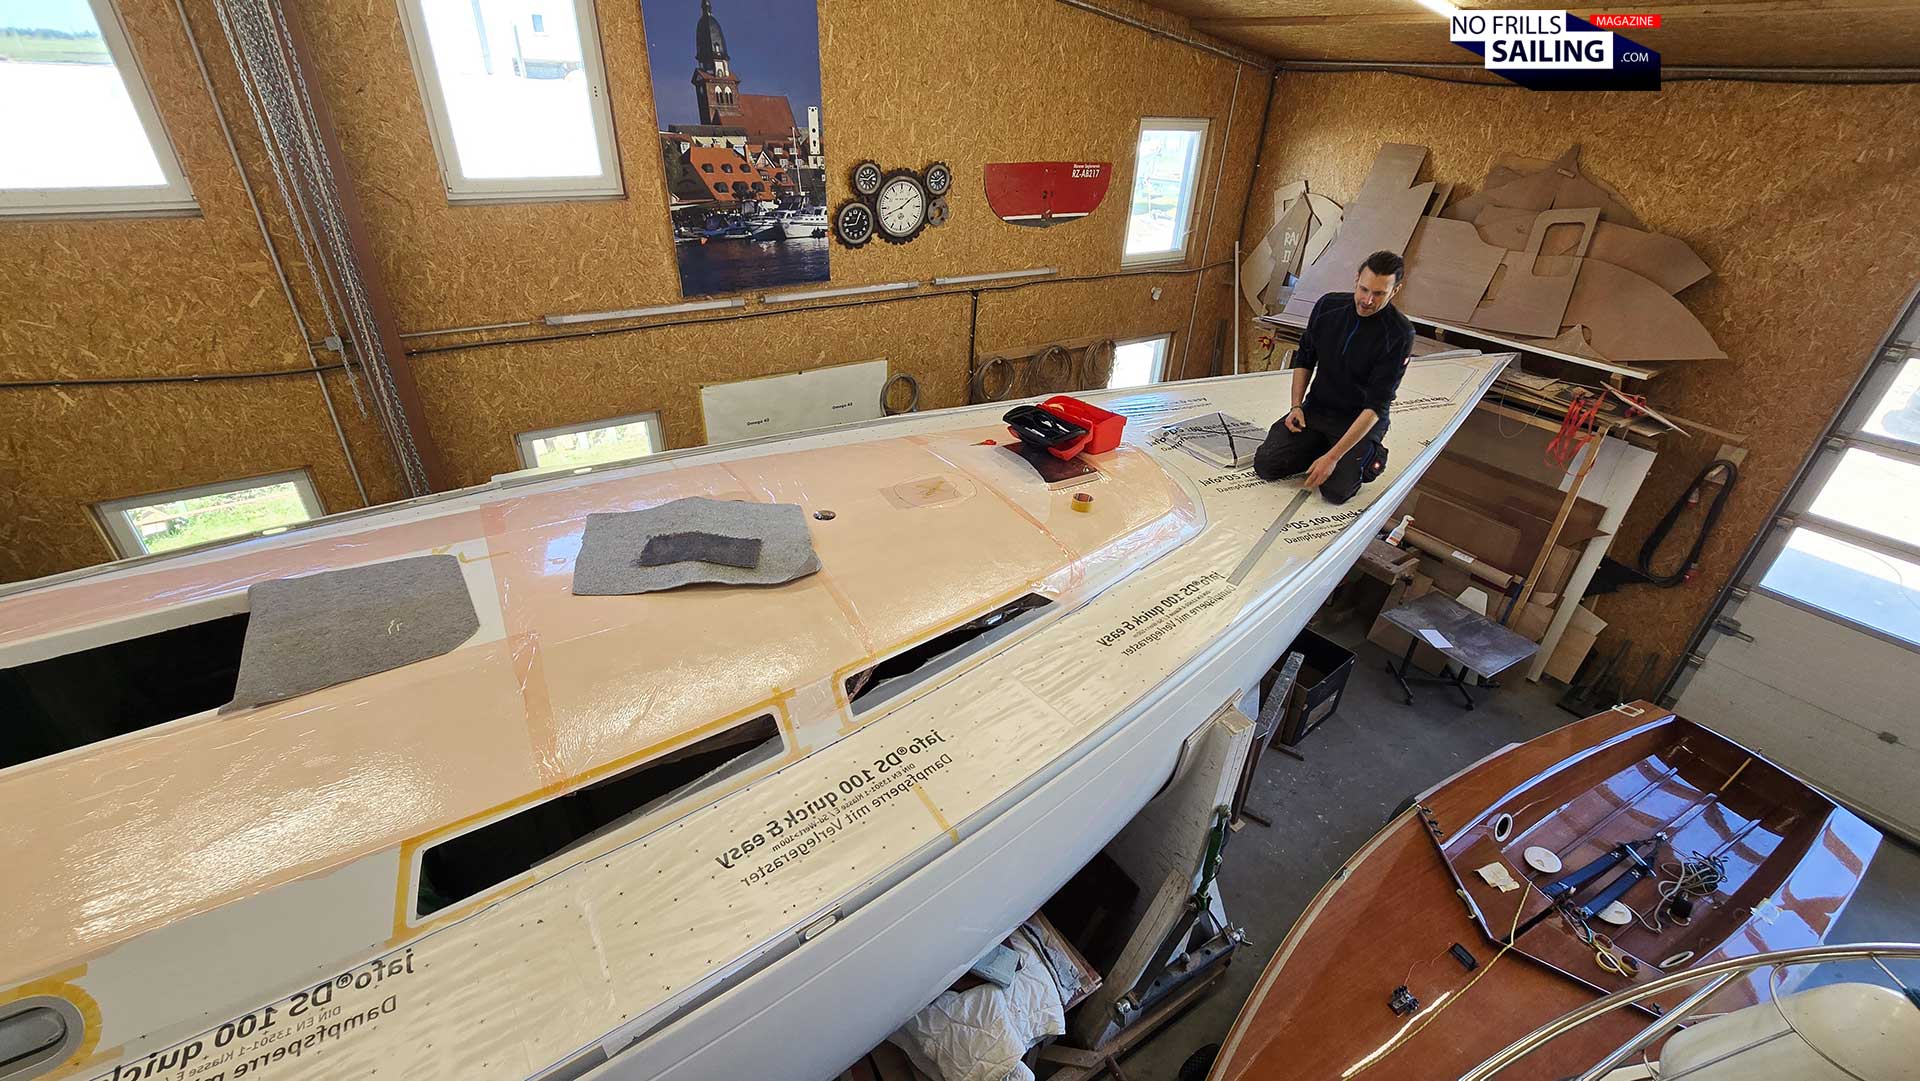
I finally decided to award the contract for my new deck to Rosch Yachts, one of Germany´s bigger companies specialized in not only fitting, but also in producing fake teak decks. I know Ralph, the founder and boss of Rosch Yachts, since I´ve bought my first ever sailboat, more than 10 years ago and even back then I had planned to make the King´s Cruiser´s new flooring with his company. Now, finally, we meet again at last and can start the realization! When Ralph had arrived, Jonas, the master boatbuilder of the Omega 42 project, did crawl from bow to stern with him, discussing the modus operandi and pointing to several details: How to deal with the boat´s front-tip at the bow? How much of a distance will there be between toe rail and deck? If any … Or: How will the mooring cleats and the rear end of the boat be handled? After this very important briefing, the question marks for both had been cleared up, let´s start working!
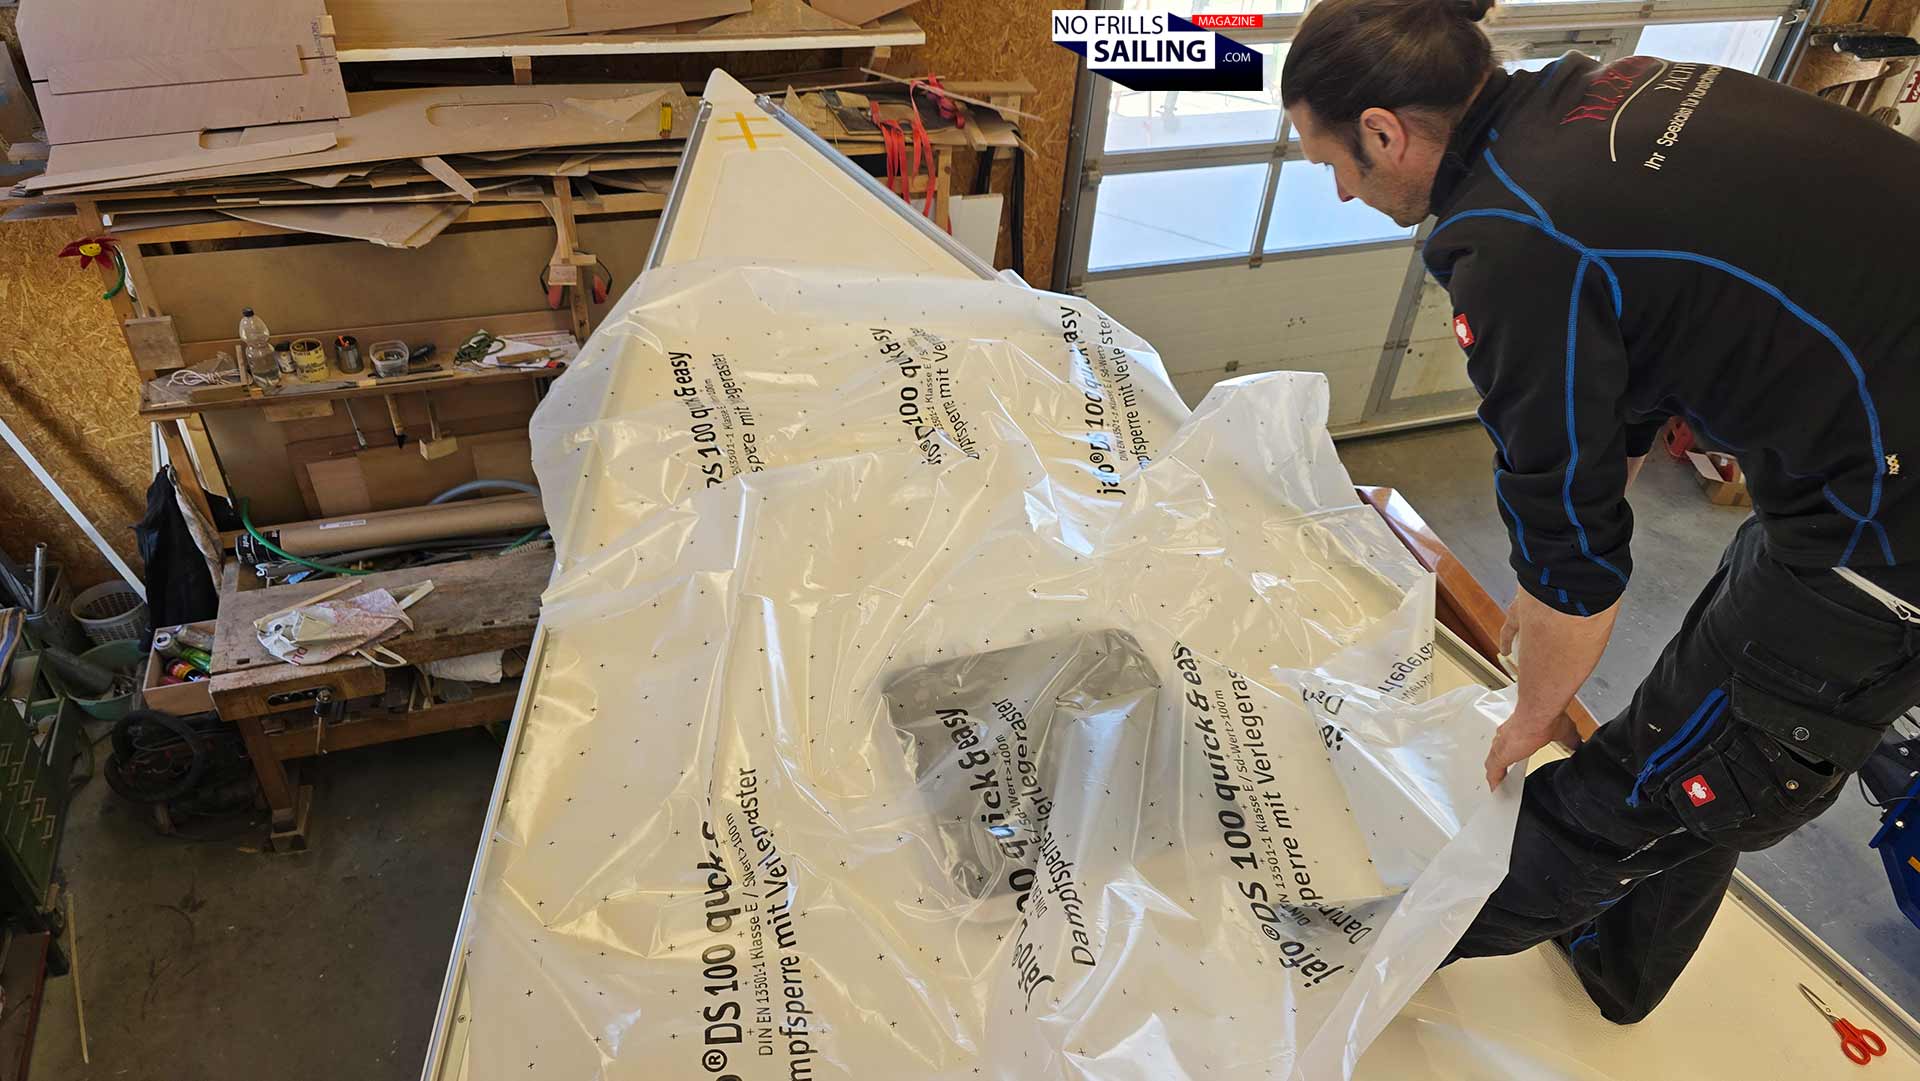
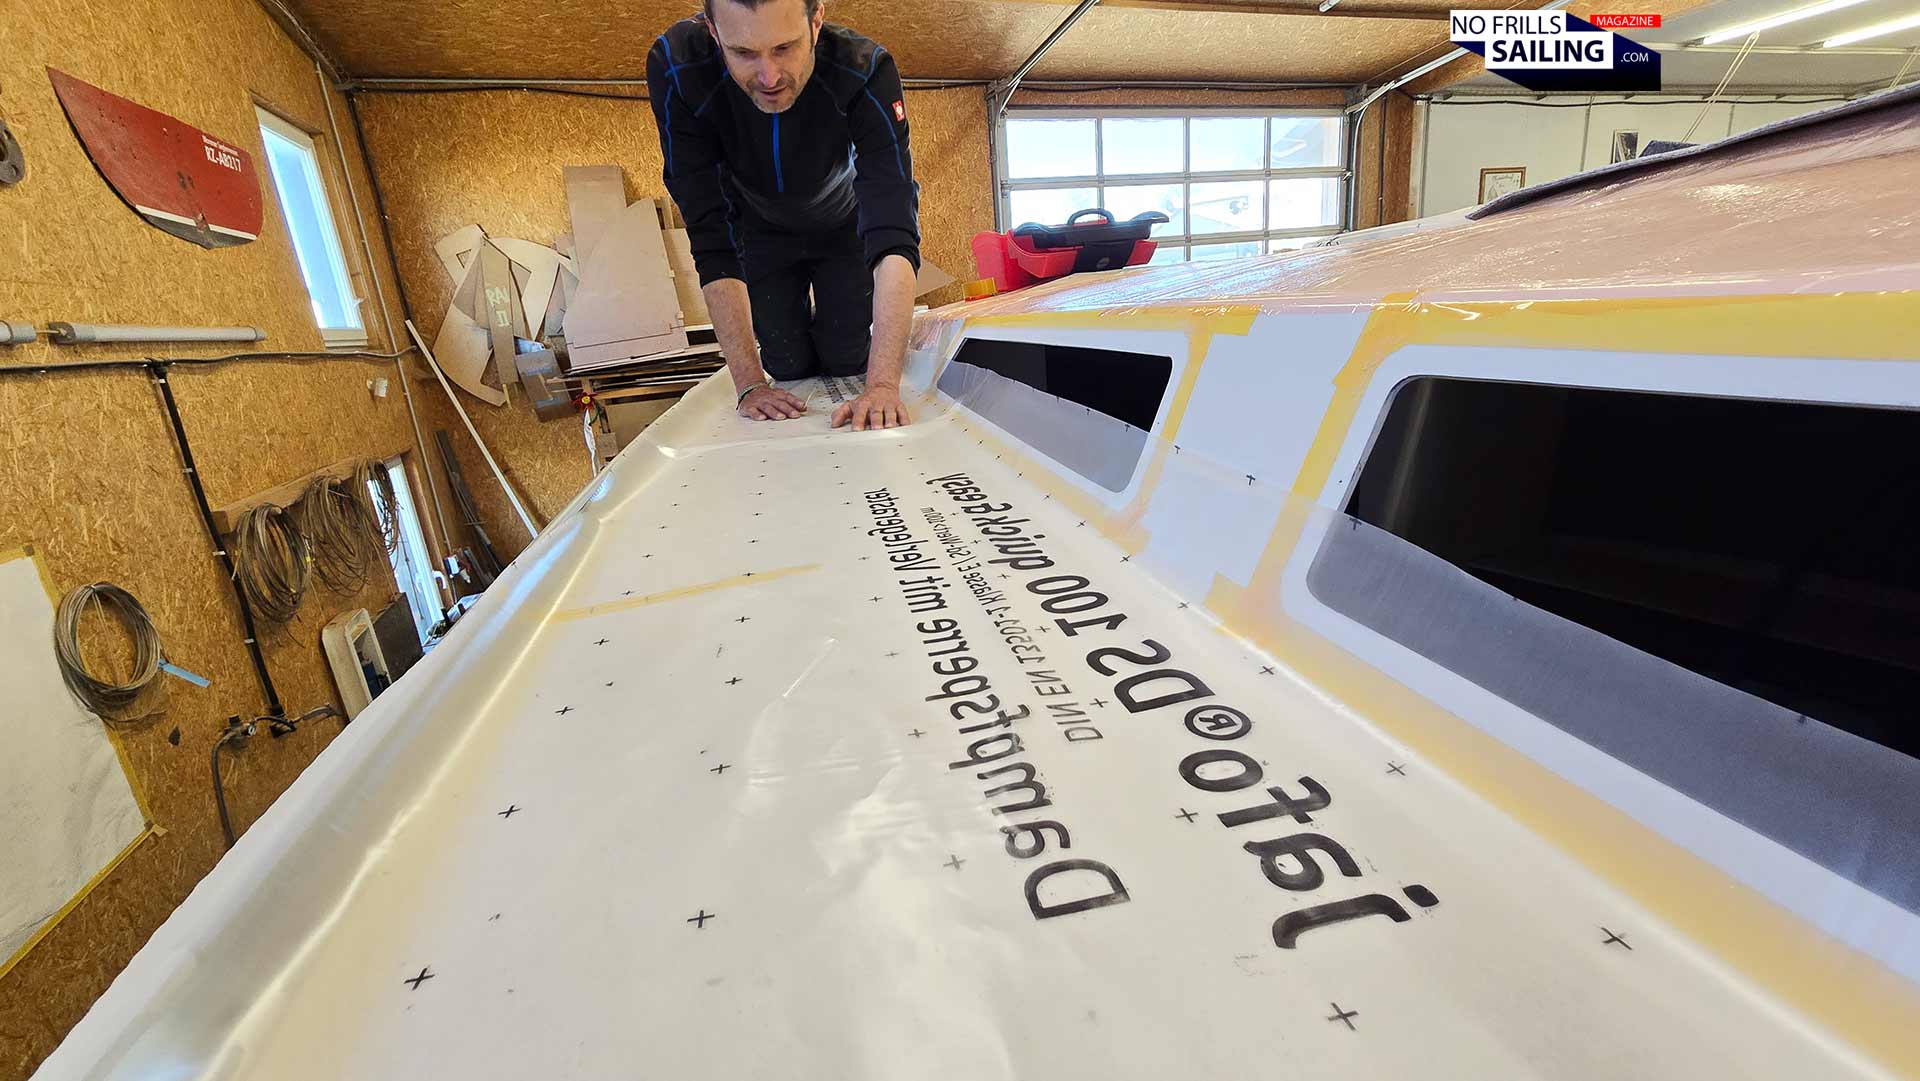
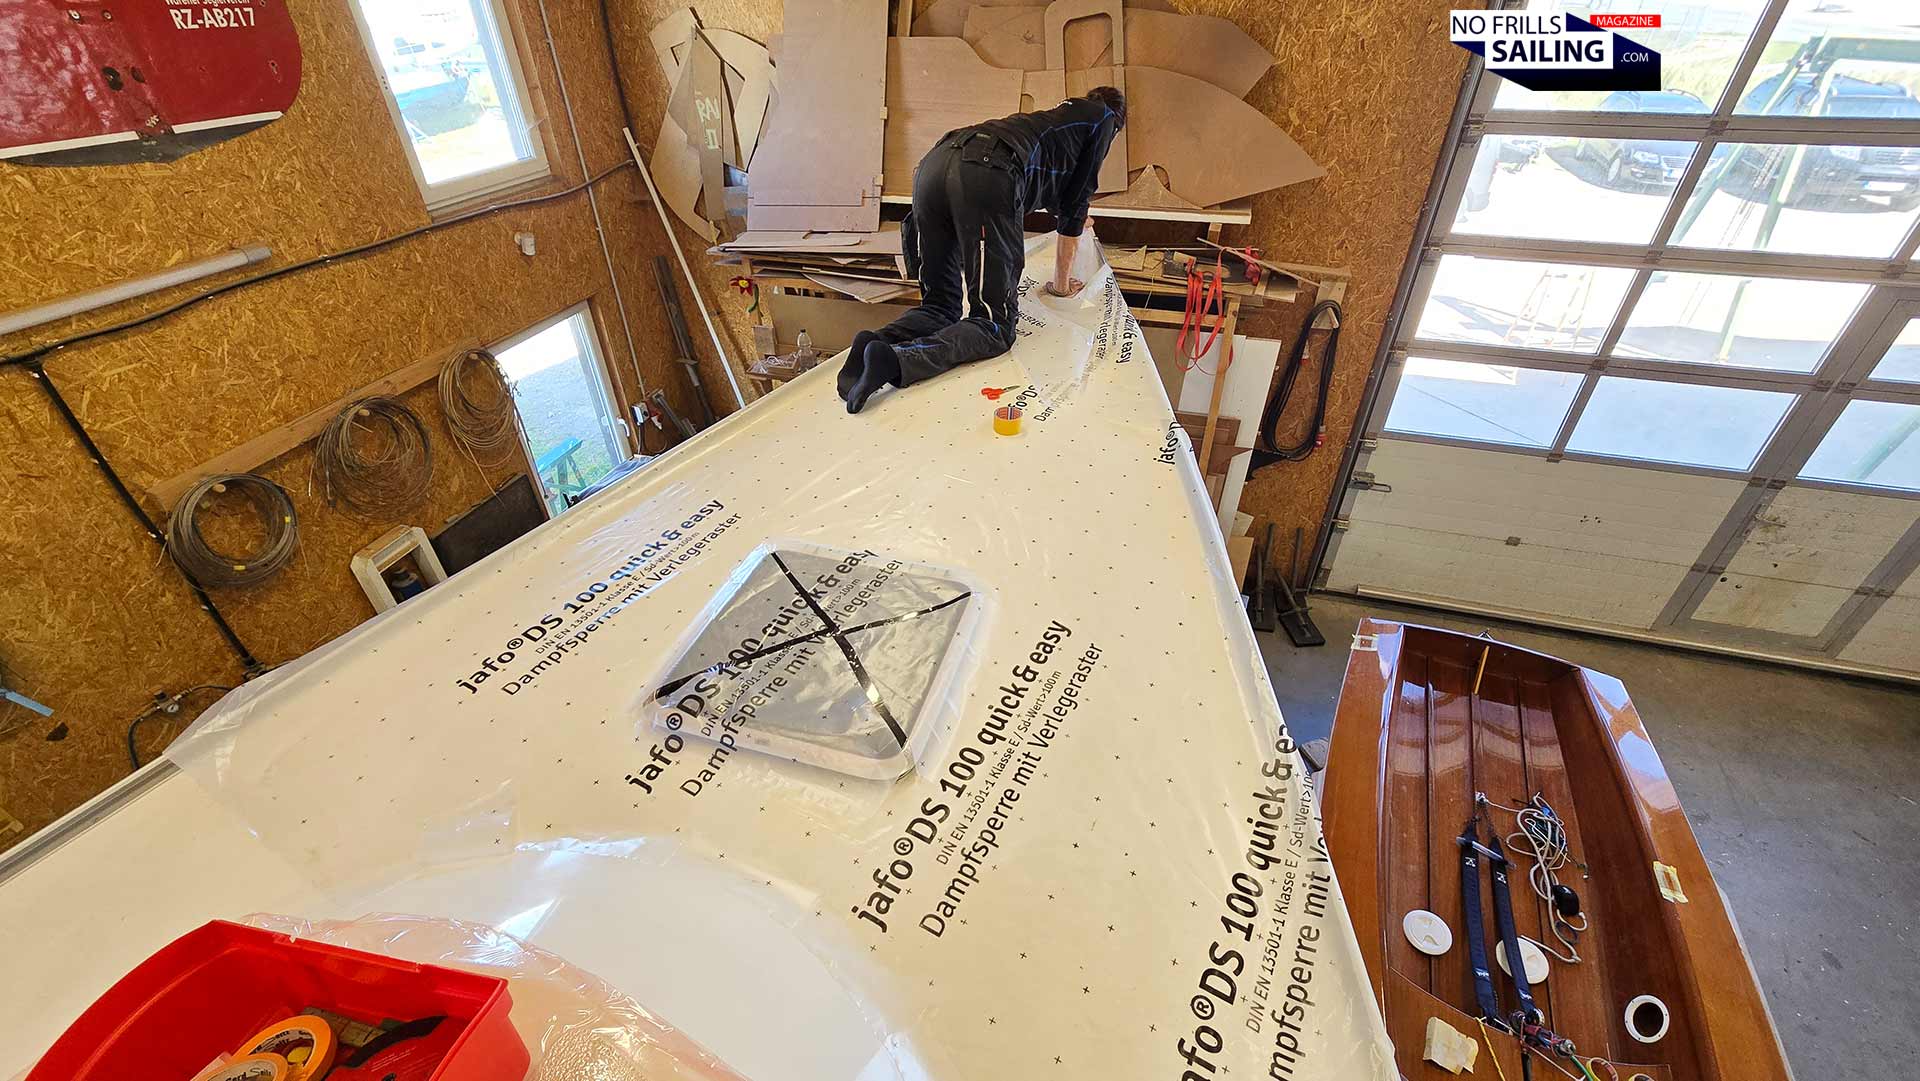
Working with vapor-barrier plastic sheets
Ralph went to his car and came back with a large roll of plastic sheet. In fact, it was a product originally intended for utilization in house construction: Thick plastic vapor-barrier wrap is it is used for insulating newbuild houses. It is a string material, tear-resistant and transparent. Also, it´s reasonably priced, so, why not? Ralph explains that there is another reason for him to use this material.
Unfolding the plastic wrap: Vapor barrier!
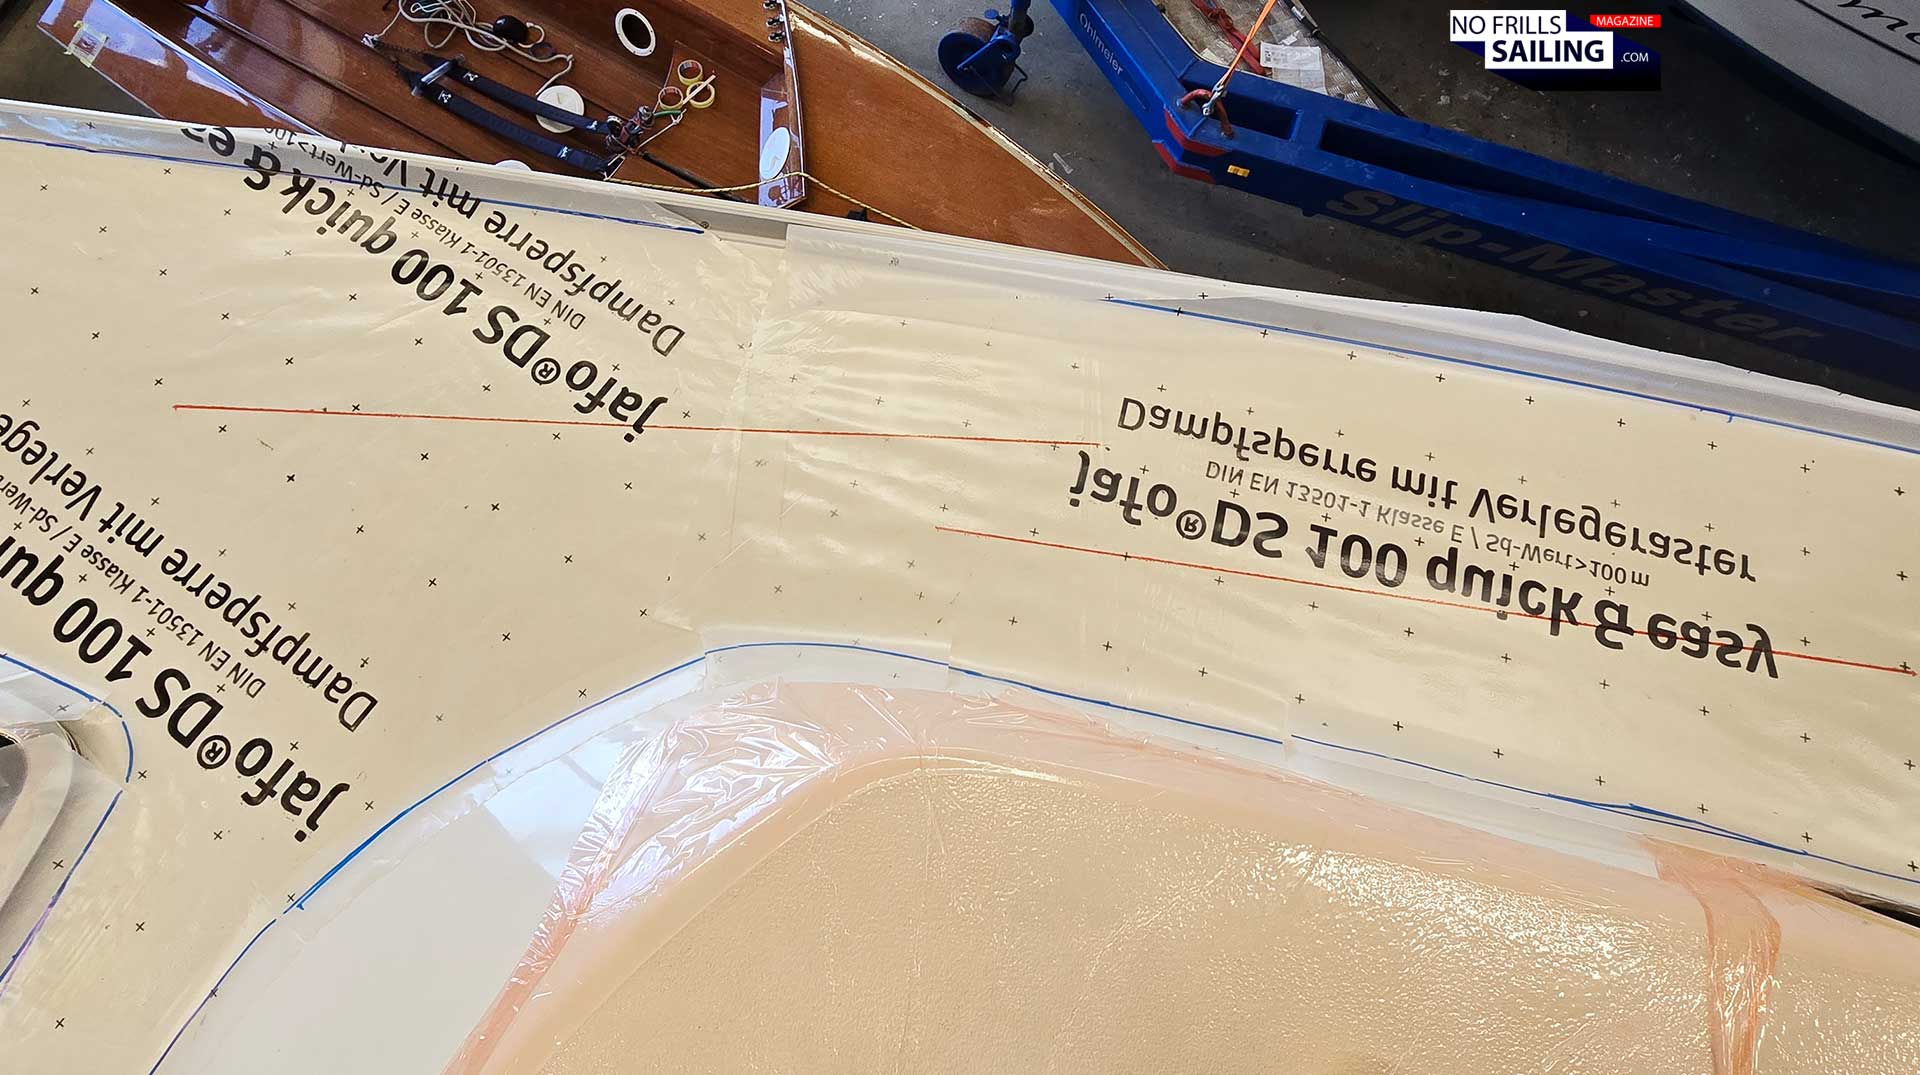
Vapor-barrier wrap must be extremely temperature-resistant. When mounted inside a house´s wall, it must not deform when subjected to temperature variations, moisture or other external influences. It won´t shrink, to be straight: Perfect for the our purposes! Sometimes, Ralph says, the take on those gauge measurements outside, maybe at 5 degrees Celsius in early spring. At home in his workshop it´s 22 degrees Celsius. Naturally, any ordinary plastic wrap will expand. But even if this is just by one single percent (in all directions!), it can and will severely impact (destroy) the accuracy of the pattern. See, my boat is about 13 meters long. A change of just one percent amounts to a staggering plus of 13 centimeters! None of the deck panels will fit. That is why thermo-resistance and non-shrinking capabilities are so vital here.
The different techniques of making a 1:1 gauge pattern
If you wonder how those deck professionals achieve a thorough, life-sized copy of the deck´s surface, welcome to the club! I´ve made several gauges myself during the attempted refit of my King´s Cruiser 33 and I know how damn difficult it is to be precise! So I was especially keen on seeing how Ralph will do it. As I could see, he is on the faction of the “handcraft”-guys who are literally making a deck copy by hand. There´s the “digital”-faction as well, most of those utilizing expensive gear like the Prodim “Proliner”.
Cuts to make it fit neatly
I´ve witnessed how this digital templating works some months ago when the floorboards of the Omega 42 had been made, if you are interested in this method, just click the link. Well, Ralph says that apart from the huge investment for the hard- and software needed, you somehow in the end need a 1:1 plot anyway. For him, having acquired his level of craftsmanship by manual labor anyway, there´s no point in switching to digitalization. He says, using plastic wrap, an Edding marker and his sharp eyes is not only cheaper, but also much faster, requires less reworking and will make at least a similar accurate end product. His success on the market is proof: I know a ton of owners who trusted their boats to Rosch Yachts.
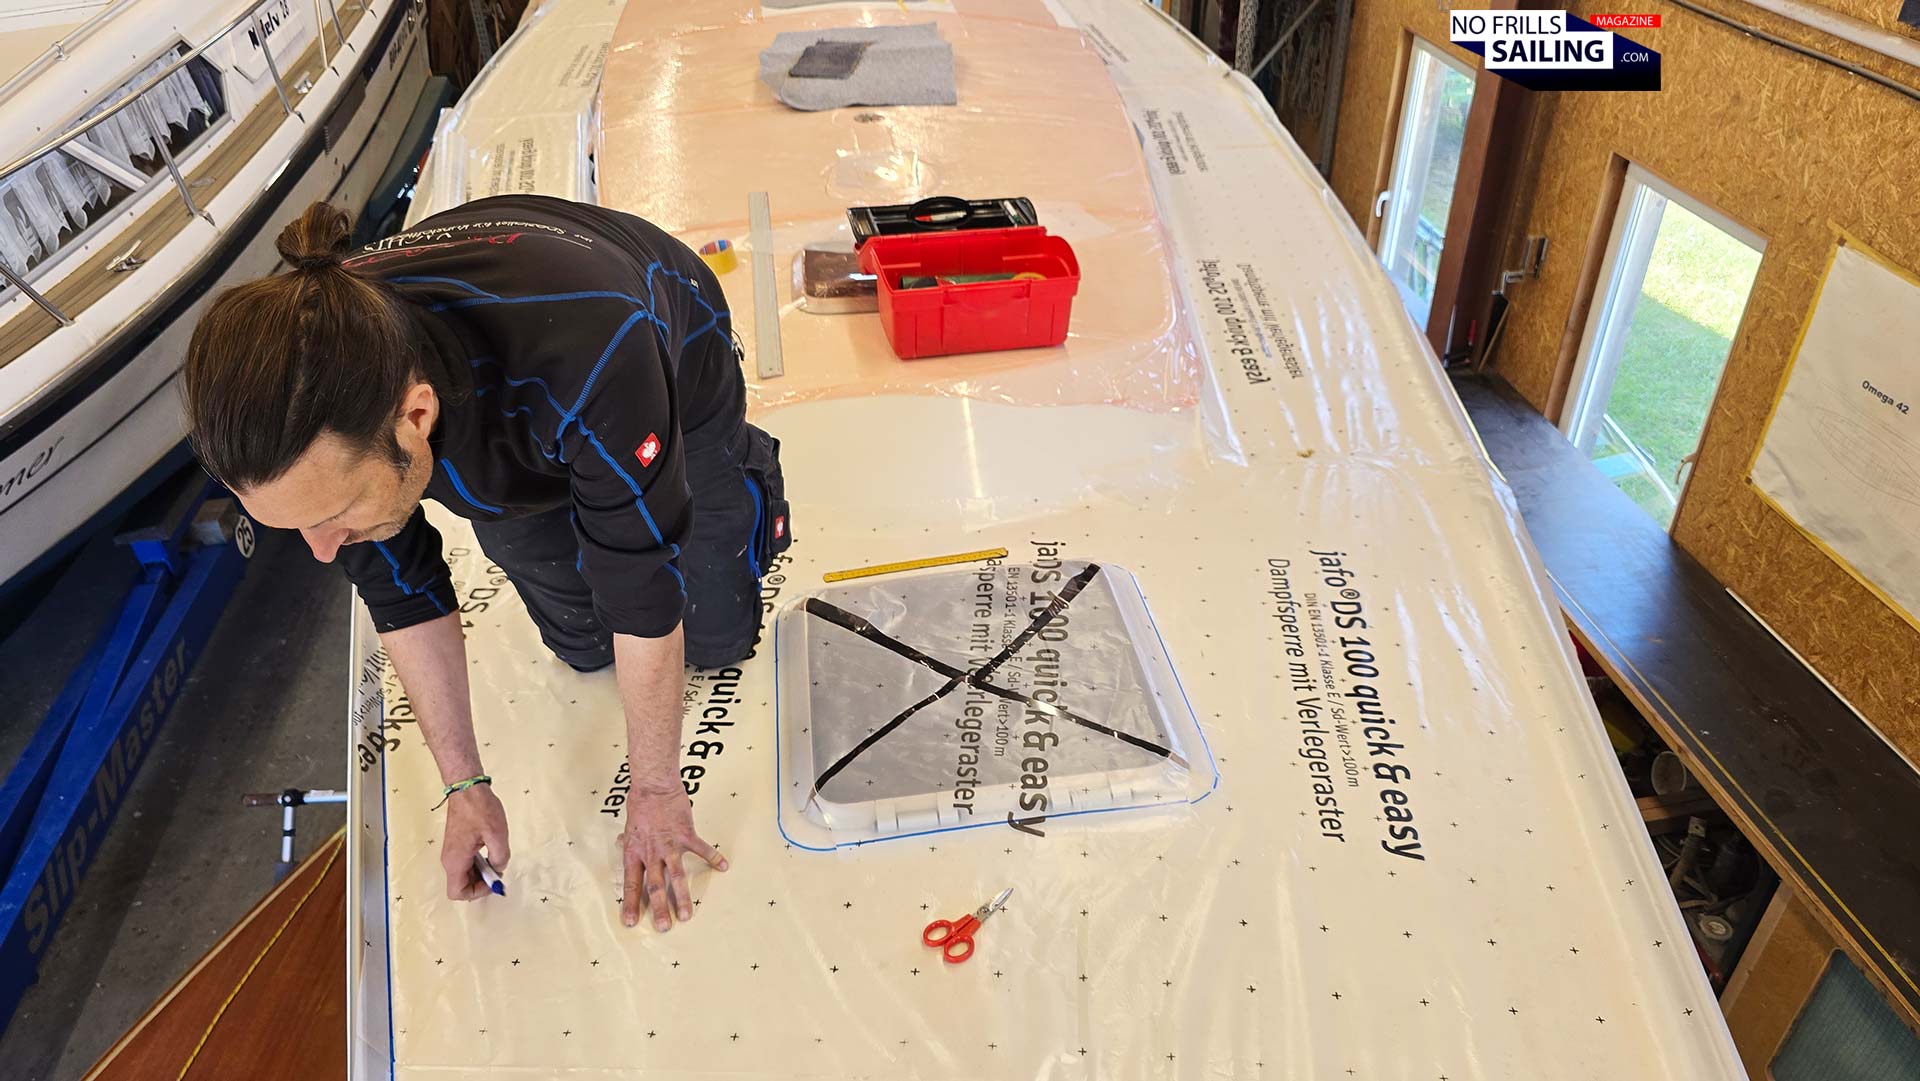
Making sure the plastic sheeting is 100 percent even
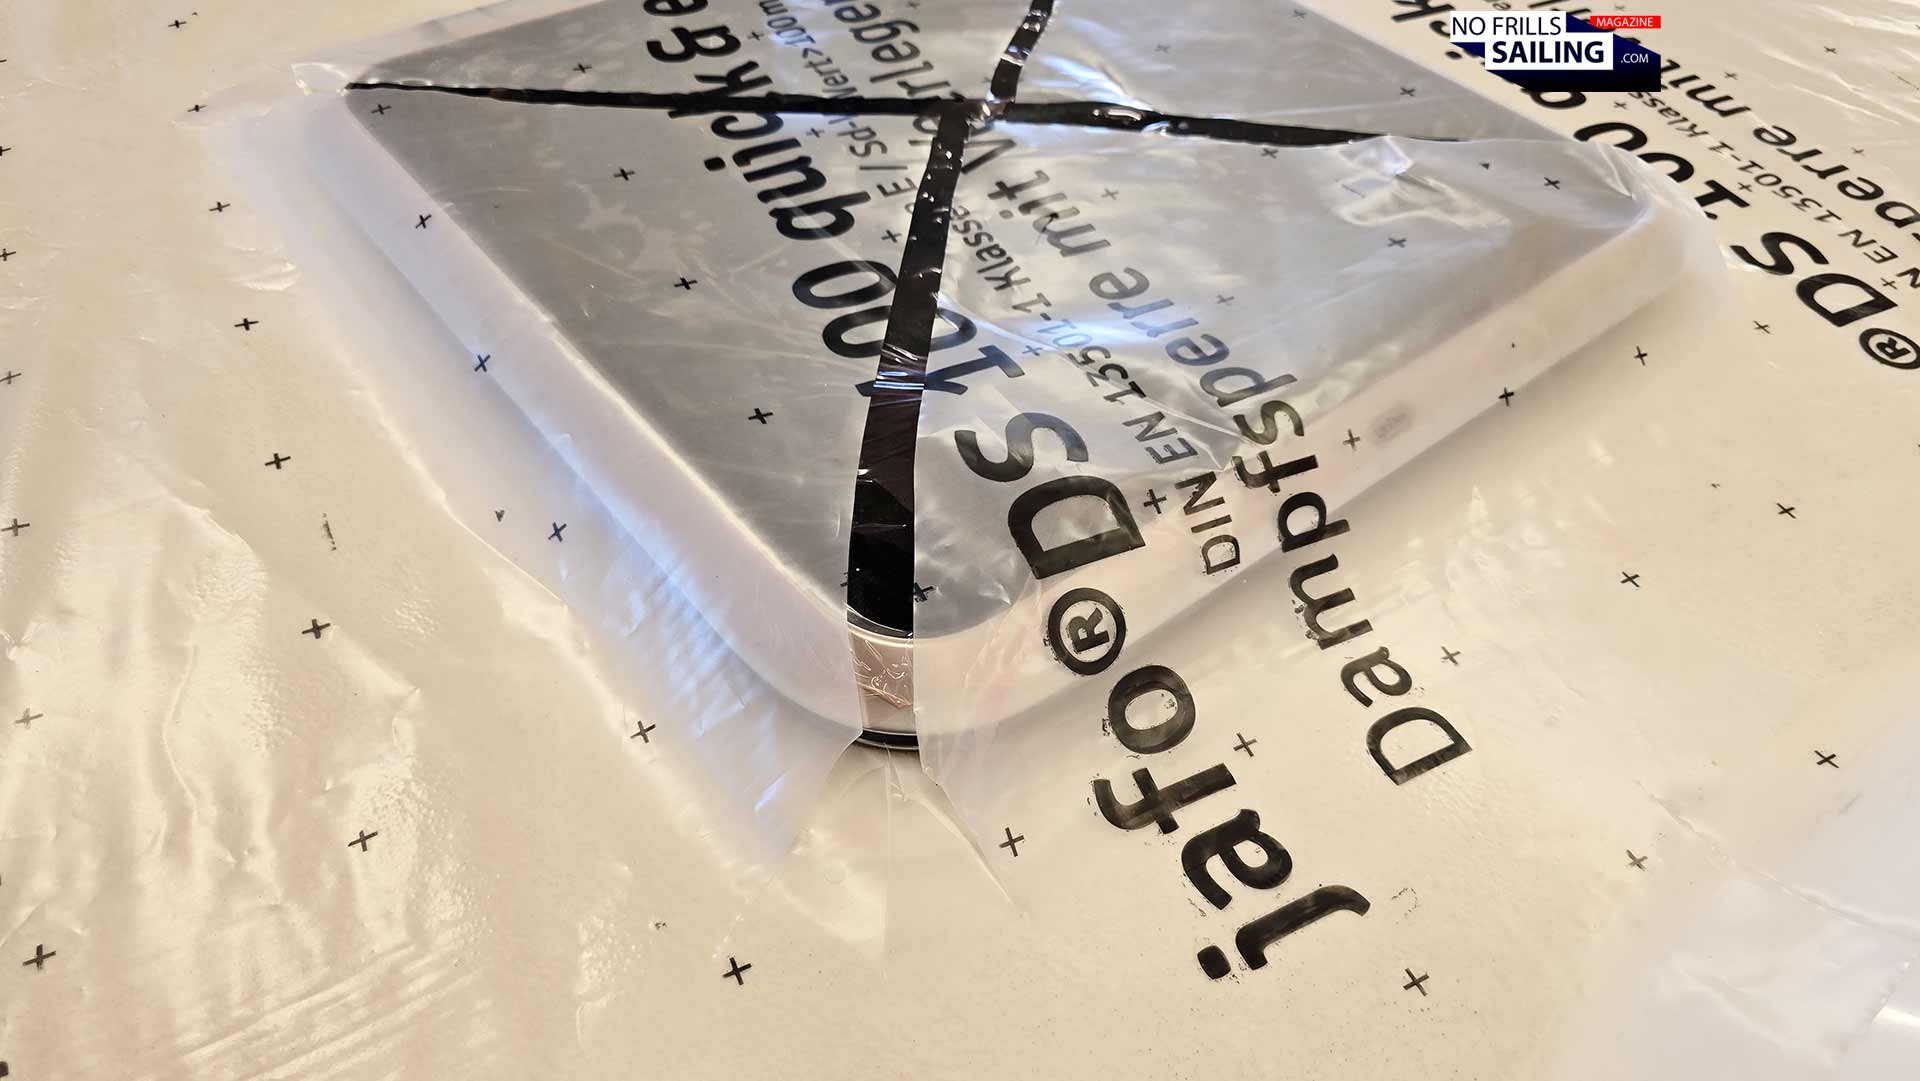
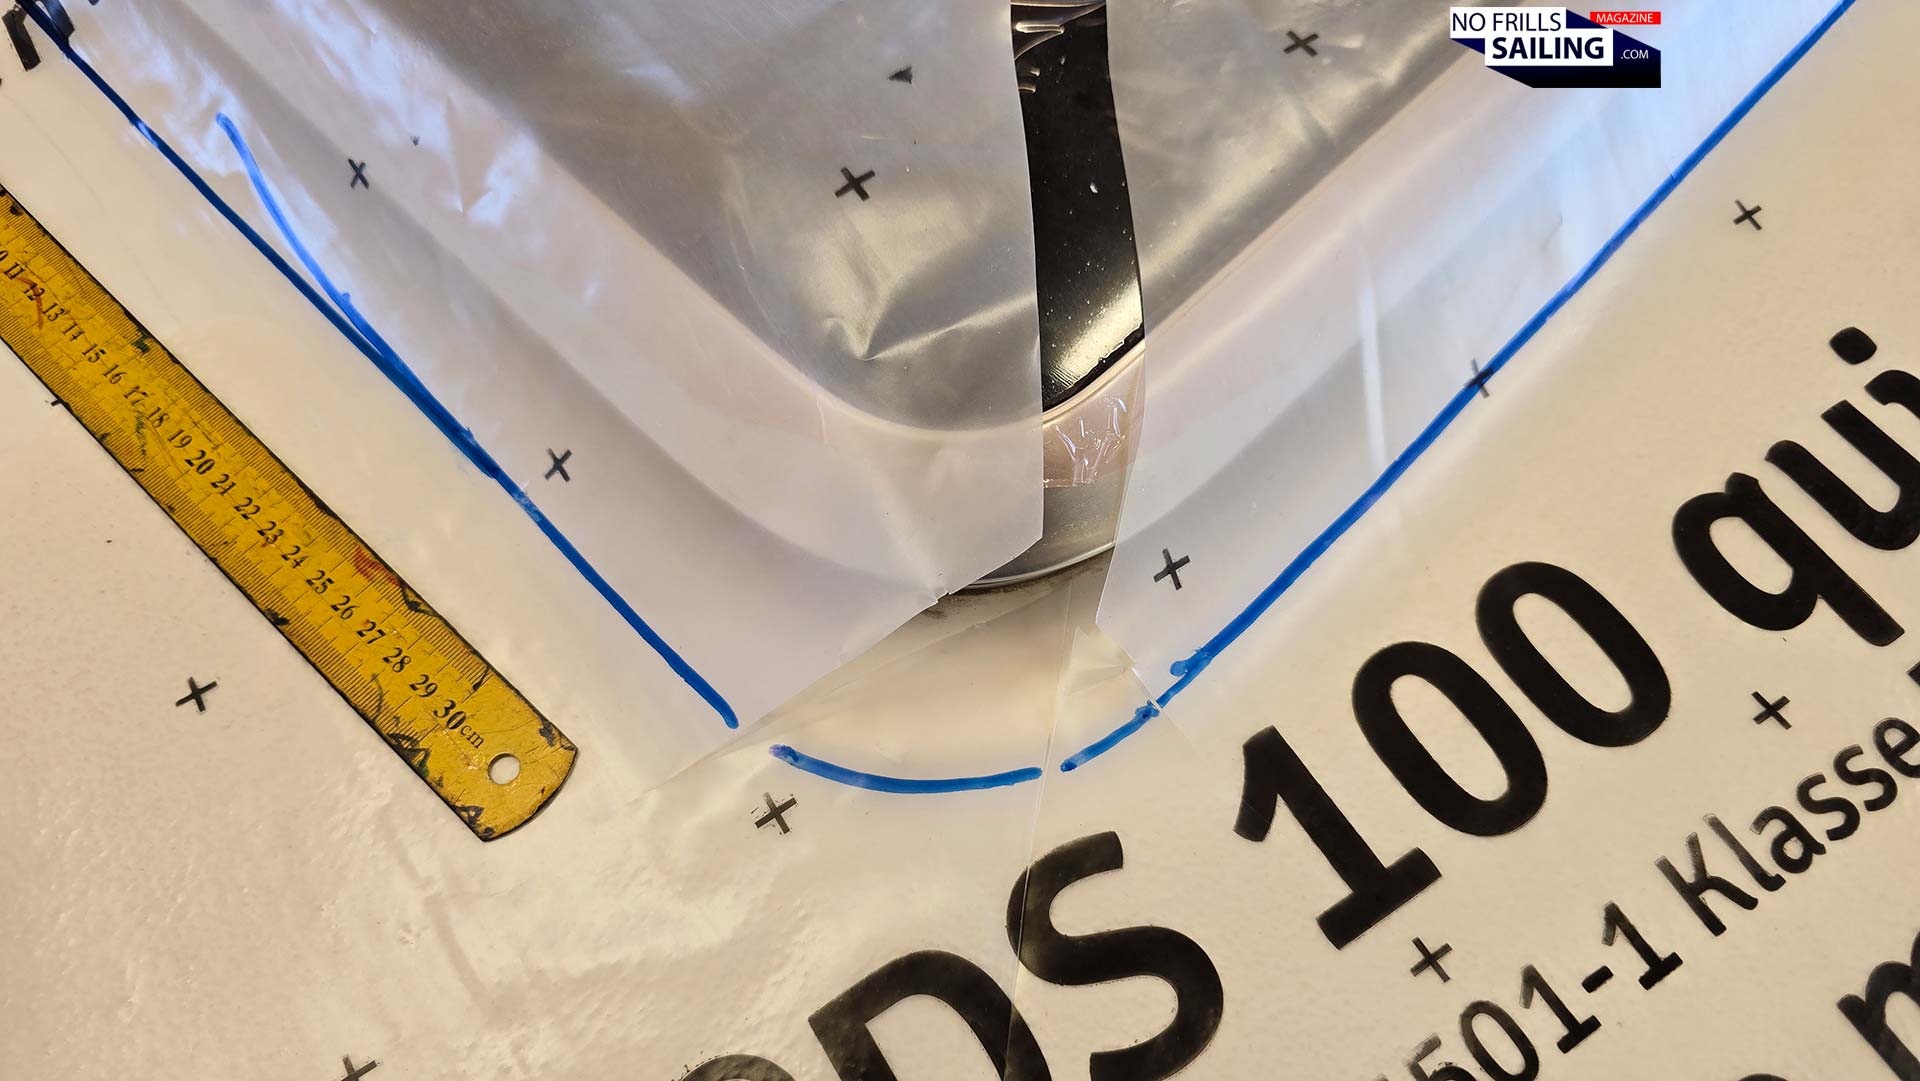
But how is a 100 percent accurate gauge pattern made? Ralph works this way: Roughly counting the width and length of a section he wants to cover – for example the bow area, the sidewalk decks or the seating benches in the cockpit – he simply counts the “+”-markings printed on the sheet and cuts a rough piece of it to size. This piece of plastic wrap is then put onto the area he wants to make a copy from. Just roughly. Now, let´s look where the bulges are: Typically these are the windows, hatches, ventilation openings or stanchions.
Double-faced tape for fixation
I´ve documented in the picture above how he deals with the large bulge of a deck hatch: Just cutting open the wrap with a large “X”, diagonally over the whole window area. Placing two more smaller cuts at every corner of the hatch will do the trick: Now, he can easily press down the plastic wrap and have a perfectly even surface. The “X” and the cuts won´t do anything to the later model, you will shortly see, why. To fix the wrap, he places double-sided adhesive tape underneath the wrap now and then.
All along the side walkways
This adhesive tape keeps the wrap in place, which is important because there´s a lot of walking up and down happening all the time. With every step, there´s the risk of applying minor changes in the position of the wrap, which could alter the imprinted copy of the deck area. And that´s not even the worst: You can imagine how slippery a pure gelcoat surface of a deck is – when walked upon with socks, it’s a horror-recipe for a hard slide and neck-breaking experience. So it better be fixed in place!
Offcut wrap is used in corner areas
Ralph utilizes the offcut wrap for smaller areas. For example, instead of throwing away a small chunk of the plastic wrap he had to cut off when sizing another part, he used it for the slim, pointy nose-section of the boat. This minimizes the trash production, which is not only good for mother nature but also for his company´s balance. Less paid for but unused material is more profit. That´s a good thing to watch! In fact, the amount of unused offcut we had to throw in the trash bin afterwards was extremely small, surprisingly small. Just a handful letter-sized parts. Nice!
Marking the outlines of the synthetic deck
It takes Ralp roughly an hour to set up the plastic wrap from bow to stern of the Omega 42. As I had already documented in an earlier article – which also can be seen on my amateurish sketch at the beginning of this article – I only want deck flooring on the bow, the side decks and inside of the cockpit. I refrain from covering the coachroof as well. Partially because too much doesn´t look right, in my view, partially I want to keep a door open for possible fitting of solar panels here.
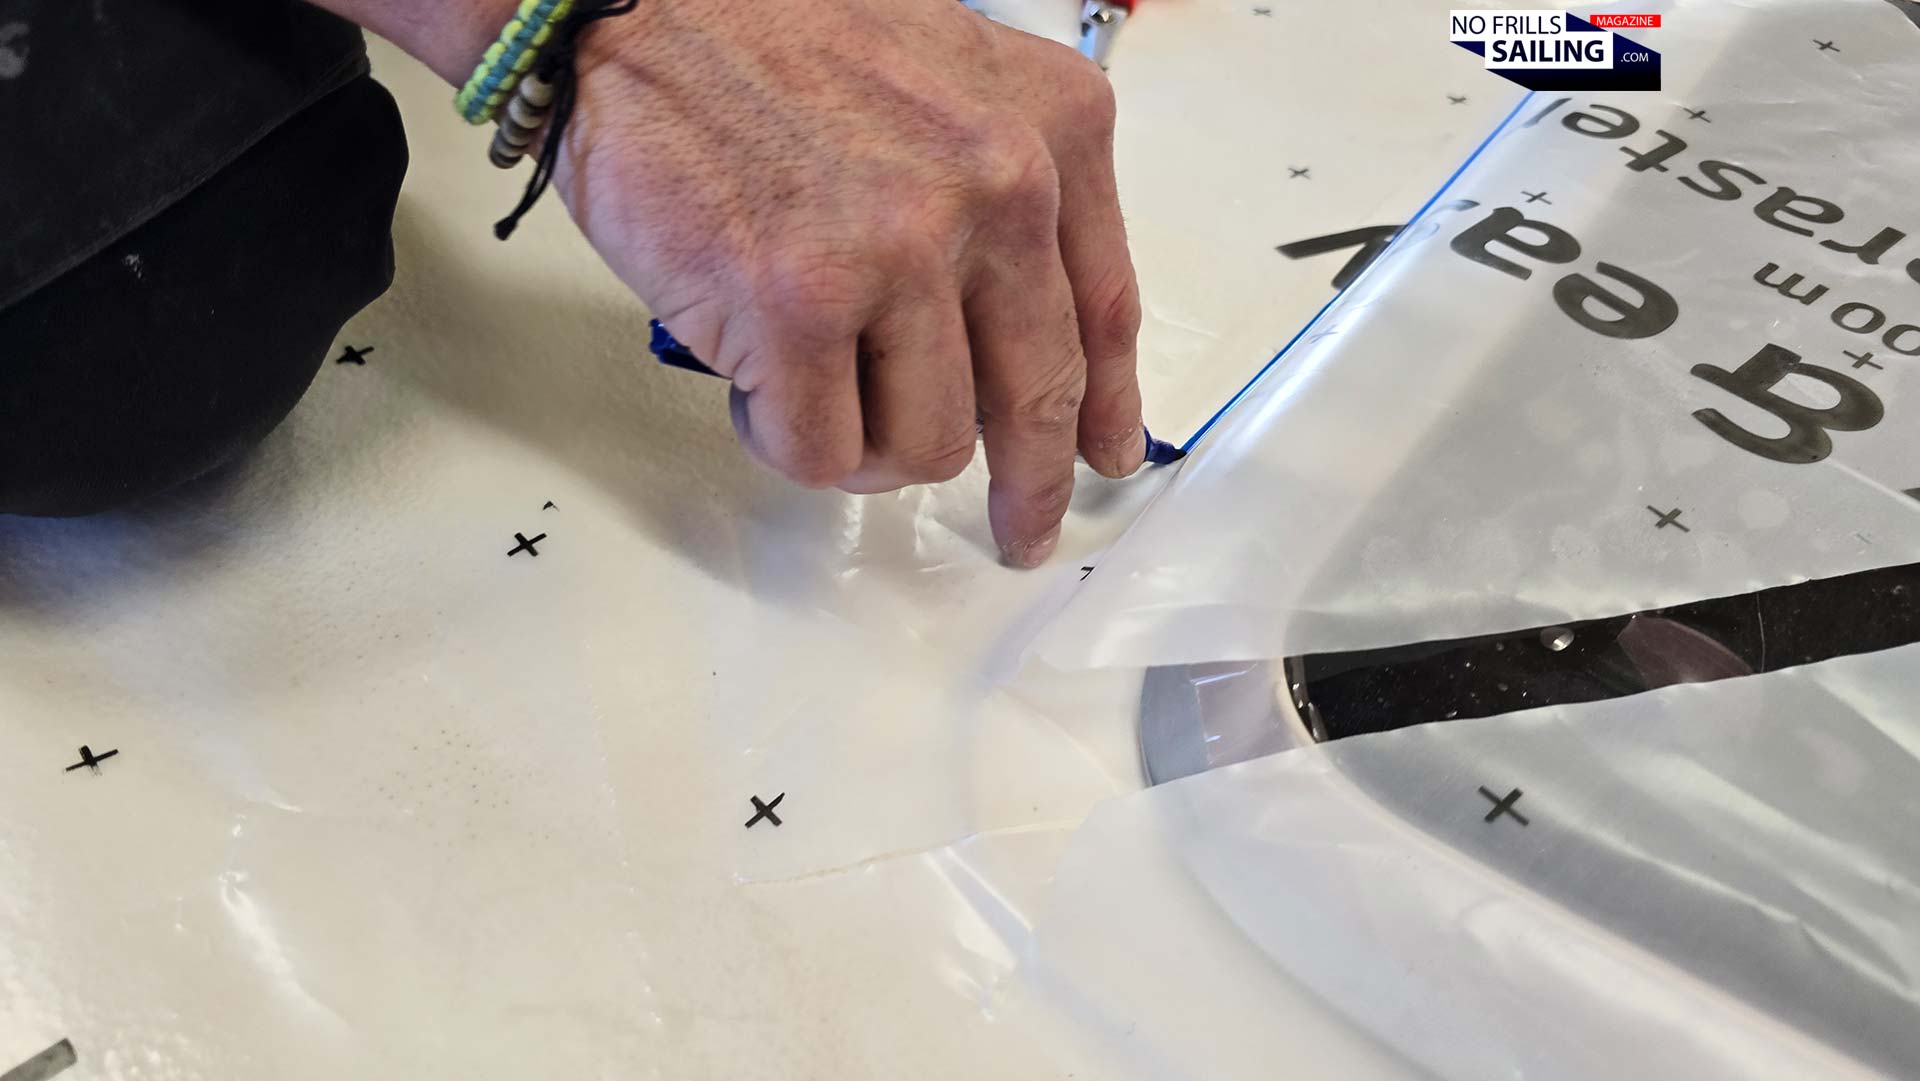
Blue marks the edges
So it´s “just” the deck. After a last thorough check of the perfect fit of the wrap, Ralph started to put on the markings for the deck panels itself. He began in the centerline of the boat with the hatches. Taking an ordinary waterproof blue Edding marker, he followed the lines where the synthetic teak panels of his would be ending. This was easy around the hatches, even easier along the boat´s side.
Being as accurate as it gets
Any new sailboat will have a non-skid pattern “baked” into the laminate surface of the boat. This is often a diamond shape, in case of my Omega 42, just an irregular pattern. Later, these will have to be sanded down to achieve an even surface (also, the gelcoat-sealing must be “opened” to allow better bonding for the glue used), but as long as they are there, the non-skid-areas generally provide a nice guiding line for the marker to draw on. I also checked how Ralph got the rounded edges of the hatches right, you can clearly see that the open cuts in the wrap are no problem, as long as the marking is done right.
That´s quite some marking here …
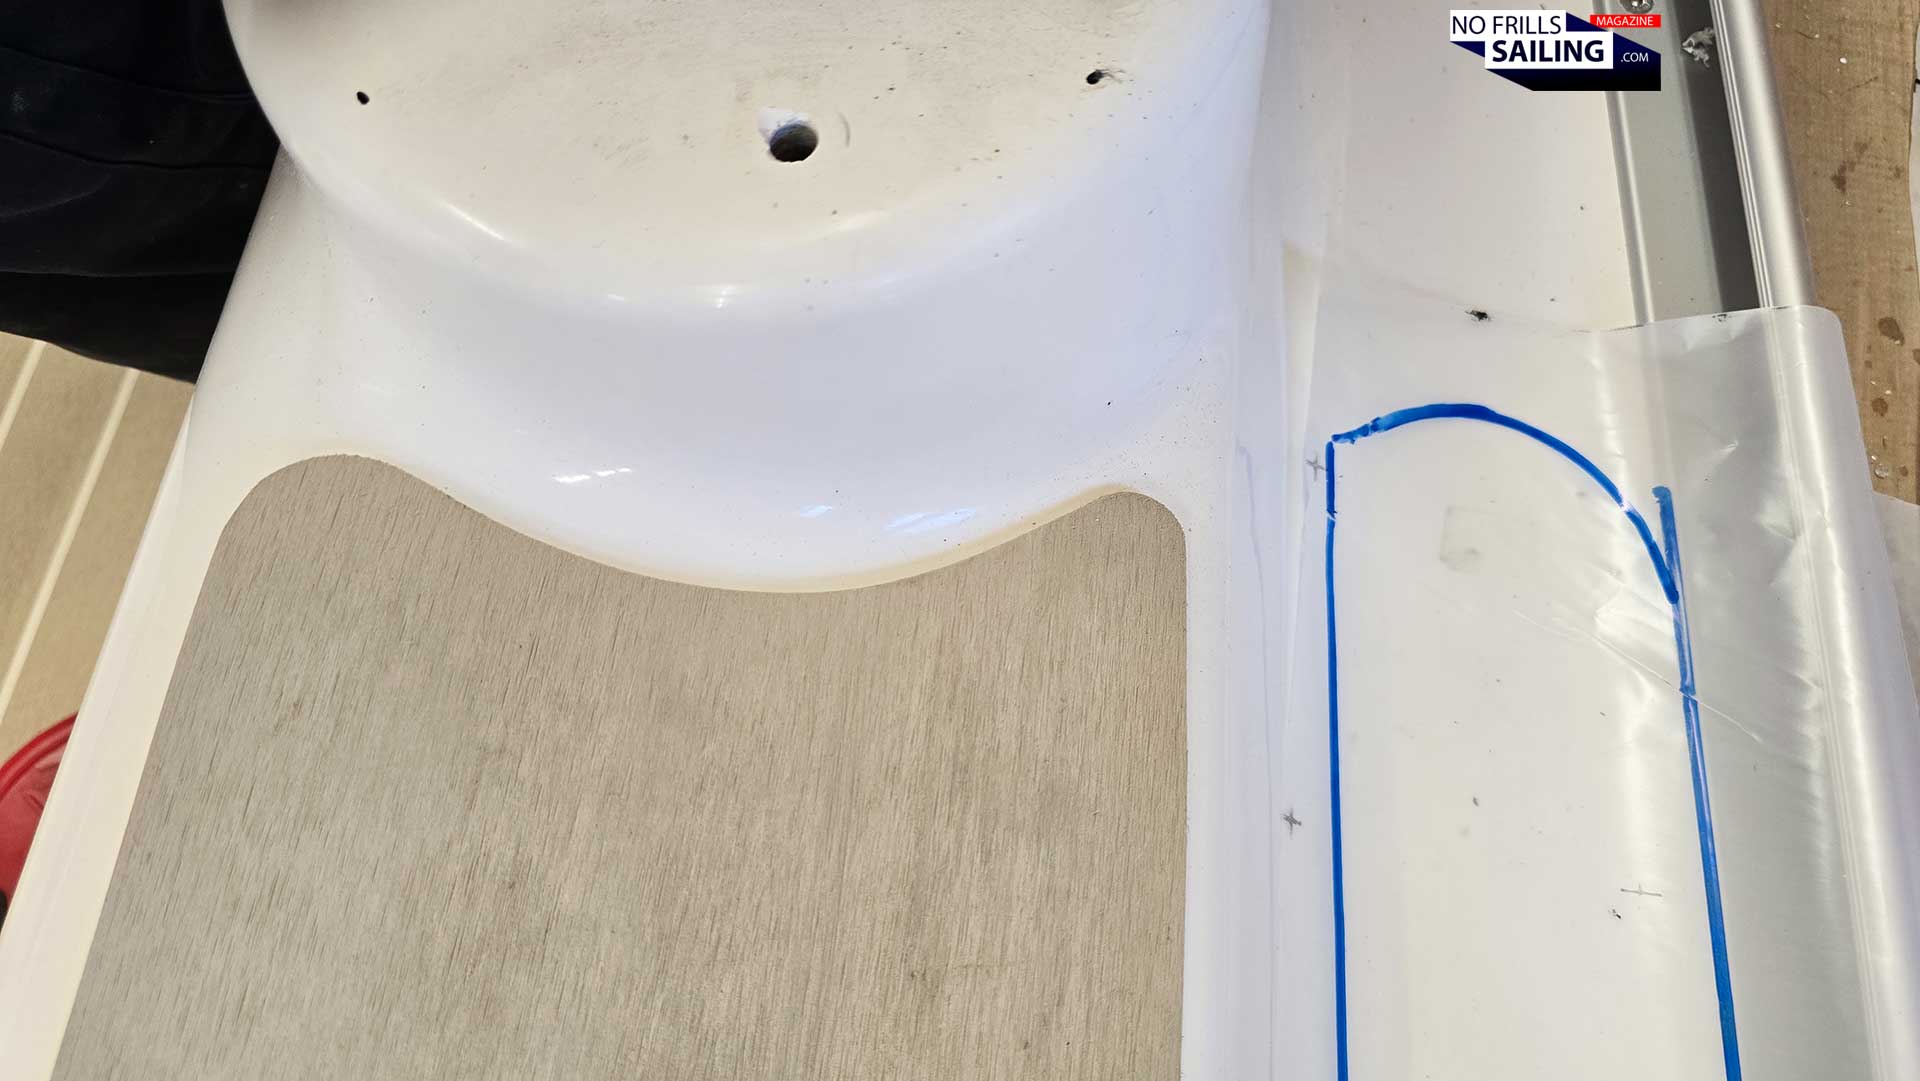
For the outline of the new deck flooring we´ve decided to have no open seam between synthetic deck and the toe rail. By design, the material thickness of the toe rail matches the thickness of the flooring-material. By exactly matching the shape, there won´t be a difference in height, which will look absolutely awesome. Suddenly, the “old-school” toe-railed deck becomes flush. Perfect!
Mastering the details
It all is done in a very quick manner. I am surprised that Ralph arrives at the cockpit in under an hour. Even though he is a bit hindered by my constant asking and him explaining. But there are also tricky sections to take care of. Here, decisions must be made and I will show it on the example of the rear end of the sidewalk deck flooring:
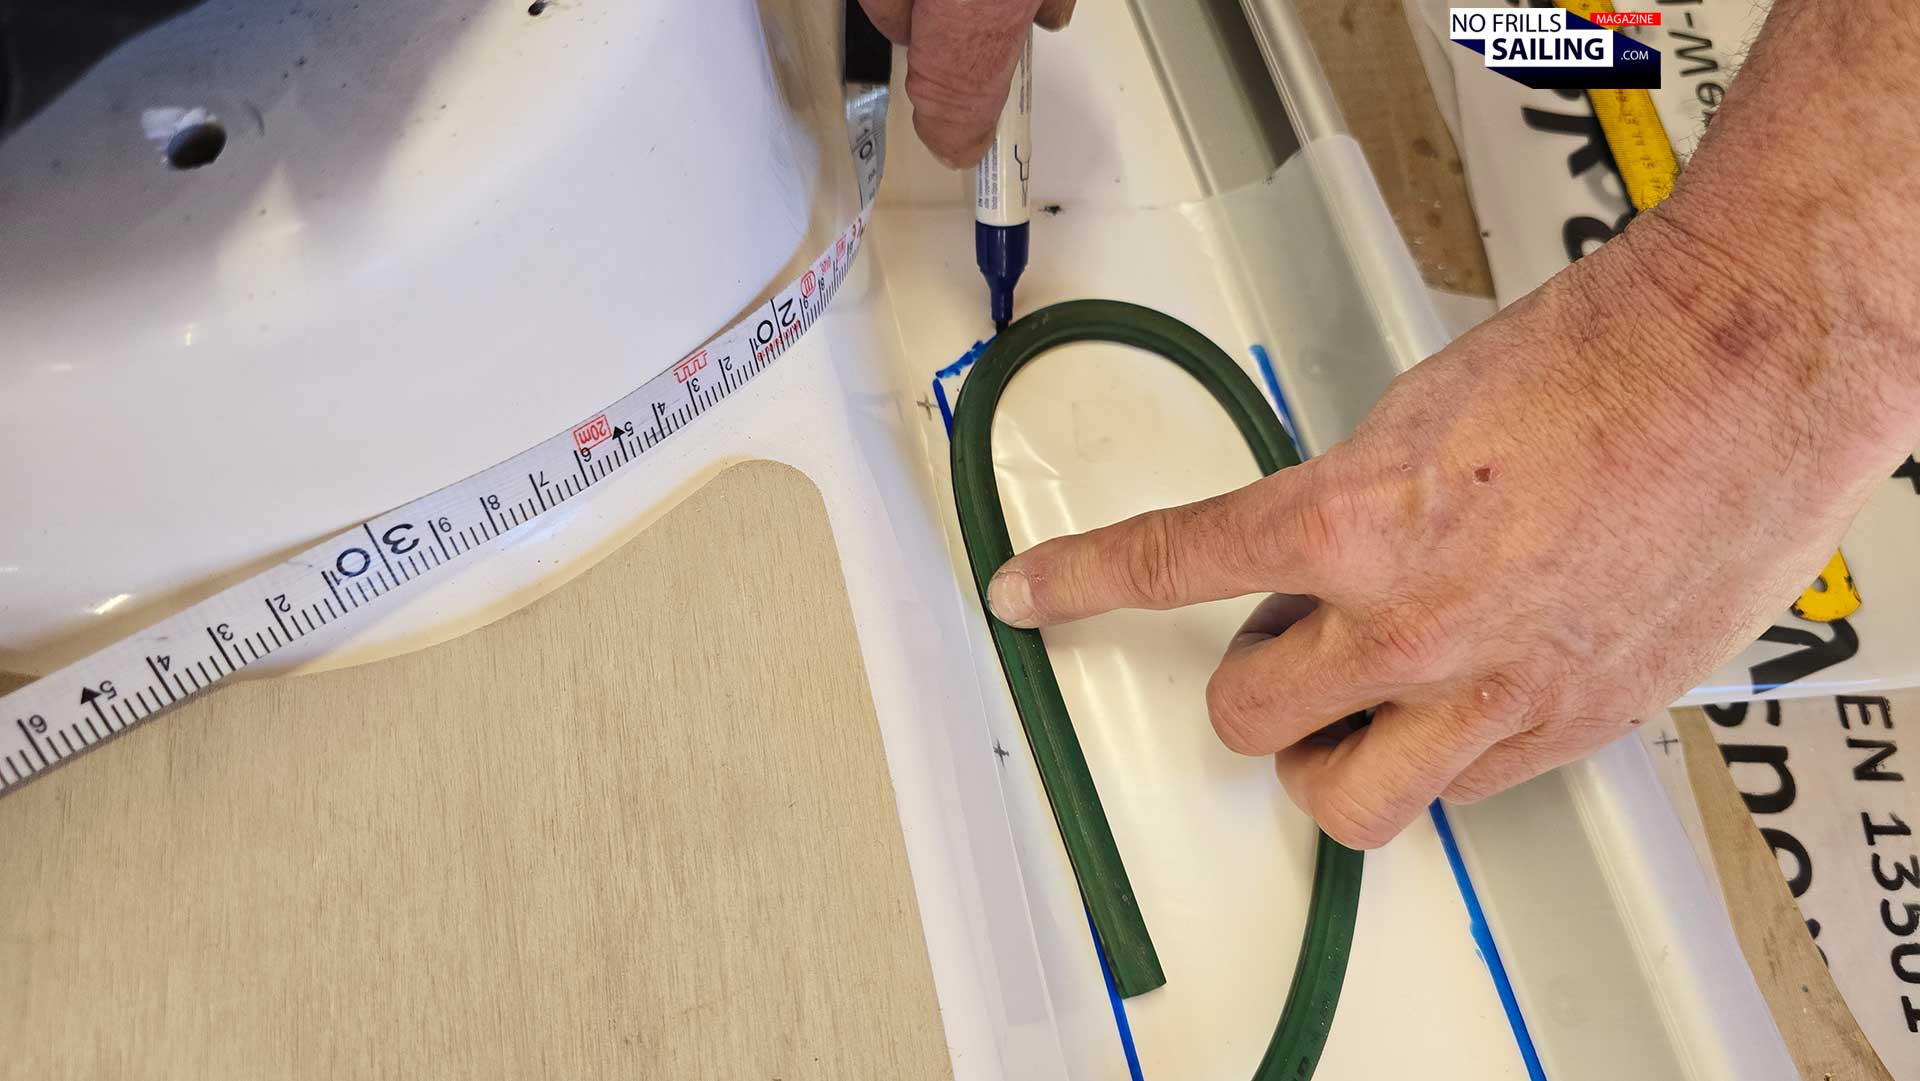
Little tricks here and there
As you can see, the covering of the coaming where the massive Andersen genoa winches are mounted, kind if “snuggles” around the rounded shape of the base mount for the winch. By chance, the side deck flooring ends exactly here: The question was, how. Straight line? Would be a bit boring. So I asked of the same radius as the winch mount, but inverted. So that we´d achieve a kind of “S”-shape, an arabesque. Ralph, being a seasoned craftsman, applied a little trick here.
A nice curved shape
With a little piece of rubber pipe, he formed different shapes and asked me to choose one. After having picked the one design that I thought would suit best, be fixed the rubber and marked its shape with the Edding. Bang! Here I have my perfect matching arabesque. There were not a lot of those questions on details, but every one of those was a bit deciding and it was good that I was sticking around, giving input, ideas and definitive answers. So for your own project: If your Ralph does the gauge pattern of your yacht, be present!
Finalizing the gauge-model for deck production
After clearing all of the (few) open questions, Ralph began to finish his work. You can look forward to the next article, because I will be present in his workshop when my deck is being produced. In order to make it happen, this huge 1:1 gauge pattern will be unfolded on the huge table top at Rosch Yachts, the blue outlines serving as guide for the guys to put together the individual stripes, thermo-welding them to large panels.
Red marks the overlapping sheets
In order to do so, the individual parts of this big plastic puzzle of sheets must be put together again at home in exactly the same manner as it was now on top of the deck. To be perfectly accurate, Ralph starts to draw long, straight lines – this time in glowing signal red – with a long ruler onto the plastic film.
For later orientation of each sheet
Later in his workshop they can reproduce the exact fit not only by means of the blue markings, but moreover because of the very straight red markings. Again, as I stated at the beginning of this article: Even a deviance of just a tenth of a percent will cause the deck to become 1.3 centimeters too long – what we need, is a 100% fit! Which, as I will come to see next, cannot always be ensured, no matter how accurate a gauge pattern had been manufactured.
What a surprise!
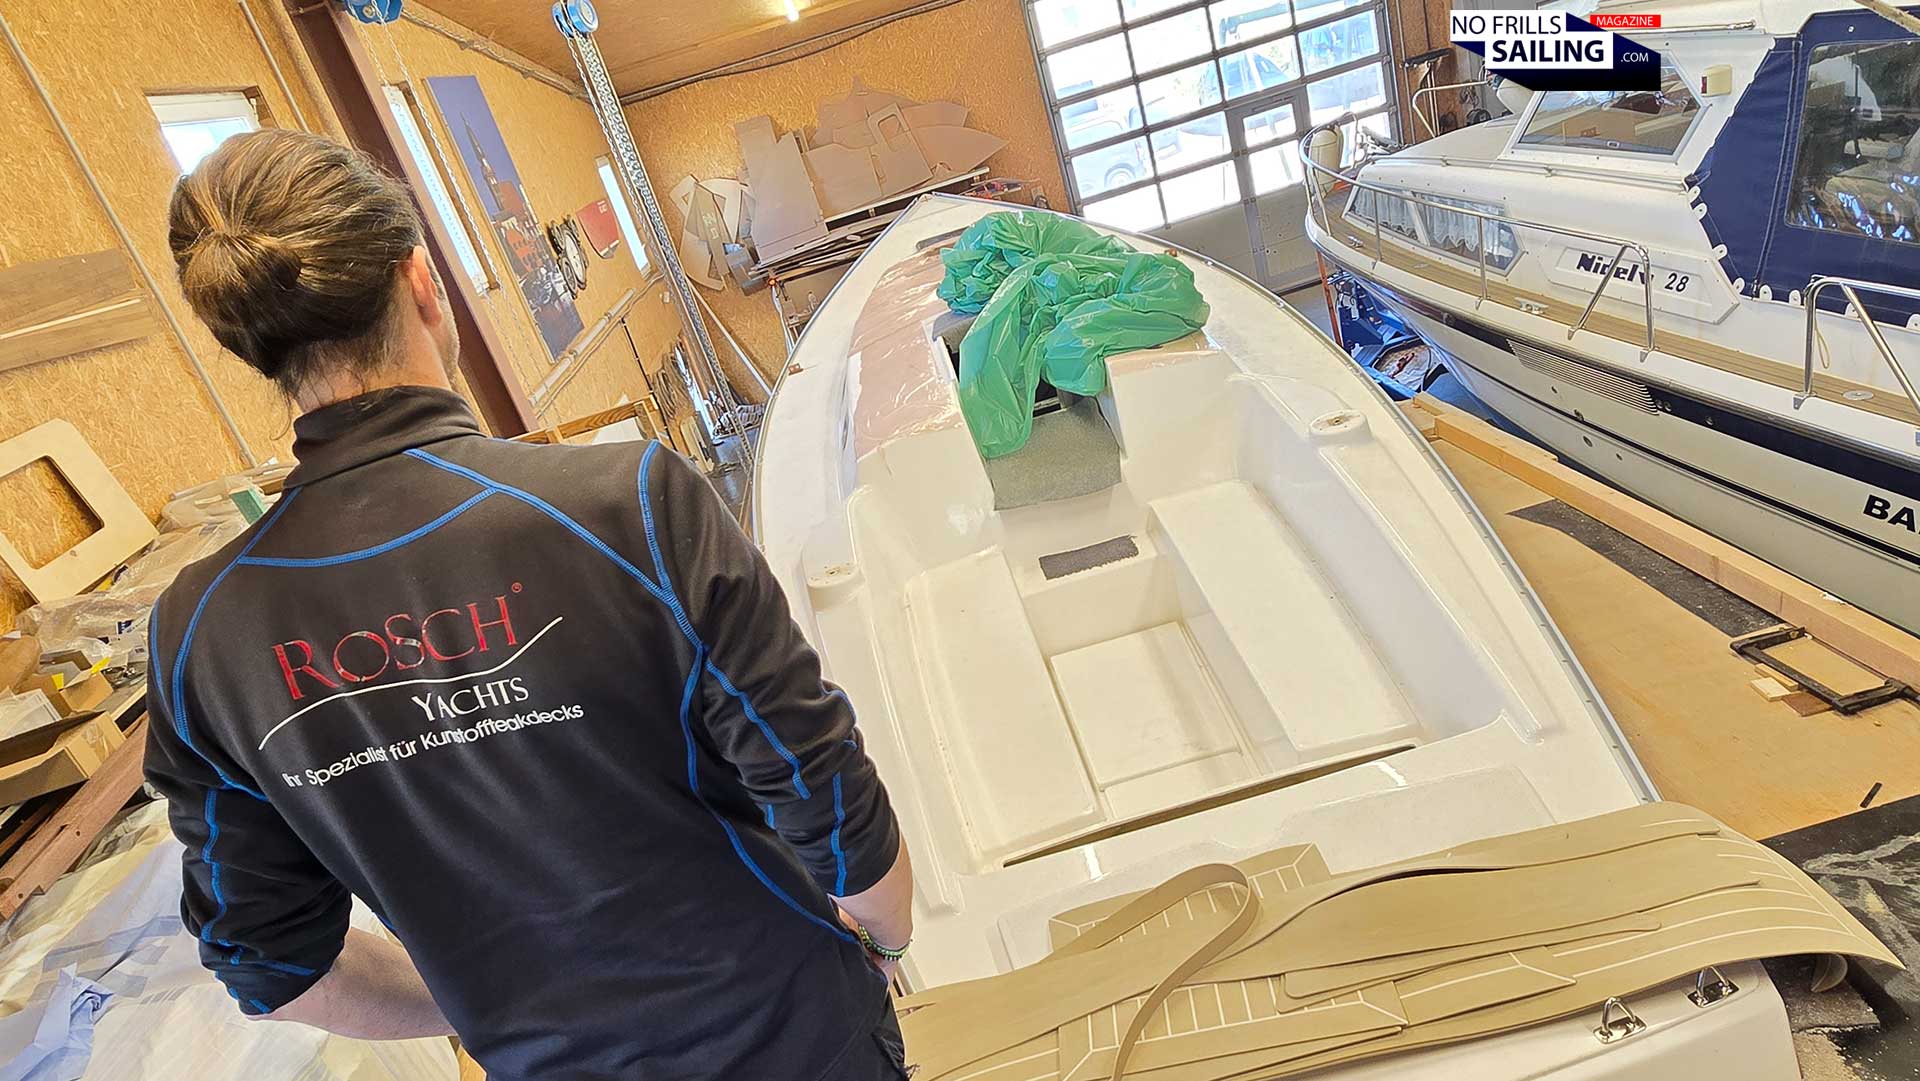
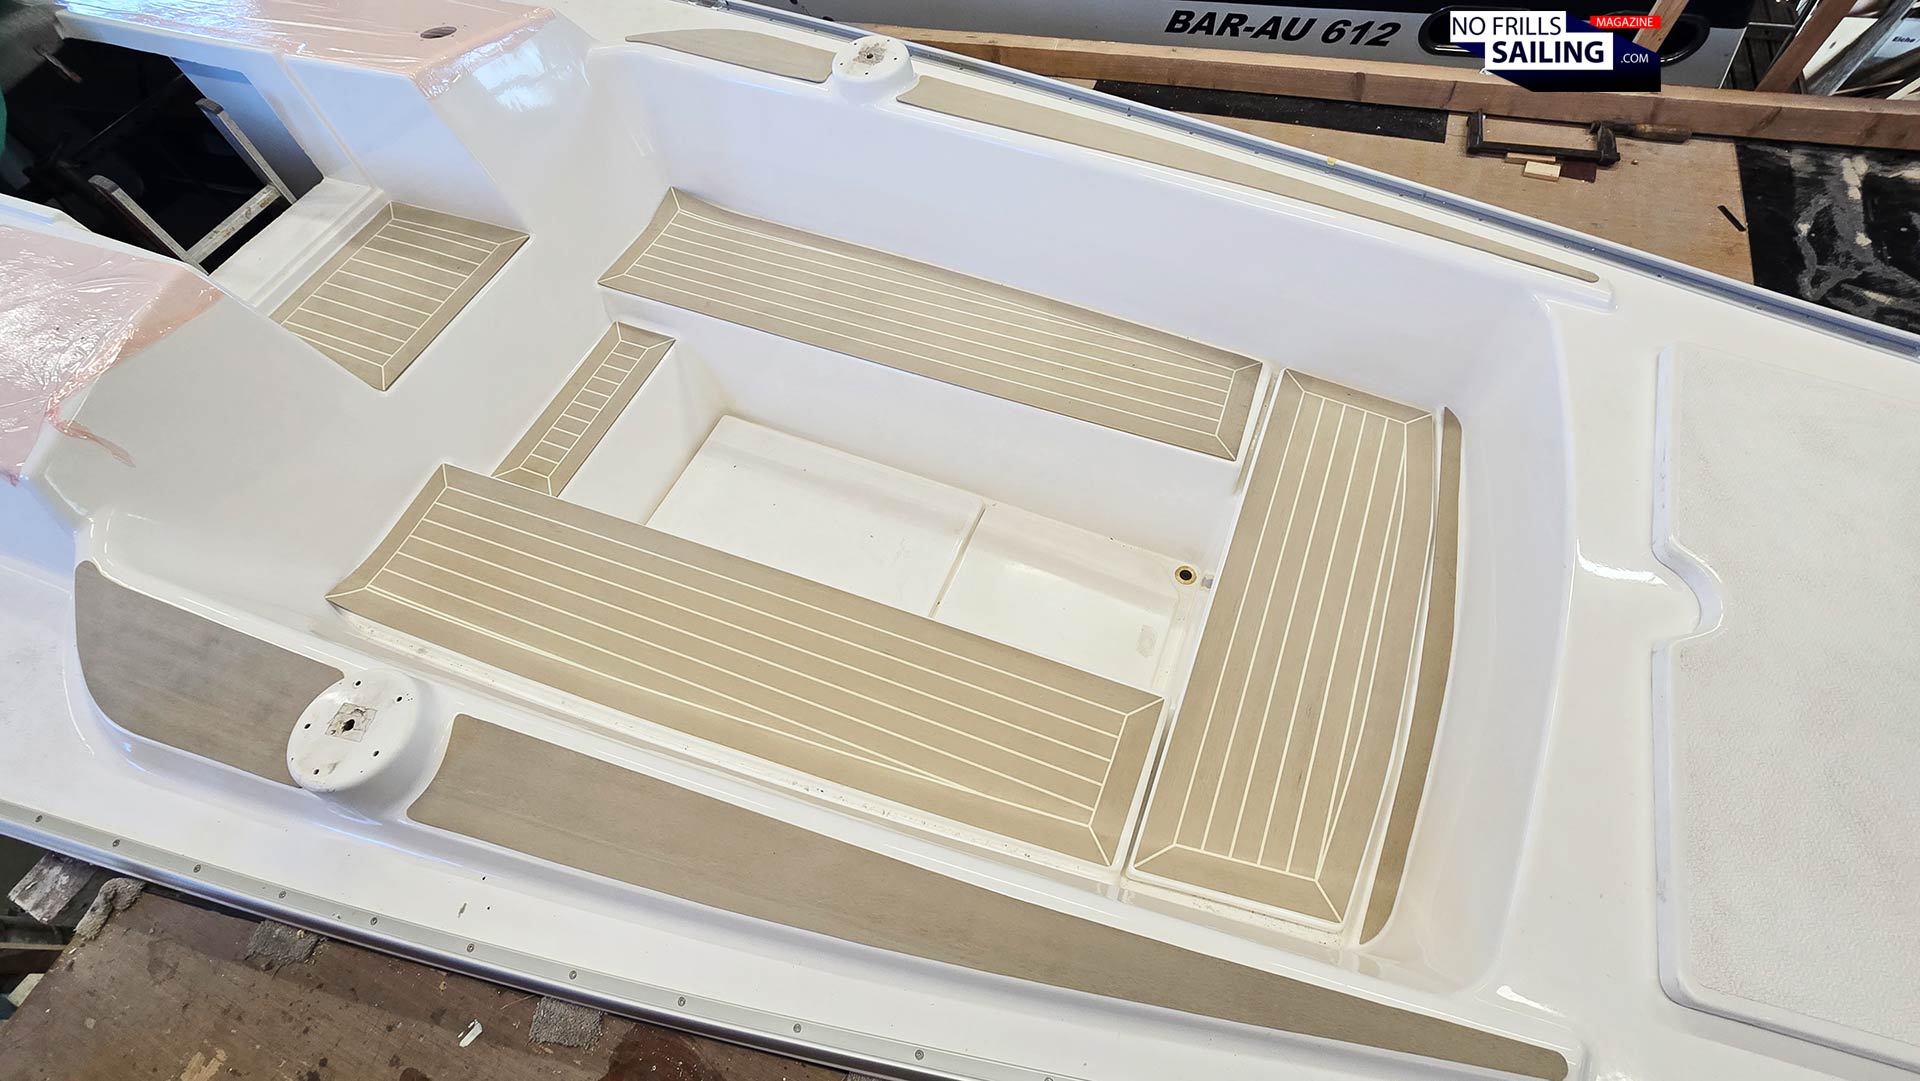
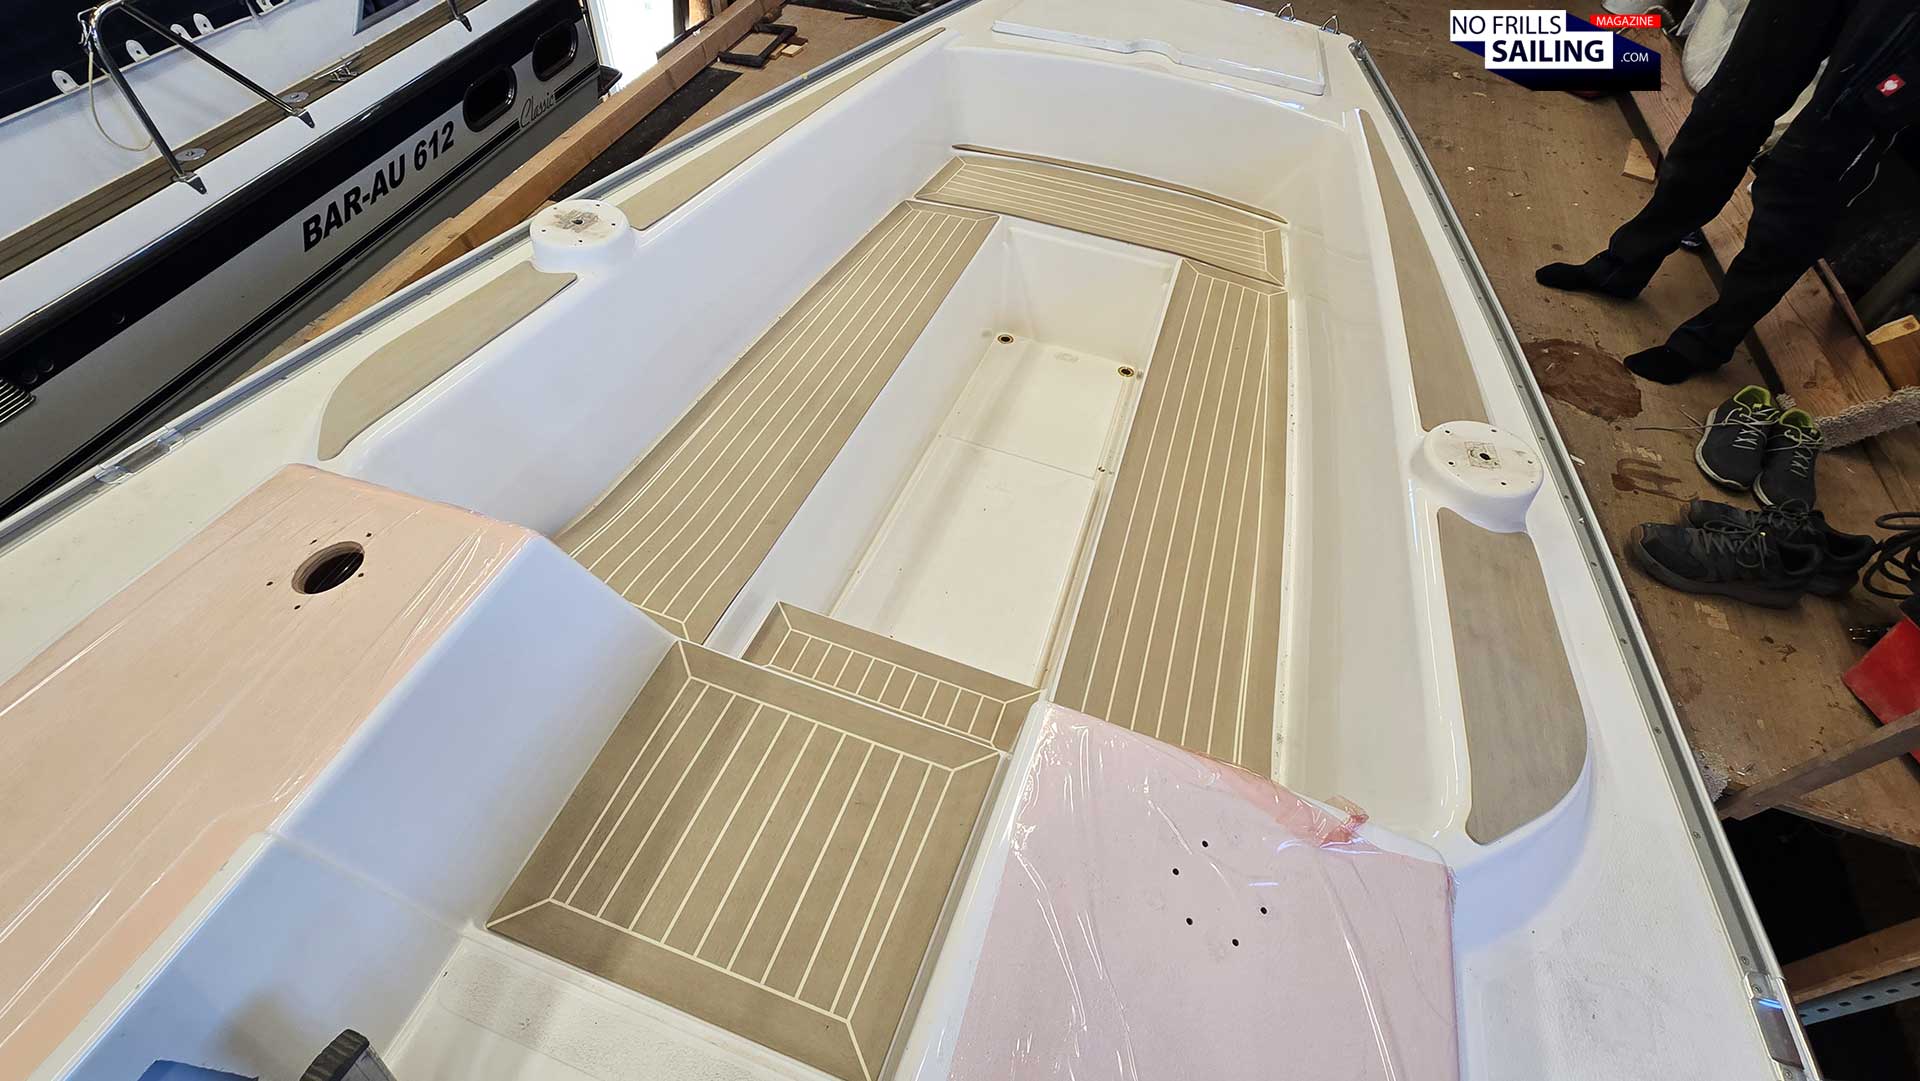
“I have a little surprise for you”, Ralph said and smiled. I thought we´d be finished and can drive home after having another coffee in shipyard´s boss Heiner´s office. But I should have seen it coming: After Ralph had already one piece of the cockpit´s deck taken out of his car (the one for the coamings), he returned with a full stack of panels: “This is your cockpit, already finished!” How cool is that?! My heart jumped! As a matter of fact, Ralph had been visiting the shipyard a few months ago without my knowledge. Back then he took first rough measurements for his offer, but as it turned out, he had also made the first gauge models of the cockpit areas where I wanted flooring. Now these are finished. Time for a try-on!
Let´s have a little dress rehearsal …
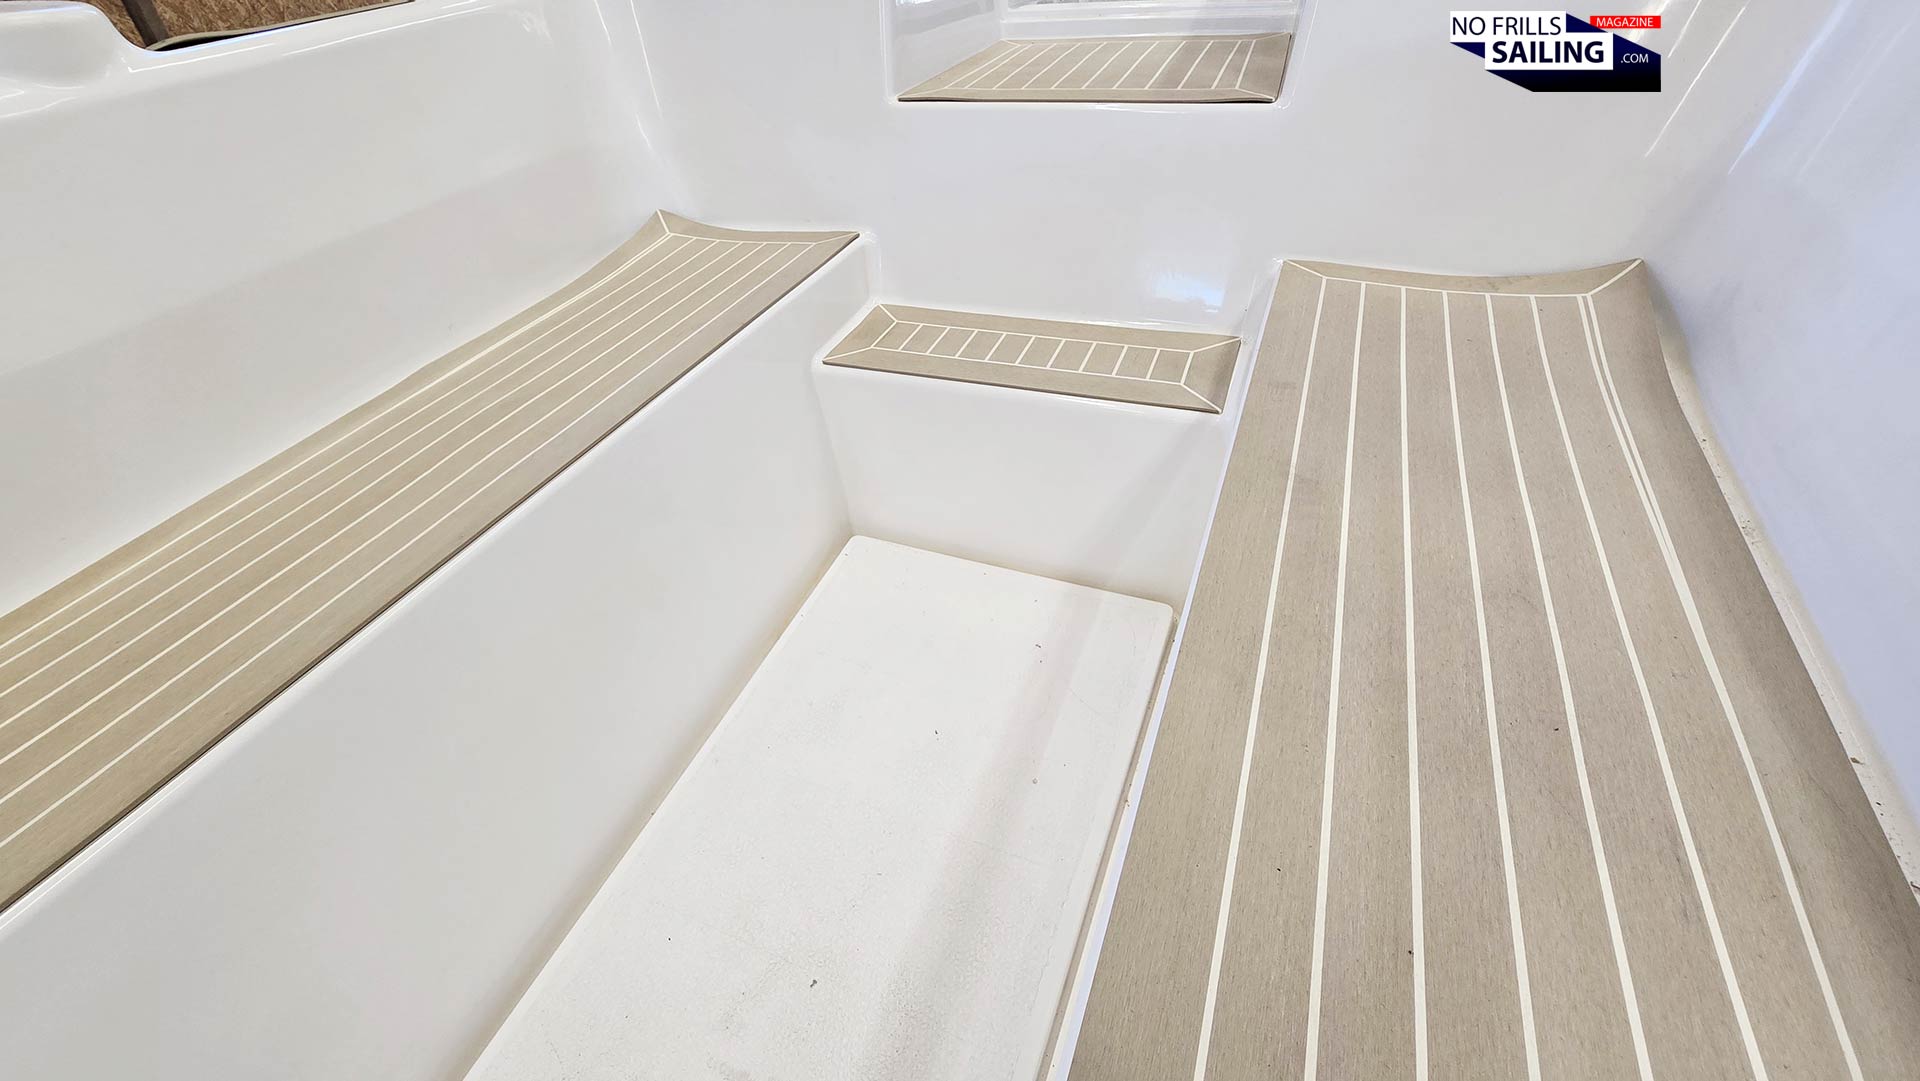
Piece by piece he arranged the panels where they belonged. Coamings, seating benches, stowage covers. Piece by piece it came together. I just stood by the rear end and was so stunned. And happy, literally, a stone fell from my heart. Because it really is a very tough decision to choose the right color of the new deck flooring. I had a sample-wheel, of course, but choosing the right color for a whole deck out of a slim, 20 centimeter piece of plastic is not easy, believe me! And Rosch Yachts offers no less than eleven (!) different flavors. Even after I had ordered, a part of me was still unsure …
I went for Sandstone with white caulking
In the end, I went for “sandstone” with a white caulking. I want a light, easy-going and “friendly” design, fitting the color scheme under decks. Not the strong “fresh teak”-color, which isn´t natural even when its natural teak as it will bleach into grey very soon. But also not the darker tones. Black caulking on the other hand would in my eyes take away the focus from the clean, neat lines of Peter Norlin. I want you to focus on the beauty of the ship as a whole. The flurry black caulking would blur those, I feared. Do you like my choice?
Still room for adjustments
I just love it! Now that I saw the cockpit with the first finished panels, it was a confirmation of my choice. In fact, back in January, I ran up to Ralph´s exhibition booth at Boot Duesseldorf boat show asking him desperately if I could still change the color. For whatever reason I suddenly thought that a light grey with white caulking would suit better. He insisted that I had made the best choice with sandstone and strongly encouraged me to stick by my initial decision. And secondly, after two days he confirmed that my sandstone material had anyway been produced and shipped to his workshop.
Minor changes in the edges …
So, if you think of refitting or upgrading your boat with a new synthetic deck, make sure to really think it through: Color of the deck itself and very important a corresponding caulking color! Try to inspect real life-sized boats where exactly your color-scheme is already installed. Don´t refrain to photographs, go out, look at a real yacht in a marina! It´s a tough and very, very important decision – and a pricy one too – so better not waste your chance here. Did I say that even the most accurate gauge model can produce a slightly deviating product? It did in the cockpit.
Doesn´t it loot just awesome?
The ends of the bench covers near the entryway didn´t really match the curved deck. But this is normal, Ralph reassures me, and it can be taken off just nicely when mounting day has come. “It´s better to have too much, than too less”, he says and smiles. Of course, cutting off is easier, than … adding. Which is impossible, really. But apart from those little things, it looks so sick! I just can´t wait to see it being fitted and finished, which will definitely be a huge leap forward for the looks of this sailboat!
Advertisement
Next step: Deck production!
So what´s next? As I said, in the coming days Ralph and his team will start the production of the large deck panels. I will be there for you to keep meticulous records of how it´s done, and believe me, it´s a fascinating procedure. It´s a lot of handcraft which contradicts a bit the “synthetic” impression of the PVC-material itself. Albeit being processed out of crude oil material, it´s far from a sterile process. Handcraft by skilled craftsmen, and I´m looking forward to this date! Especially how they make the “fish”, the central spine in the centerline of the boat, and the embrasure around each panel.
A grating for the cockpit´s floor?
Lastly, and I guess this will happen very soon thereafter, maybe mid or end of May this year, the fitting and application of the new deck: How do they achieve a perfect fit? How do they treat the surface area in preparation, which bonding agent is utilized and how is a tight, “forever” state without bulges or other defects achieved? Me – and you – will get to see this in a few weeks. Stay tuned!
You might also like to check out these related articles: