Now that weather conditions over winter improved a little and our technical staff got me thumbs up regarding heating conditions in our workshop hall, I decided it might be a good idea to take care of the solar side panels. Since changing the center panel from 50 Wpeak to 144 Wpeak and starting my #atlanticloop-project. I thought that some more energy harvested from the sun wouldn´t be a bad idea, so the side panels with 39 plus 23 Wpeak, adding up to 62 Wpeak for each side panel. That said, the total of 268 Wpeak is possible (but not probably since one of the side panels will be in the shade at any given time, so 208 Wpeak max output is possible.) Not bad.

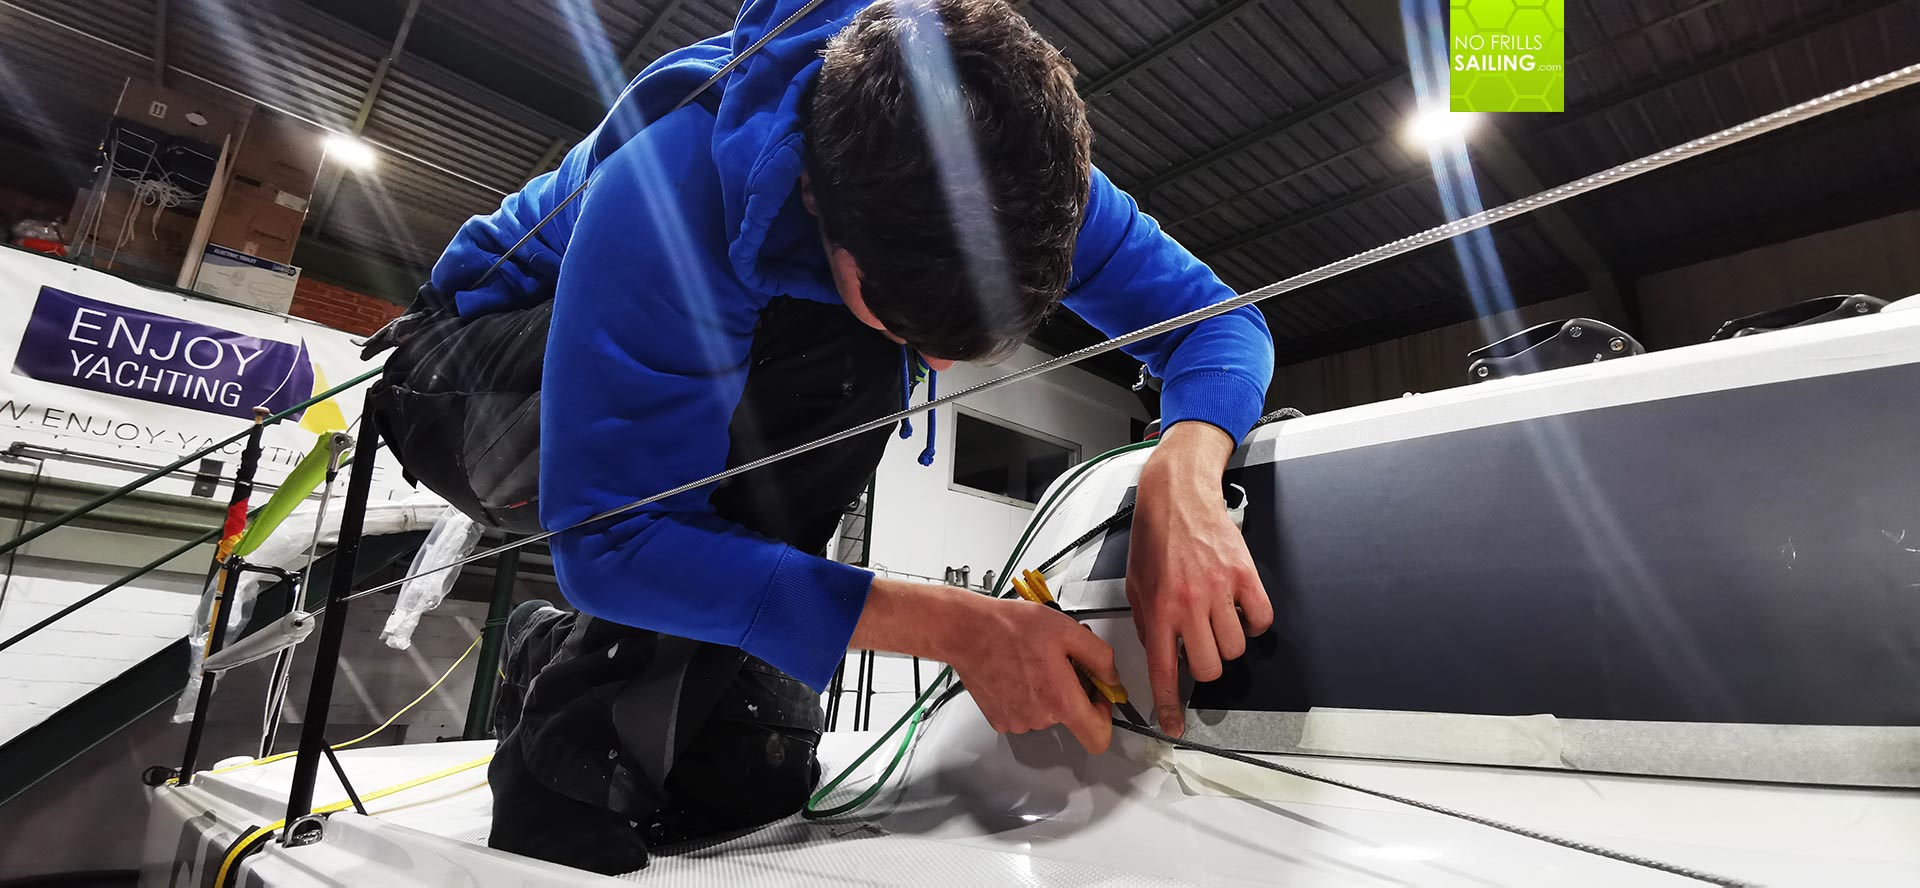
So I called my dear colleague and friend Finn who is a skilled and trained professional boat builder to help and he agreed. I placed some protective mat on the freshly tuned cockpit flooring and readied the tools needed: This time, as the side wall of the cabin GRP was flat polished GRP, we didn´t had to sand down the surface. So less tools needed, such as a drill, some Acetone, masking tape (very important!) and of course, Pantera. Let´s go!
Side Panel Solar mounting: The Challenge

The challenge this time would be gravity: As the panels are side mounted, gravity would pull them down. You couldn´t rely on just fitting them to position and let gravity do its work. Another factor was the bent surface which led Solbian to partition the panels into two separate items. That´s also tricky finding a position where both re-appear to being one continuous panel. So Finn suggested “let´s just fix them with tape and check for a perfect symmetrical position on either side.”
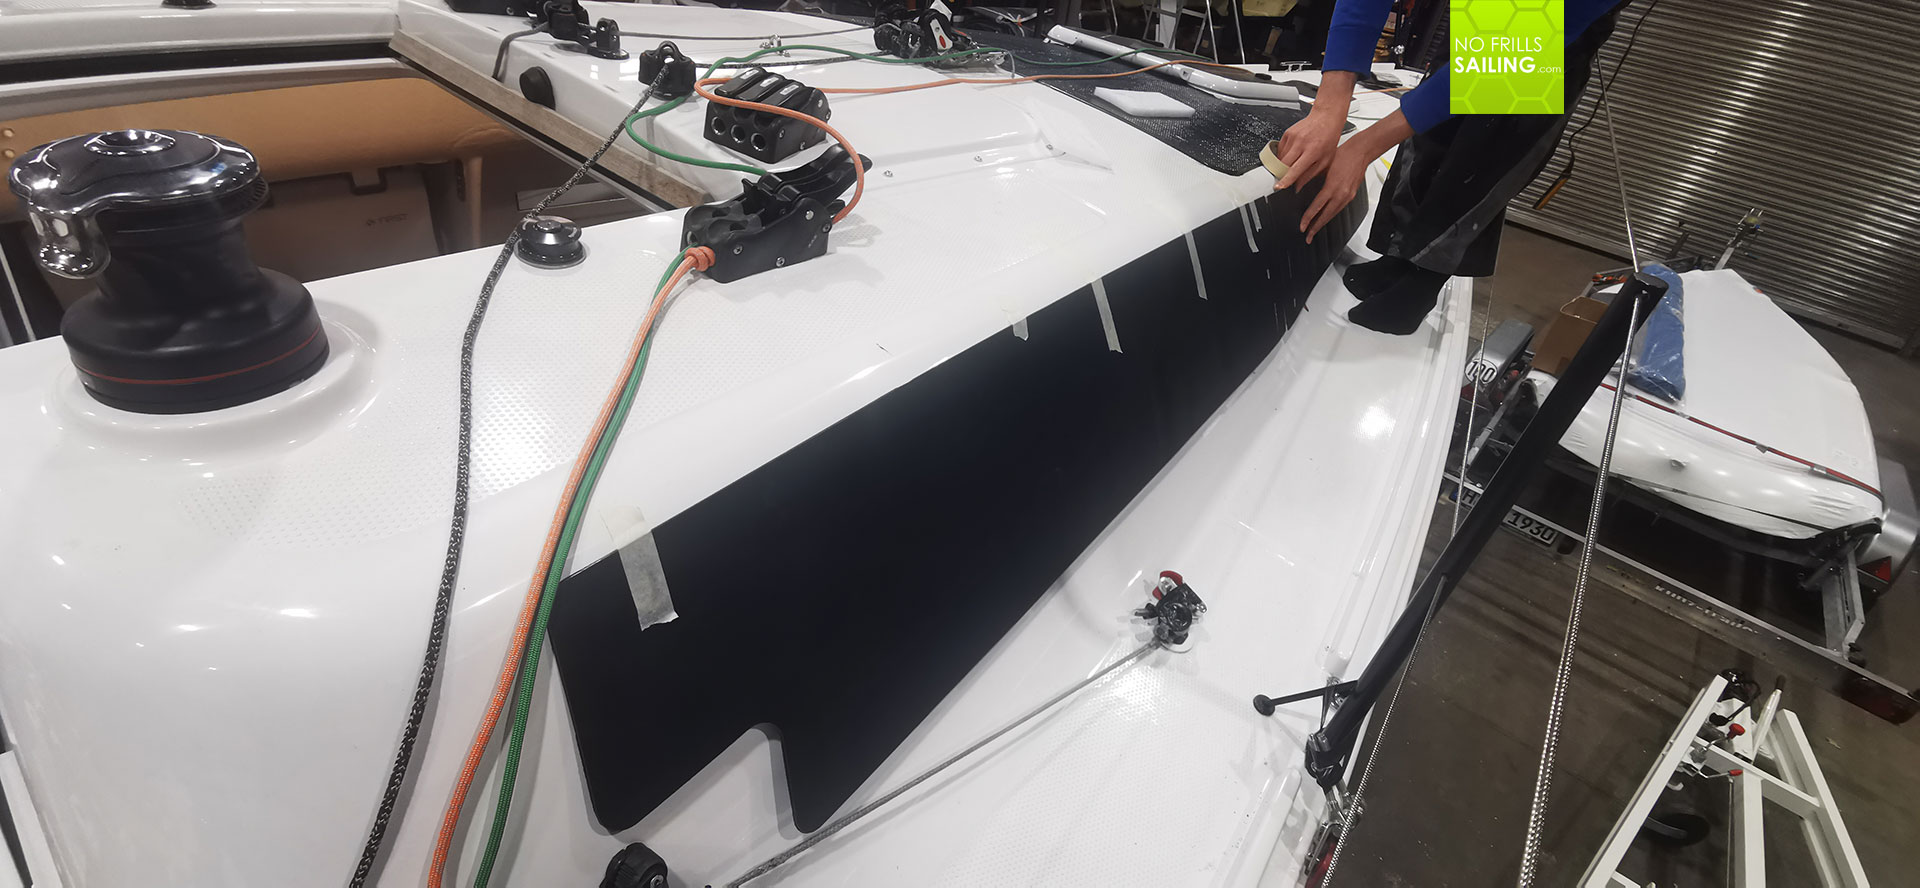
Said and done. The panels which house the solar-cells must never be bent too much, so we had to carefully adjust the position by the millimeter to find a place where neither the upper edge nor the bottom of the panel would be bent by the cabin roof or the side walk deck of GEKKO. Once found, we fixed the panel with tape and went on to fix the second, forward, panel as well. This took a while since we wanted to have it perfectly done. Also, between the two Solbian solar panels, the joint did not had to get thinner than 5 millimeters.
We finished starboard side, checked twice and for a third time. Finn then marked the outline of the solar panels with an Edding to finalize its position. Changing to the port side of the boat, we repeated the work with one difference: I started to carefully mark the exact position where the starboard corresponding panel started so that both side mounted panels would be absolutely symmetrical. That´s kind of enervating since all surfaces are bent and there is simply no chance to take a measurement off the right side and re-enact it on the port side. Multiple times our eyes had to decide. But it kind of worked just fine.

After more than half an hour we had finally found the right positions and Finn signaled that he was happy with the current state. Thumbs up from the master is a good sign, so we could go on for second stage: Making the bore holes for the connecting cables, red and black, from the panels leading inboard. We already have 4 holes for the center panel (which also consists of 2 separate panels) and now four cables on each side would also enter GEKKOs interior, a total of 8 holes to be drilled.
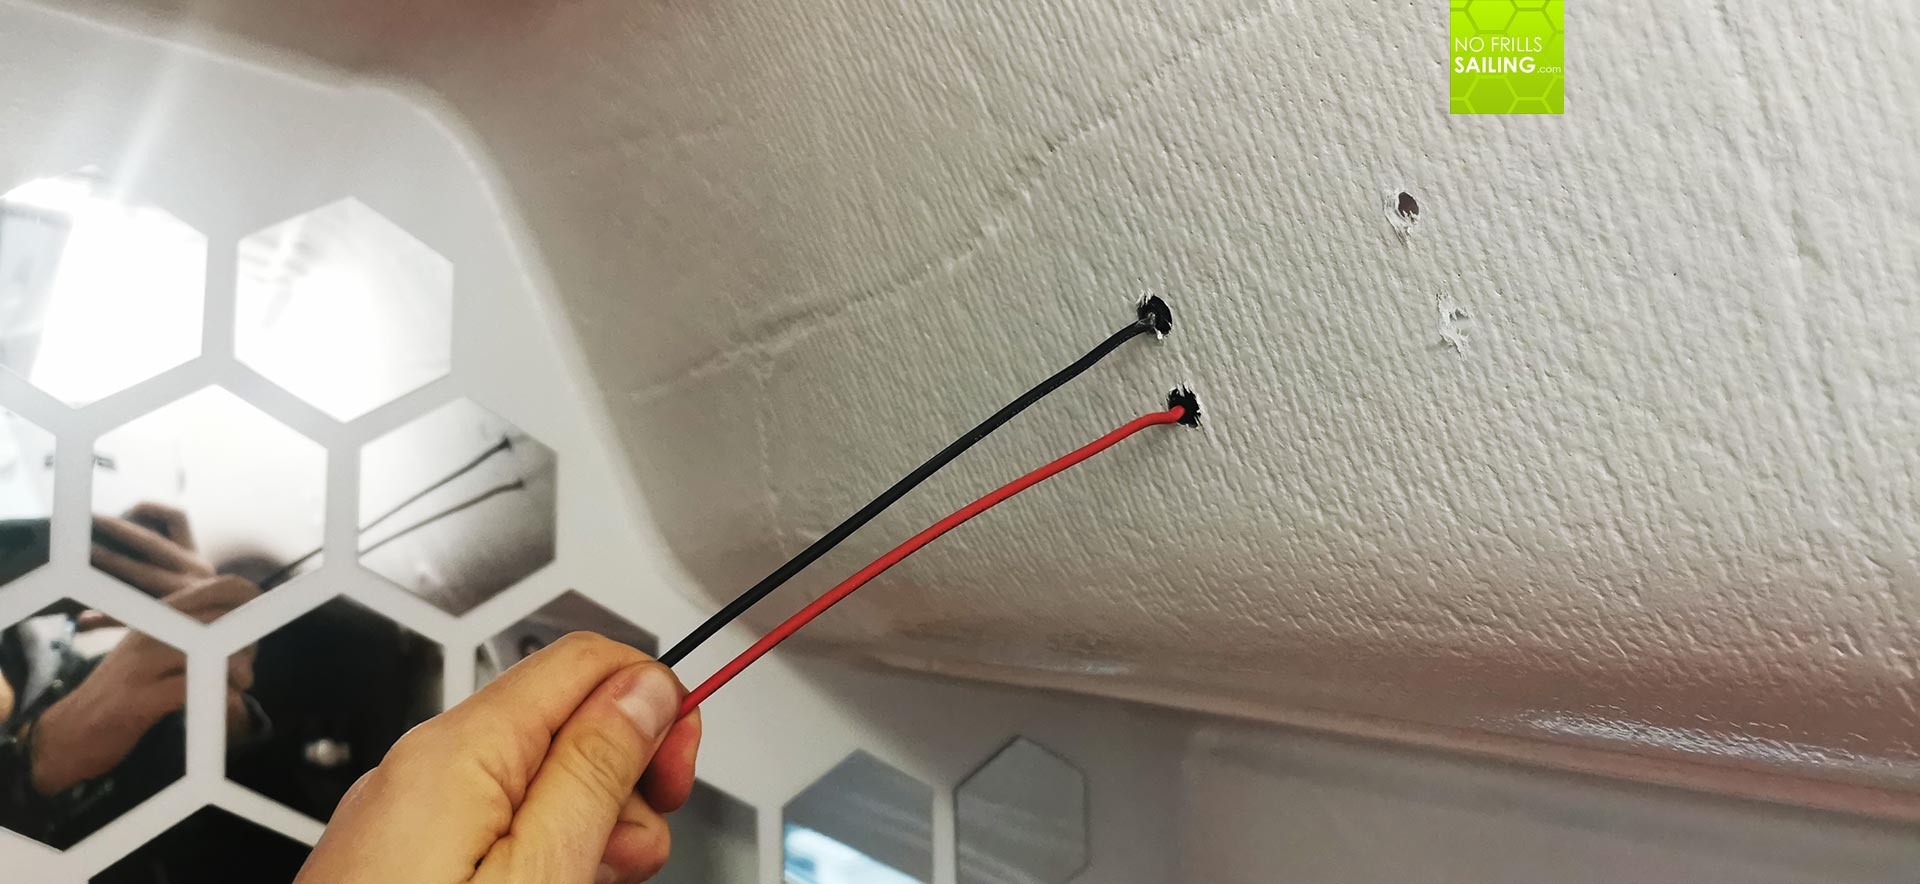
I must say I simply hate it to drill holes into a boat. I just hate it! It´s a sound worse than a dentist maltreating a tooth, the squeaking and cracking when the drill bit cracks open the hull is just awful! I sat down in the salon and collected the dust and offcut GRP, vacuuming away the fine white dust. But as much as I hate “injuring” my boat, it´s a job that must be done so that the energy collected by the solar panels can enter flow to the solar-chargers and into the battery. I am well aware of this, but still, I hate it! 15 minutes later all was done and the provisionally fixed panels had their wires lead into the boat. It looked fine to me. Let´s glue then!
Pantera-Action!
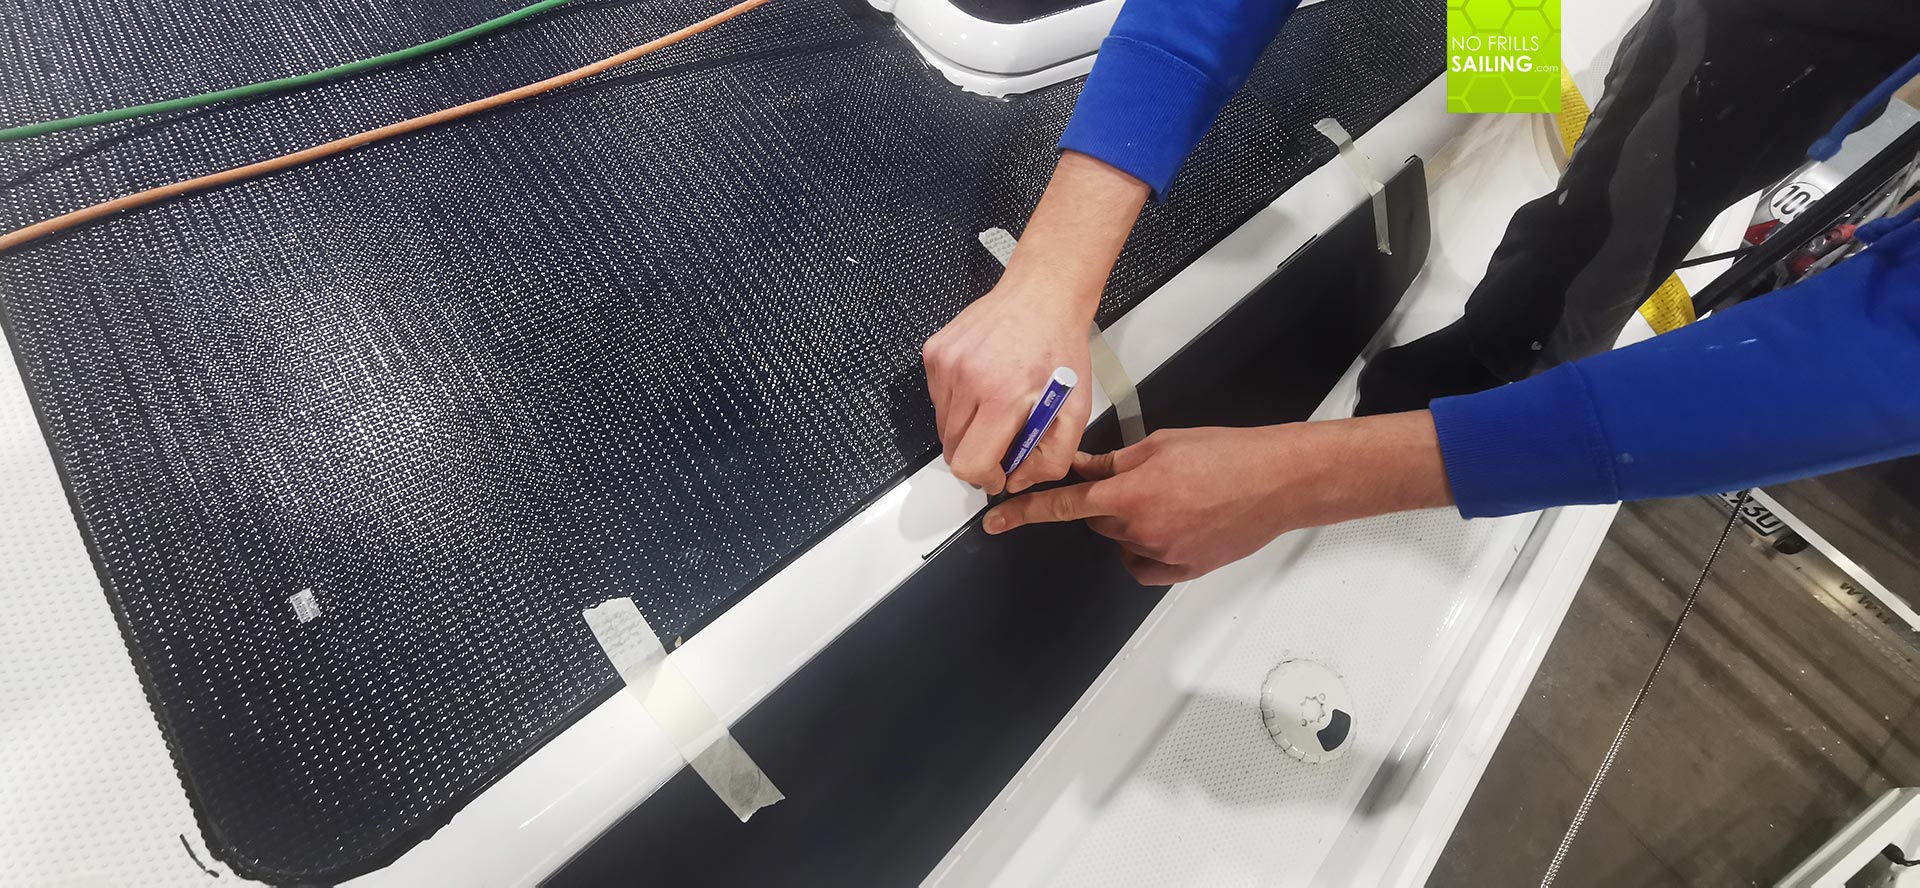
With Pantera we have a saying: “It starts to stick when you think about it.” And that´s the truth, I really love Pantera adhesives, but it´s really a messy, sticky thing to work with it. Finn prepared himself and after we had double-checked the position, he started to apply a trail of Pantera all along the outside edges of the panel.
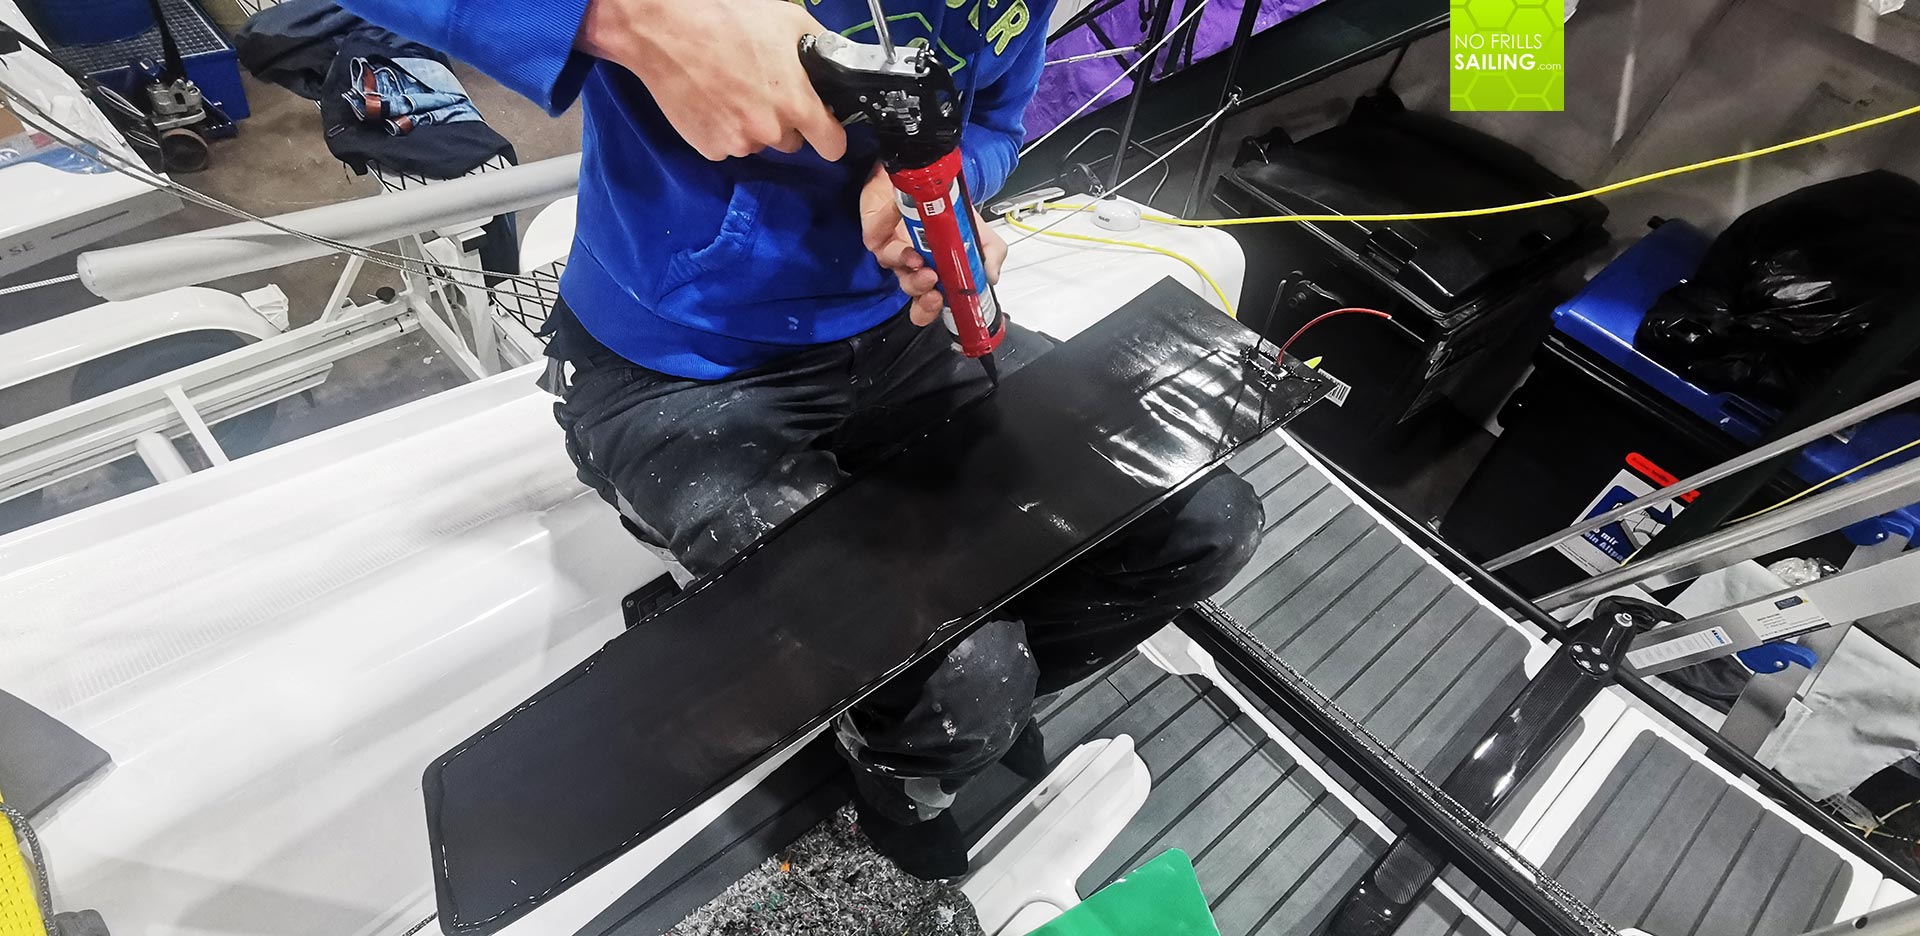
Although Michael Körner, CEO of Solbian Germany, had advised us not to apply glue to the inside of the panels, just the way we had done it with the center panels as well, I decided to do so because for some reasons the solar-cells inside the side panels had kind of slightly bent outwards so that I found it appropriate to bridge the distance with some extra-glue. We placed the panel onto the boat fitting the Edding-markings and carefully applied pressure. The stuck immediately – I am always astonished of what modern chemical technology in terms of sealants and glues can do!
After we had fitted all four panels to the side of the cabin roof, we pressed the panels firmly – but not overly aggressive – to the surface and to my surprise the sticking power both of Pantera and the pre-applied adhesive surface underneath the panels themselves made them sit tight and perfect. After cleaning the panels and the edges, Finn asked for a reel of masking tape and proceeded.

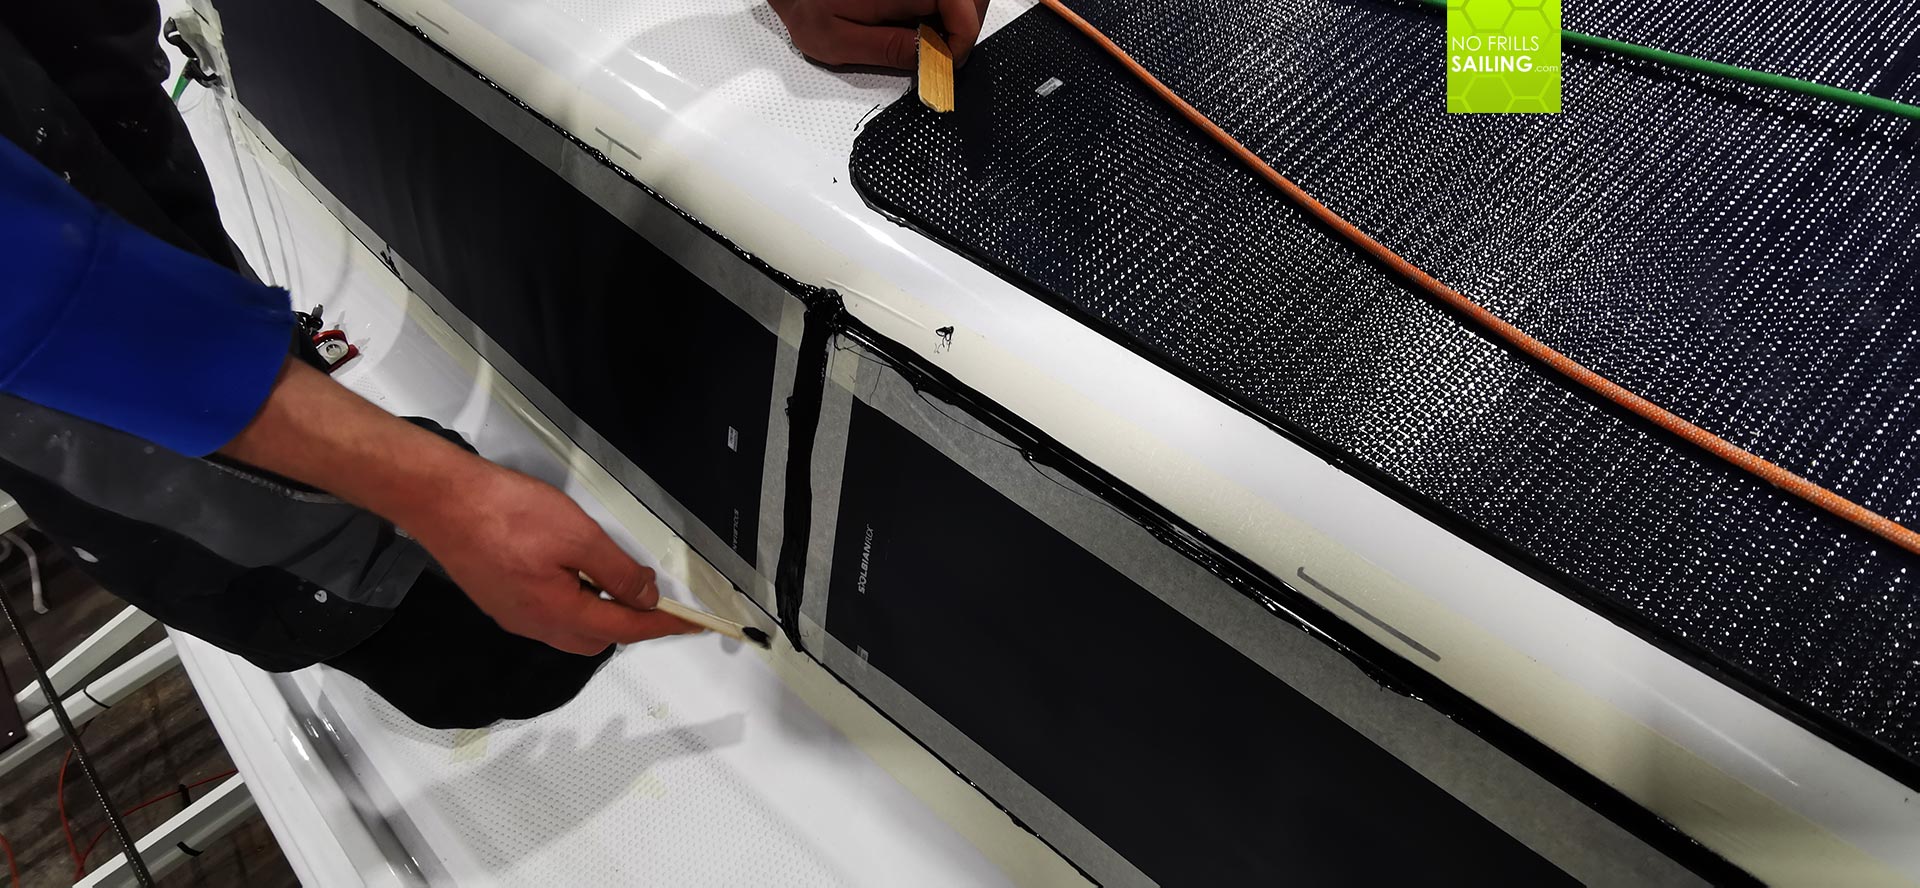
“For the jointing of the panels, we need to work meticulously accurate and clean.”, he said and started to put the masking tape all along the solar panels at the edge of the outside. Finishing the panels, he did the same approximately 0.4 Centimeters all around the panels on the GRP. The area not masked would be filled with Pantera to create a final jointing.
The Importance of professional jointing
Why so much effort? Well, two reasons: Firstly I do not want any water enter the area underneath the panels. This water will surely find its way into the boat, start to deteriorate and damage the laminate or the solar panels themselves. When we took off the small standard 50 Wp-panel I saw it with my own eyes: Brownish, stinking water underneath the panel. Not good. Second: The power of the waves! Especially the side panels will be prone to washing waves breaking on the bow and running all along abaft. This can be a hundred or more liters at one time – a constant force exerted onto the panels. Especially the underside may be leveraged and taken off. This must not happen.
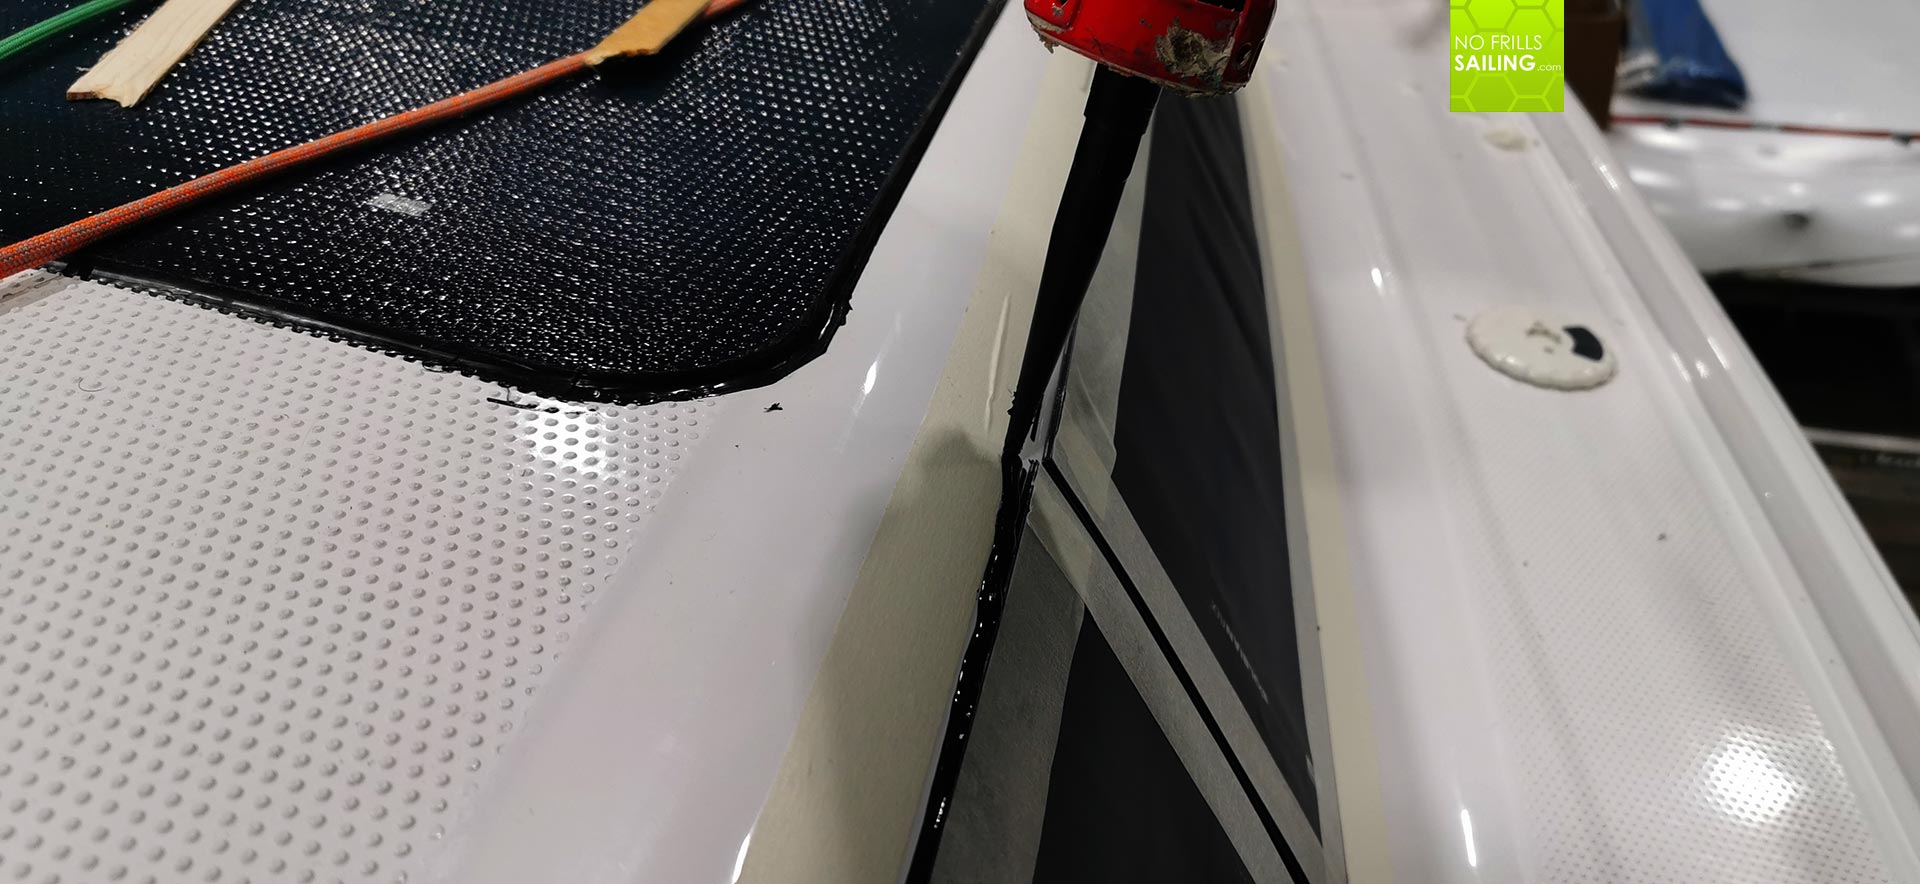
So, after the masking tape had been applied, Finn pressed a proper load of Panter in the seam between panel and boat, filling up the interstice. Once done, he took a small piece of thin wood, a mere splinter, and went all around the joint, roughly taking off surplus sealant.
Then he cursed: „Dammit!”, and looked onto his hands: Forgetting to wear single use rubber gloves, his fingers and the whole hand got messed up by the black sticky wonder-glue. I cracked so hard: “Well, just go on, ignore it. A proper hand-bath in pure Acetone will help …” Finn went on to kind of “pet” the joint: With his pointing finger, wetted with dishwashing detergent beforehand, he time and again swept all along the joint, one time and another smoothing it out.

In this I could literally see how important the proper application of the masking tape really was: It would have been a total mess without tape at all, but also a pain in the ass to clean afterward if the masking-job hadn´t been done properly. I also found it interesting to watch him smoothing out the joint with his dishwashing-finger, producing a perfect seam.

The whole effort took about twenty minutes for either side and although it seemed easy, it really wasn´t: As GEKKO is a very small boat, the sidewalk deck is very narrow. Kneeling down every couple of feet or working bent down was a physical strain, also, avoiding to touch the Pantera-filled jointing with socks or trousers meant to look after himself whilst working. It was tough and so Finn was groaning every now and then, but smiled when finally having finished the job.

All solar panels are fitted: What´s up next?
„Finished!“, he triumphed and laughed, standing up on the deck and waving at me. I took pictures from standing right next to the trailer and watched him ripping – carefully! – off the masking tape, revealing a perfectly well made joint. What can I say? It just looks awesome! Finn kneeled down every now and then to meticulously re-work and adjust details, finally taking off the last piece of masking tape.

GEKKO now looks like she had been fitted with extra-large windows (and I wish I had these, like on the lately launched FIRST 27 aluminium-rigged version) but I would say that the extra-push in solar energy is way more important that adding more natural light to the interior. The side panels add to the “speedy” looks of the boat, although I must confess I regret to having chosen the tarnished-matt style instead of also going for the non-skid shiny surface as used on the central panel. It just looks better. Well, a learning for the next boat …

I do miss the Gecko-stickers on the boat which I had to remove for the side panels. So I have the idea – inspired by the masking tape – to go for a Gecko-green sticker marking the outline of the side panels just like the masking tape did, garnished with some Gecko-stickers to re-gain the positive nice stylish looks of the boat that she had before hand. My kids will surely agree that this is a very important effort.

Now, what´s up next? Well, wiring action! The coming week I will check with our electrician the best way to lead the wires from the panels to the solar charging devices (of which two more have still not arrived due to tis crazy ongoing supply-chain-apocalypse). Then, in the same step, after having connected solar panels and chargers with the big Torqeedo-battery we will install the DC/DC-energy transducer for making sure that the big battery reloads the small domestic battery. And then, I hope, this #boatenergy-article series will come to an end – of course with a “how its working”-conclusive article which I plan for the summer. Stay tuned.
You might also read these related articles:
Solar Power on Sailboats, all articles #boatenergy
Battery contradiction, what is the solution?
First impressions sailing with an all-electric boat