With temperatures well above freezing point hovering around 10 degrees Celsius, I decided it might be a good idea to finally start working on the solar power array for GEKKO again. As you may have read in the previous articles, I went for custom made solar panels by Austrian-Italian company Solbian of which I have finally ordered three panels. One big, central unit, boosting the standard 50 Wp-panel to 140 Wp and two more panels for side mounting with 60 Wp each on top. Why the whole fuzz? Well, my boat is all-out electric and I simply need photovoltaic energy to reload the battery.

Solbian panels come not only custom-made fitting exactly to the area for which they are made, they are self-adhesive too. That will make fixing the panels much more easier. Nevertheless I asked our skilled and trained boatbuilder Finn to assist me (or to put it right: Me assisting him) in affixing and installing the first panel. So here´s my account of 3 hours of work, applicating the first central solar power panel to the boat.
Preparing the surface

First step was to take off the standard 50 Wp panel delivered by the yard. This module, under normal circumstances in sunny weather, is more than sufficient to replenish the domestic power battery supplied by a standard lead-battery. The panel apparently had been glued with Sikaflex to the boat´s surface. My pledge to Finn was to try and remove it in a way that it won´t be damaged as I of course intended to re-use it.

That was easier said than done. The yard had made a good job fixating the panel. Even though we tried to get it off evenly – under all circumstances avoiding to bend and break the cells – we simply couldn´t do it. The Sikaflex fixation was as strong as ever and the panel simply did not move an inch. With a chisel, Finn tried, to slowly and gently remove the panel step by step, but apparently it didn’t pay off that much. The panel got finally removed but the individual cells, nearly each of them, got broken all over the place. Later, I noted to myself, I would gauge the power output of the panel to determine if it is really destroyed or not – judging from the looks, its gone.

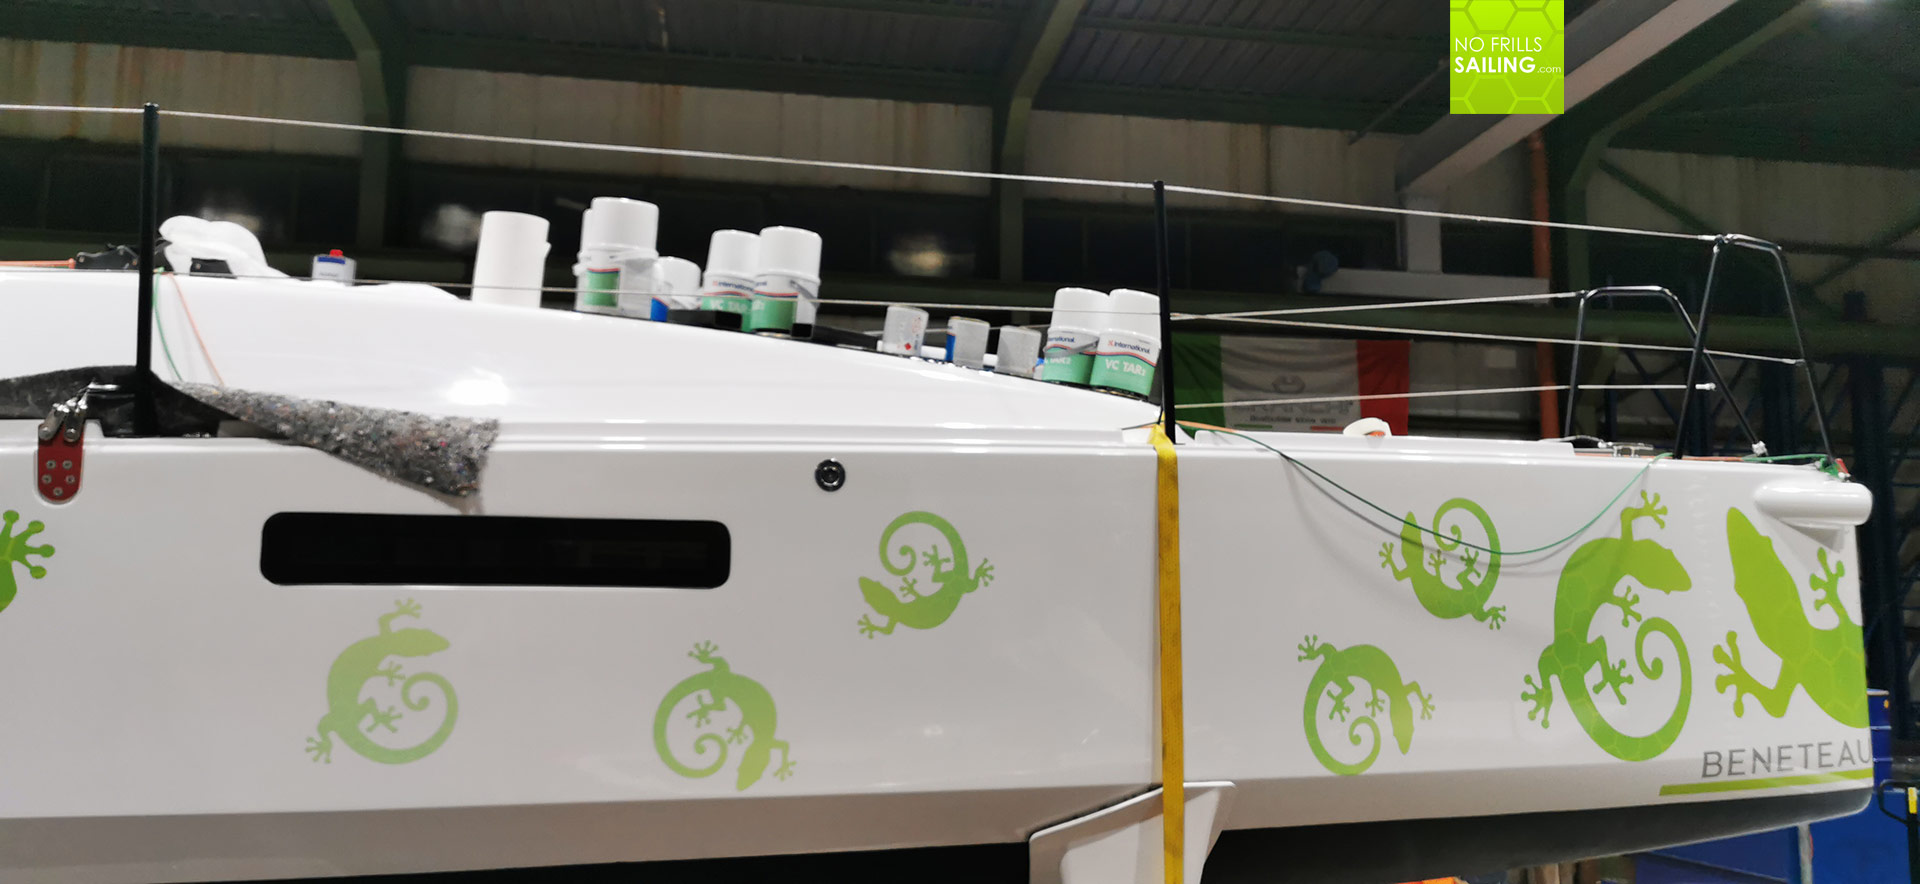
Whilst Finn was meticulously trying to remove the panel, I dedicated myself to taking off some of the Gecko-stickers on the side of the salon´s superstructure to prepare surface for the side-mounted panels. It was indeed a bit sad as these green amphibians mean so much to my kids and myself as well. Maybe I have a solution later, when the panels are installed, to again stick some of the Geckos again to the boat. Surface eventually got roughly prepared and we went on for the second step: Boring holes.
Wired!
Of course, when the sunlight hits the panels, the energy produced must reach the battery. This is done via wires. Each panel has a black and red connection, plus and minus of course, and these must be lead into the boat´s interiors. Finn prepared a handheld drilling machine with a small diameter and after pre-fixing the panels to their final position and marking their outlines, we put two Xs onto the center of the holes-to-be. Always a special feeling, drilling holes into a boat …

The sound of the drill entering the boat´s hull is … wrenching. It is similar to that one produced when sitting on a dentist´s chair starting a root canal treatment. Ear-piercingly brutal, it gave me shivers. Finn sent me down to the salon where I sat underneath the new holes, holding a plastic cap to collect dust and splinters. When the drill broke through it suddenly came with that signature smell of GRP, gelcoat and epoxy-odors, a smell I love so much. What I did not love was the fact that our first holes unfortunately missed the right position by half a centimeter and we had to re-work the holes by widening them a lot. Next time more precision in marking the centers!

After 15 minutes four of them new holes had been drilled and the cables went through seamlessly. The panels on the outside got re-positioned and we marked their outlines again. All along this outline Finn applied masking tape very precisely. Taking the panels off again, he went into the workshop and came back, fully laden with some more heavy duty tools: Time for serious business!
Absolute premise: Surface sanding
Solbian´s guide to application of the panels include the premise to prepare a smooth, clean and perfectly even surface. This of course is not apparent on GEKKO as most of the deck is covered with non-skid diamond-shaped GRP-surface. “We have to sand it down”, Finn says, covers his ears with protective gear and switches on the orbital sander. This one is a professional tool, connected to a very efficient vacuum machine that immediately takes away most of the dust.

In this, Finn works his way around the main hatch of the boat, sanding down the non-skid surface. At first, very slowly and trying to avoid to enter the masked area and damaging surface outside of the panel´s boundary. I am not a trained nor a skilled boat builder, although I tried to refit a boat for 4 years, so it is always so interesting for me to observe the pros how it´s done – so sure of his abilities, determined and efficient. What a great sight!

After another half an hour Finn finished his work, switching off the sander and the vacuum. I went on to apply Acetone after vacuuming the surface with another machine to wipe off any possible leftover dust and GRP-splinters. Now the surface was prepared and we could go on to apply the solar-panels. What an exciting day!
Glue – less is more!
On different occasions in the internet I have read before finally working on my own boat and I often read that the self-adhesive glue with which the panels arrive aren´t so efficient. Many of these recommend to work additionally with a sealant, at least around the outside edge of the panels to keep out the water. I got reassured of this technique after we took off the small panel, we discovered surprisingly much water that had accumulated underneath the panel.

So, I thought it might be a good idea to not just seal the outward seam of the panel but also to apply some surplus glue in the center of the panel. Finn recommended to have them made in a way that if water enters it would be streaming down to the outside of the panel. The preventions of those water-“pockets” underneath the panels had priority. Now, we went for Pantera instead of Sikaflex and, as we put it, even “thinking of it is sticky”, the glue´s nature, name is program. Even wearing gloves didn´t prevent our hands to get dirty.

We did have a little conversation beforehand whether I should go for white or black sealant. Finn argued that white is much, much easier to work with as wasted or spilled glue won´t do much harm, black, he said, is way harder. I on the other hand wished for black as the expansion joint between the two panels must not have a different color and, secondly, white over time will bleach and turn yellowish. Okay, then, black!

I was a bit proud and astonished of how fast we worked our way through the items list and as such I took some pictures and sent them to Solbian. Another cool thing about that company: The guys seem to be online almost all the time. Instantly, Michael Koerner, CEO or Solbian Austria/Germany wrote back: “Why so much glue? You don´t need it. On the contrary: It can be harmful!” Oh boy, what had we done? Five minutes later, the phone rang: Michael!

He explained that, if the glue in between the outer seams won´t be pressed hard enough to form just a little, little, thin layer, upon hardening, could damage the cells. “If there is a difference in elevation within the panel and you walk on it, conducting paths of the cells could break. That´s not good.” Nope, indeed, that is not good. He suggested, now that it´s on, to continuously walk on the panels to press them as hard and firm as I could. Said and done!

Removing the protective foil we placed the panel on the boat´s deck. First the small one, which went on just fine. The second, bigger one, was a bit more tricky but we made it. Just minor corrections and I began walking on my new walk-on solar panels. I saw some of the black sealant squeezing out between the panel and the boat, which was a good sign. As Finn prepared himself for the “most annoying part” of the job, as he called it, I went on walking on the panels.
Finetuning the details
We first checked if the masking tape around the solar panels on the outline of them was still intact and renewed it where necessary. Then we began to attach masking tape to the edge of the panels themselves, which was a tedious work again: If not done properly and spilled with black sealant, it could not only look shitty but also account for some shading, which, one by one, could account for some loss of wattage.
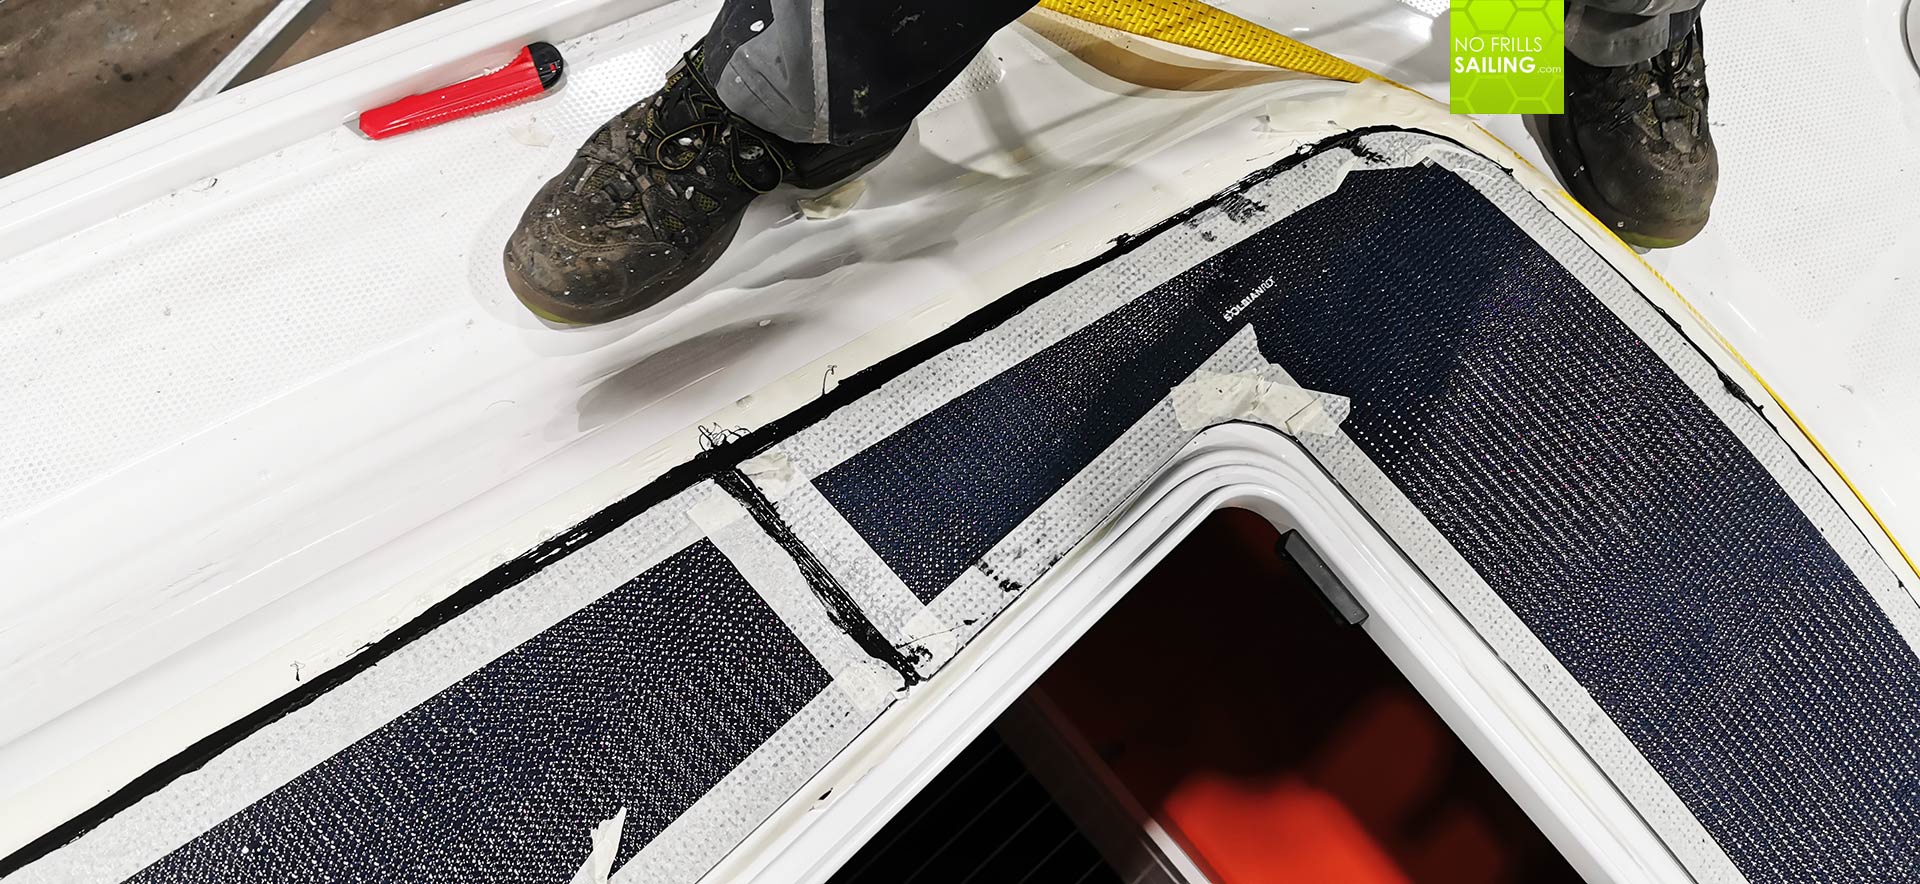
I was the one to press Pantera in between the joints and the seams, Finn, two layers of new rubber gloves on his hand, started to form the seam. In total he went three times over each joint. First with bare rubber gloves and his pointing finger – stretching out the black sealant and make for one continuous seam, taking off the surplus glue. Then, new gloves on, he dipped his printing finger in simple dishwashing detergent and went over the seams two times more, producing a one flat, nice and perfect black joint.

A bit tricky was making the joints behind the main escape hatch because the hinges were so big that it was first nearly impossible to bring the right amount of sealant in between panel and boat. And second, when applied (in raw numbers), all of our fingers turned out to be too thick to really make a nice seam. “Anyways, I said, don´t mind: This is an area nobody will see or take a look at.” And when I peered into the said area, honestly, I couldn´t spot a difference.

After some more minutes of final detail works, Finn stood up on deck and said: “That´s it, Lars! Let´s remove the masking tape, clean the area and get some weights.” Tape by tape, meter by meter I peeled it off and what I saw was wonderful: Flawlessly handcrafted, the panel and its seams looked absolutely awesome. Fantastic work, Finn: Thanks so much! I couldn´t take my eyes off of it, liking the outcome very much.

For the coming two days we´ve had placed all sorts of heavy canisters and cans of paint and antifouling on cardboard paper, resuming a certain surface pressure to help both Pantera an the adhesive on the solar panel bonding with the GRP-surface. Glad that it worked out so well, we finally climbed off the boat, cleaned the workshop and switched off the lights. A better part of the project done, absolutely motivated to resume work as soon as possible.

Next steps for the Solbian solar array
For the coming days the to-do list is pretty easy: I will have to attach the two side-panels too. This will be a level up because this time gravity will work against me. As the surface is upright I need to come up with an idea to hold the panels in place to fit exactly the position desired as well as a bright flash of inspiration of how to inflict pressure on the panels to help bonding as well. But there´s some time in between: For now, we have Christmas.
After that, the electricians will take over. Wiring of the panels to the solar charge controllers (of which the boat has now three devices) will be a major task. How can we have the wires in the naked interior of the boat without spoiling all-too much of the looks? Also, from the charge controllers to the big Torqeedo LiIon-battery. Also, via DC/DC transformer to the smaller domestic battery, finally solving GEKKOs battery contradiction. But, for now, as you know me: One step at a time …
You may be interested in these articles too:
All solar-related articles of this series by clicking the hashtag #boatenergy
Almost one year ago: I have made my decision for a new boat
My first 500 miles on the First 27 SE