As better looking synthetic deck-materials increase the gradual phasing out of real teak decks in boatbuilding, more and more vendors offer their services to prettify ordinary GRP-decks of plastic boats. The kingplank, central and most prominent part of any boat´s forward deck sections, plays a decisive role in this matter.
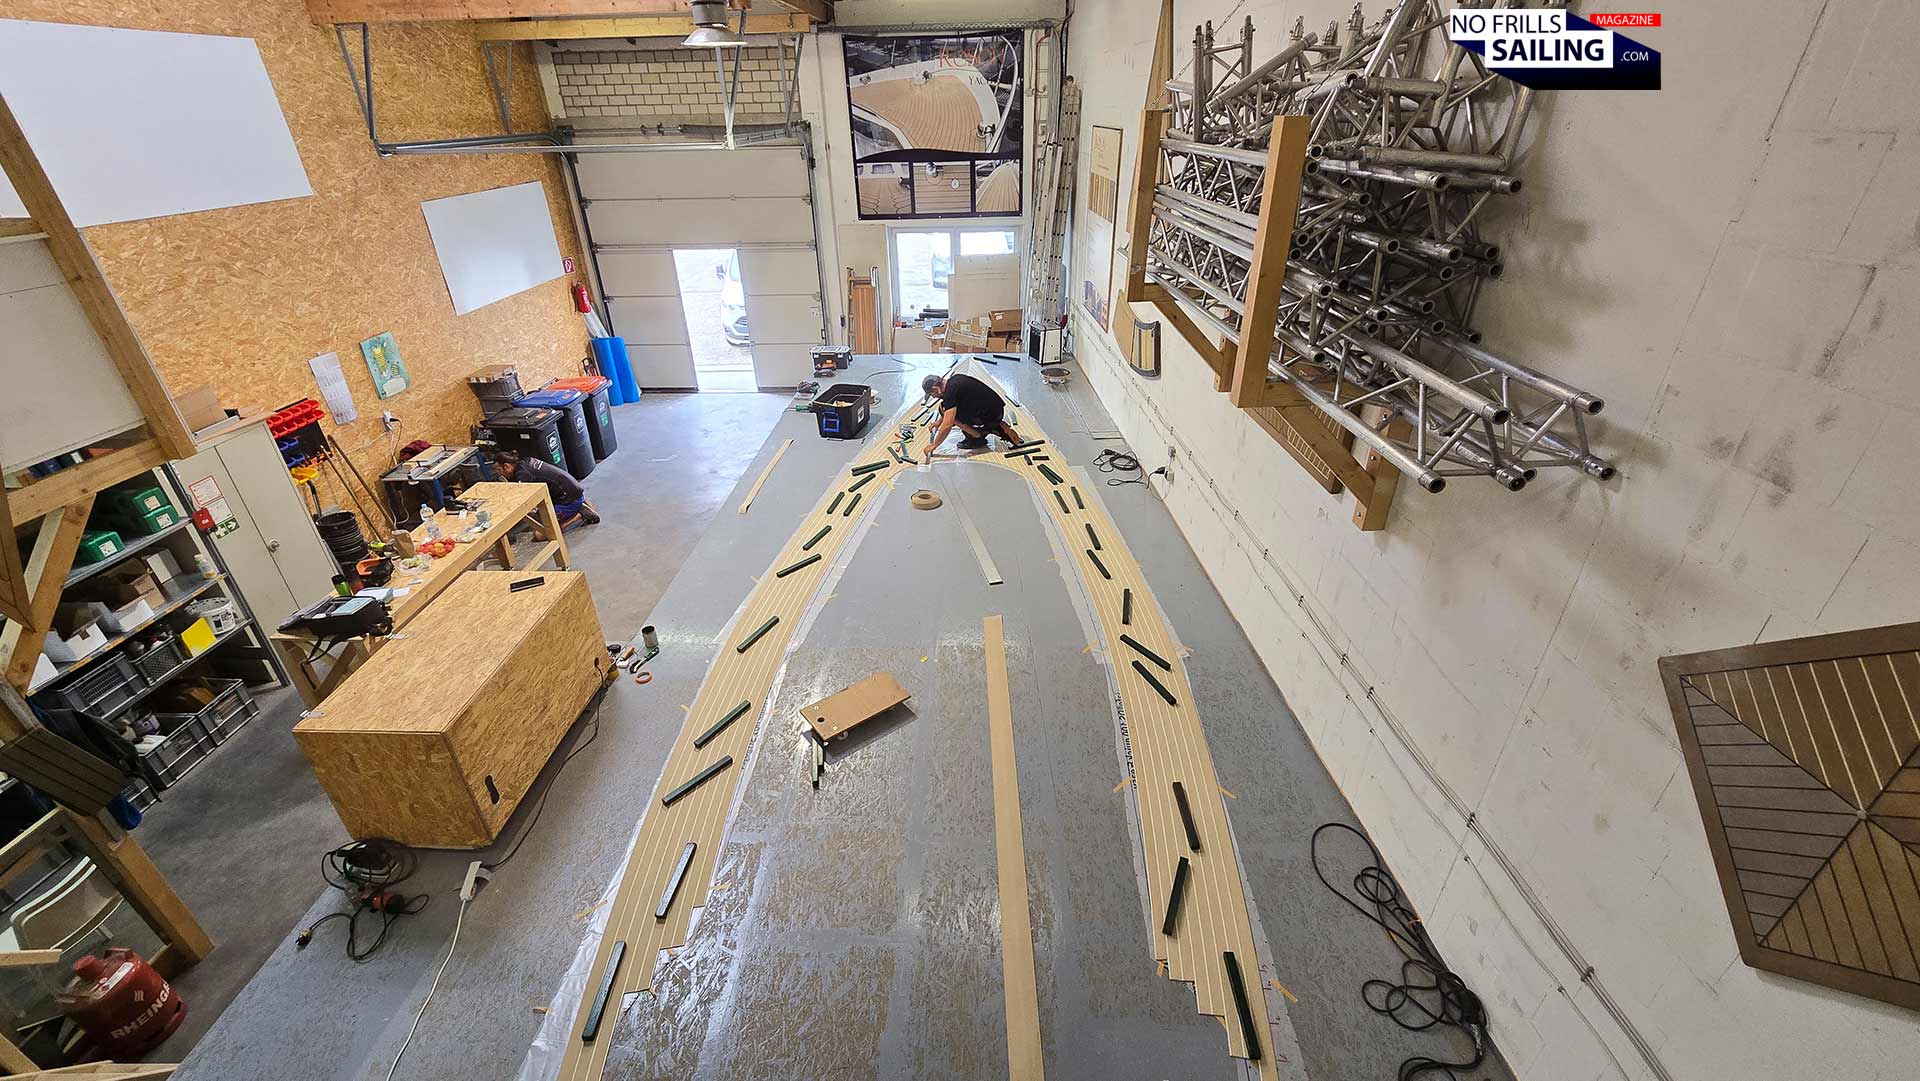
So here we are, a few dozen kilometers north of Hamburg, just an hour´s drive from my home town of Luebeck. These are the headquarters of Rosch Yachts, one of Germany´s few and well renowned companies offering high class synthetic decks. Rosch, aka Ralph Schiecke, is a staple of Germany´s craftsmen offering new faux teak deckings, bathing platforms and any other boat parts in need of a new spiced up look.
This is one half of my deck
I know Ralph since my very first days as a new boat owner: Actually he was one of the first external suppliers I contacted right after I had bought my first boat, the King´s Cruiser 33 roughly 10 years ago. My then-project to hire him for the refit of OLIVIAs deck never came to a satisfactory end (just like so many do) but now with my new boat in the final months of her building, it was a no-brainer giving him a call and ask him if he´d be in for the Omega 42 deck. So, here we are: Let´s check out how far he has come.
Why the central plank of your deck is so important
Advertisement
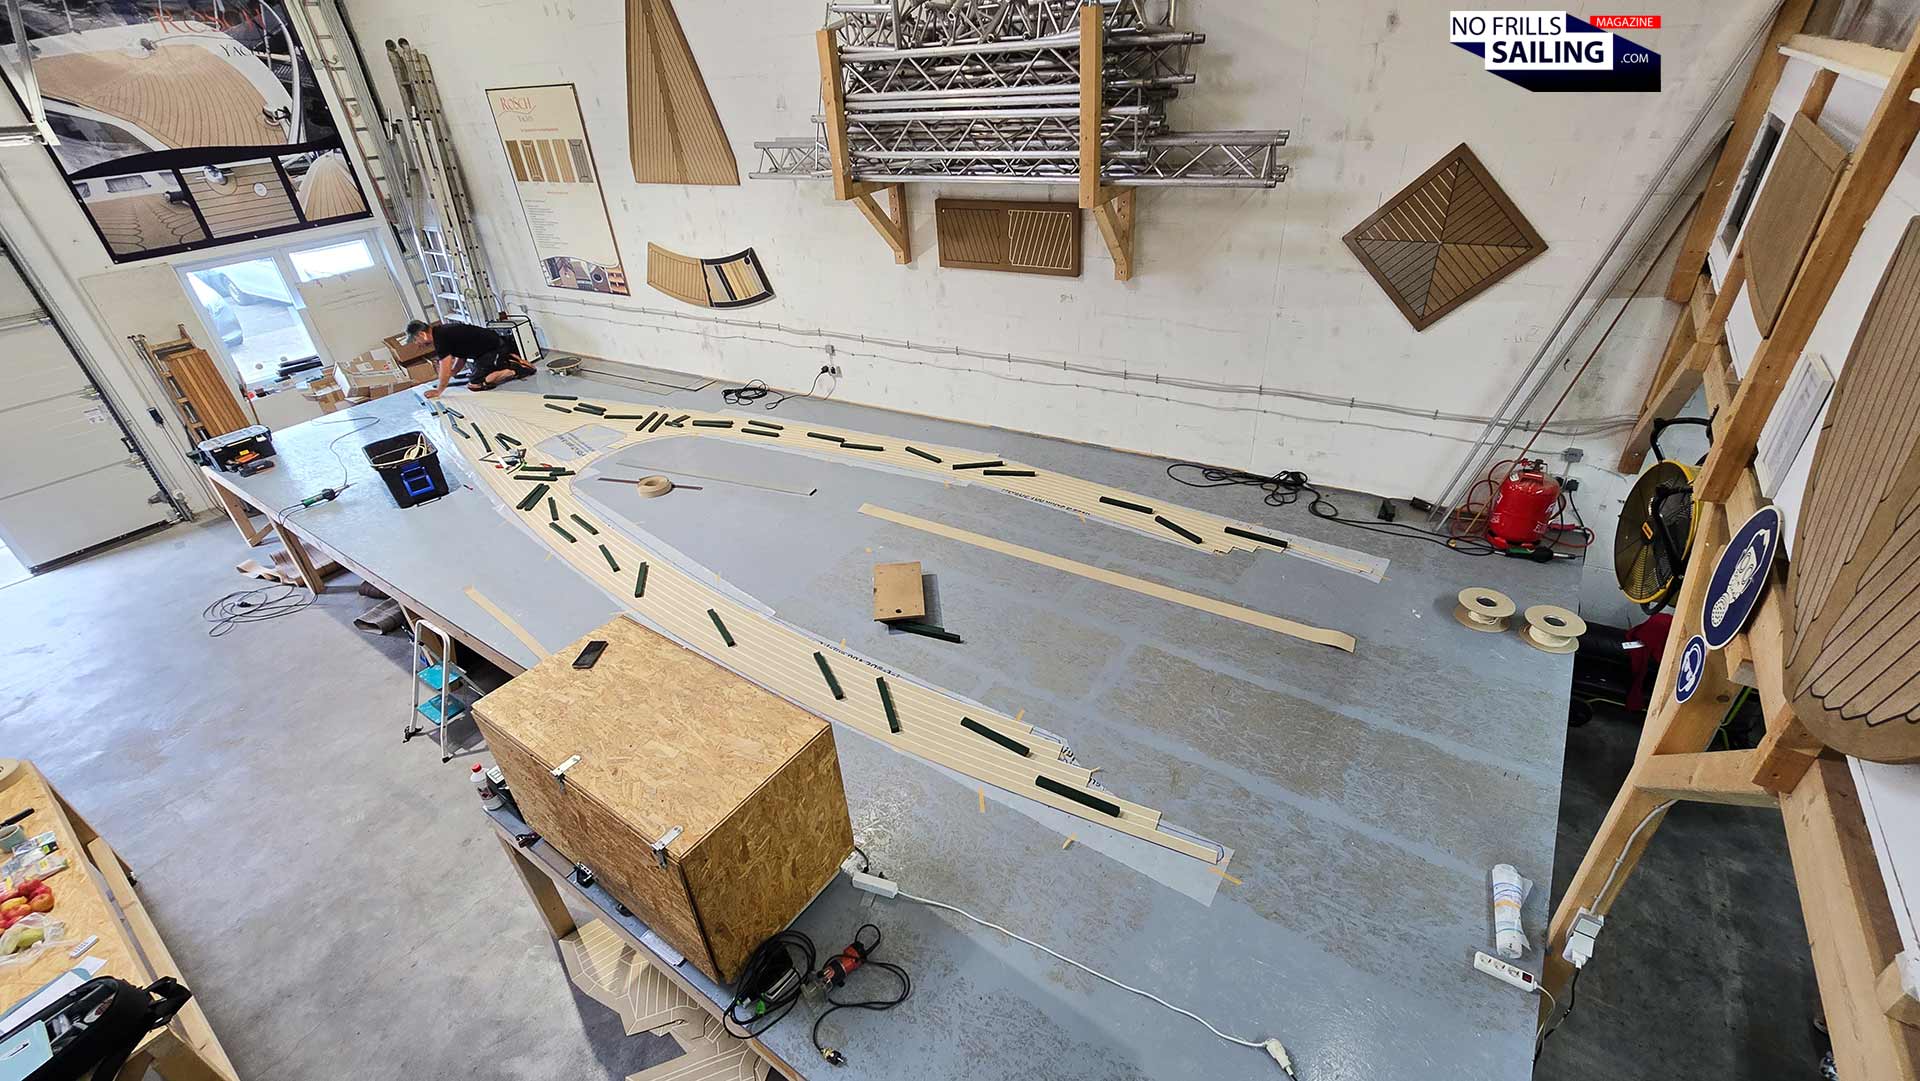
Arriving at his workshop I see the bigger part of the Omega deck on the worktop. A few weeks ago Ralph had visited the boat in the shed, I´ve published a very detailed article on the meticulous efforts which went into making the 1:1 gauge templates of the individual parts of the yacht which will receive a faux teak deck surface. Make sure you check this one out before reading any further to fully grasp and appreciate the craftsmanship that goes into such a deck.
What´s in the middle?
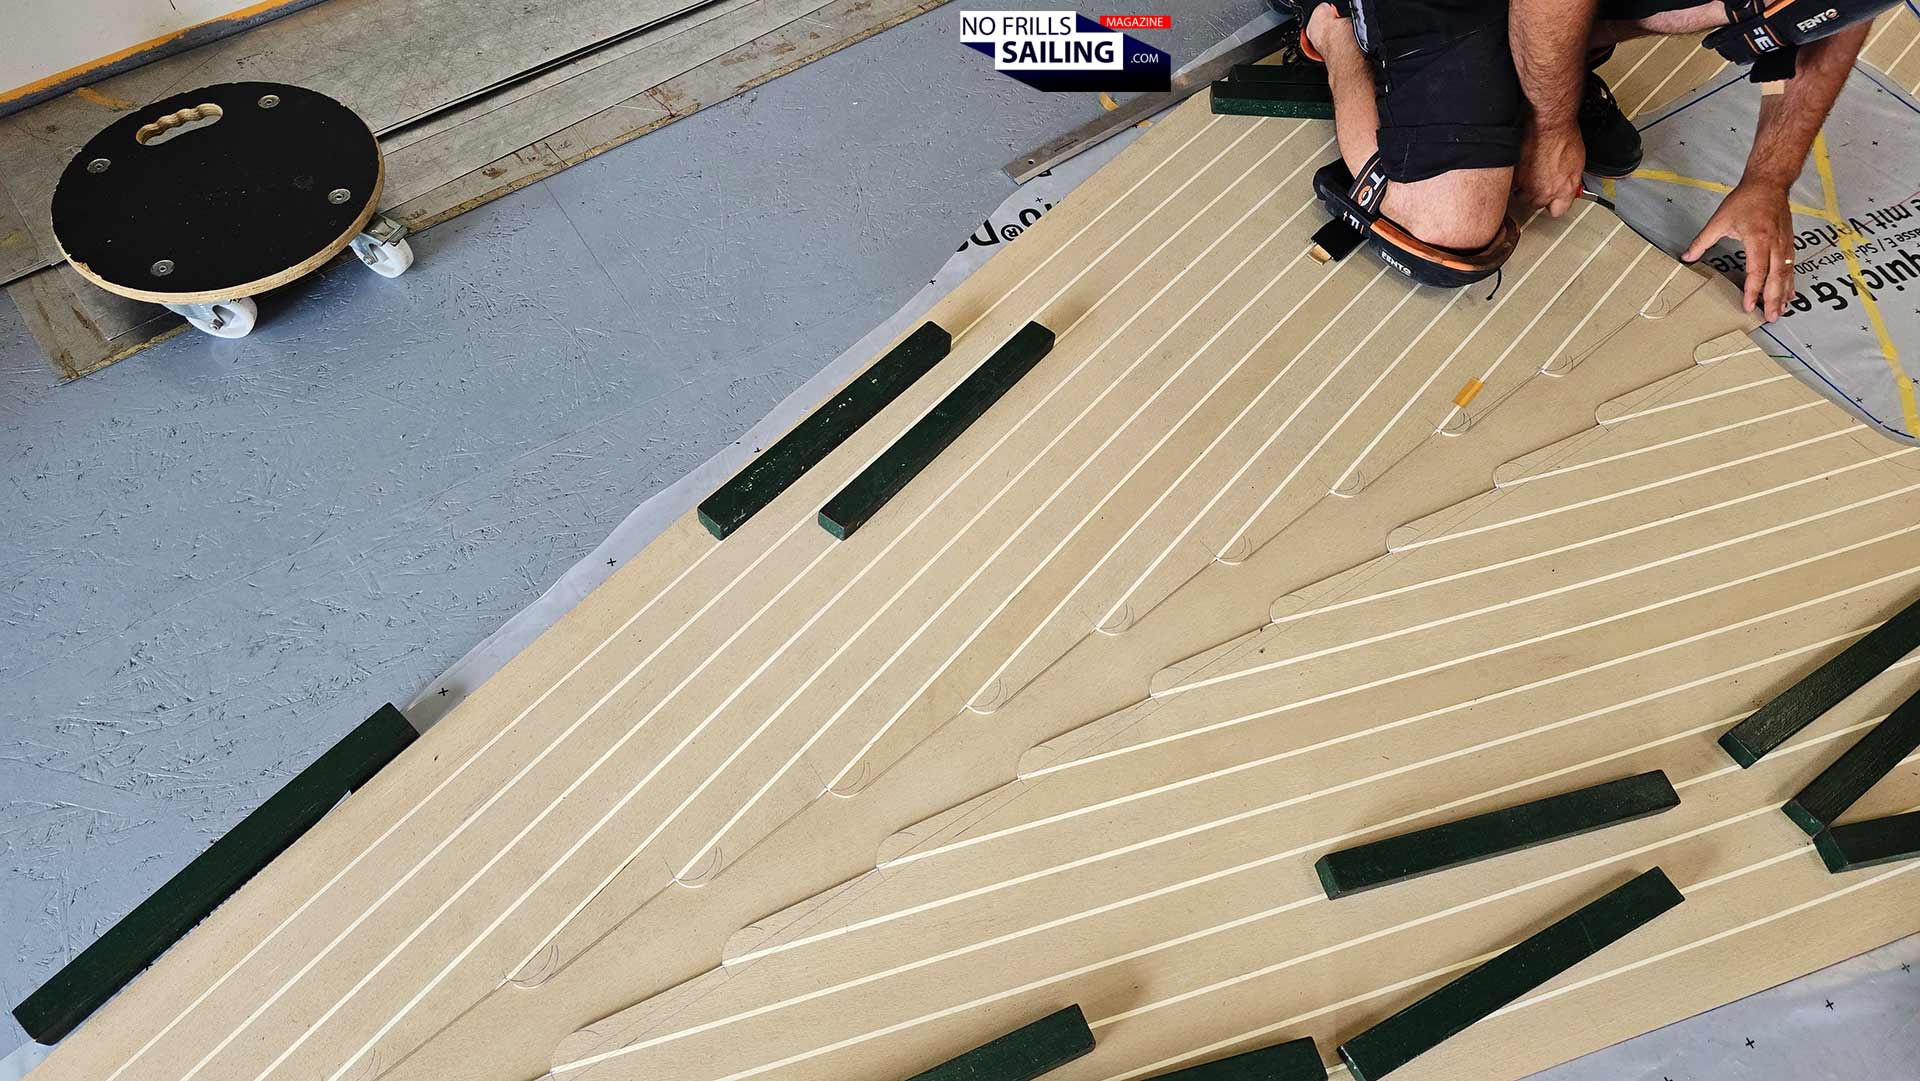
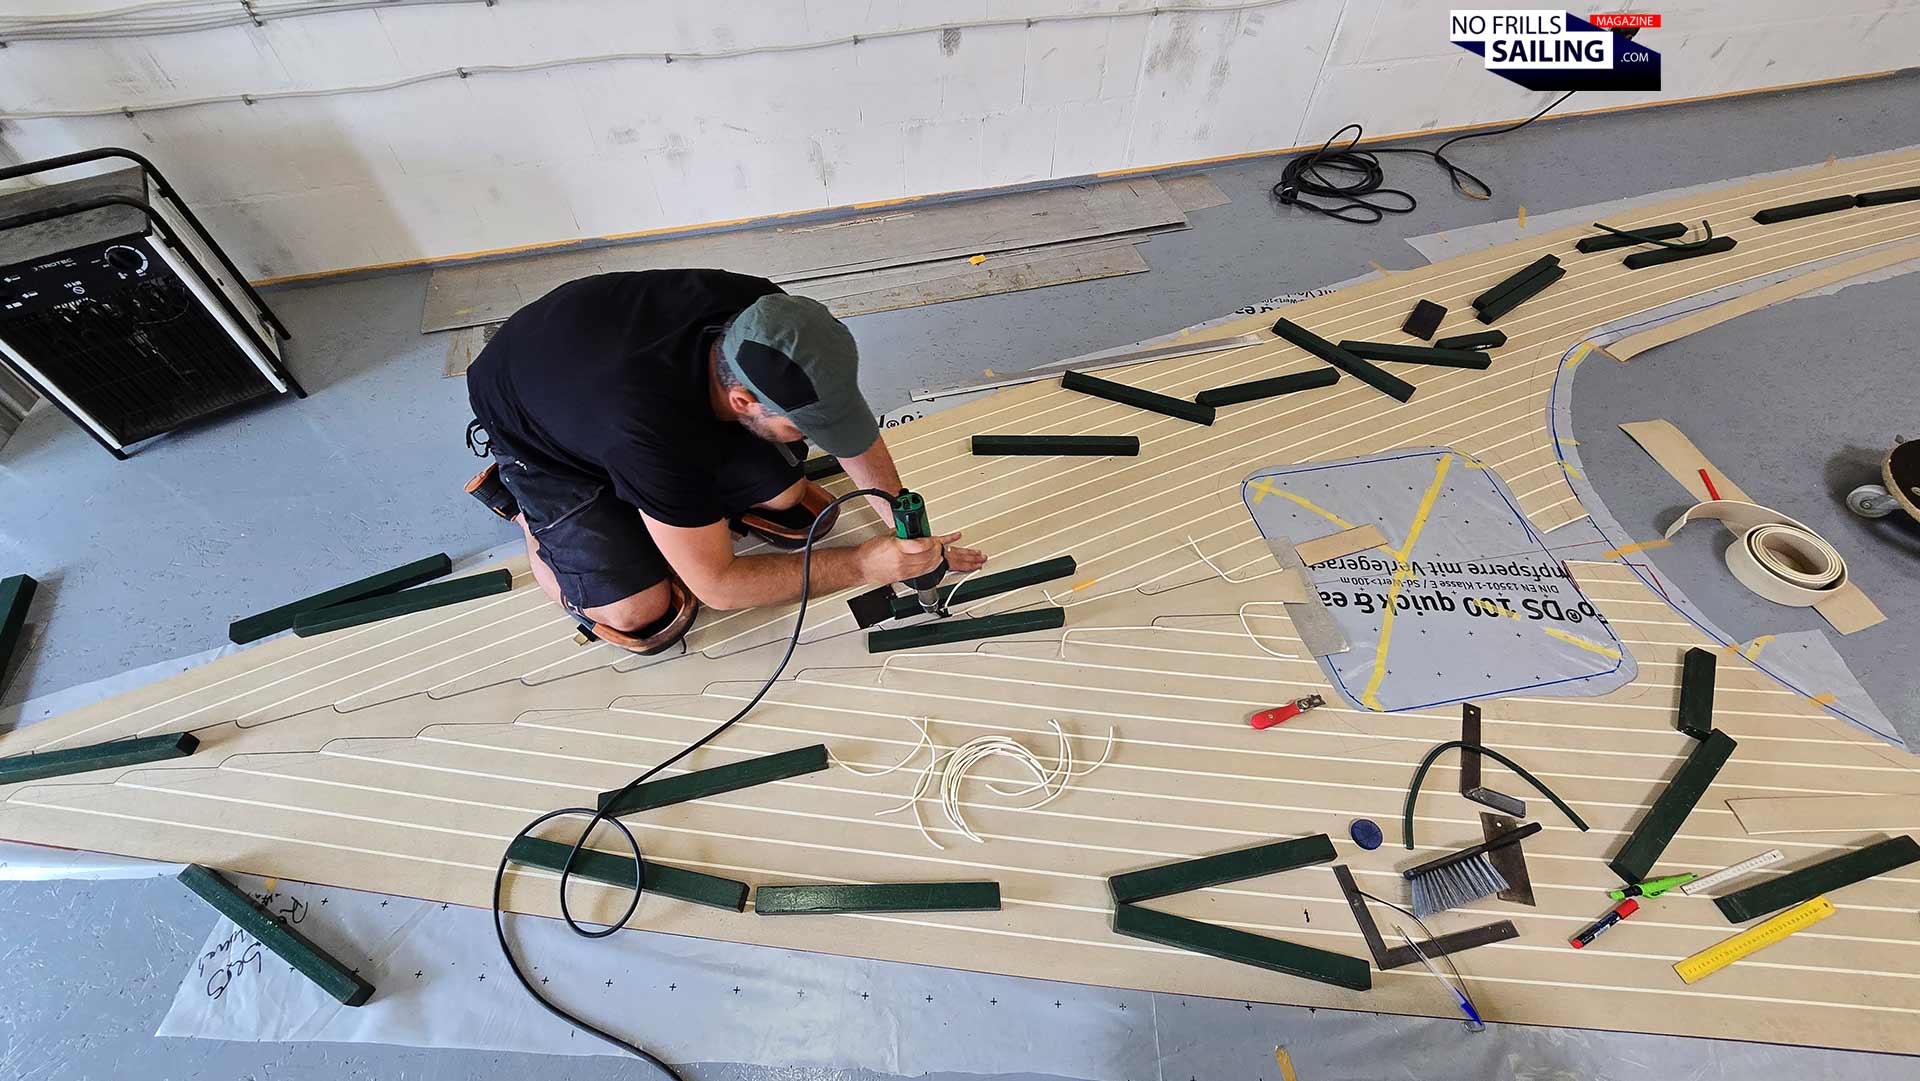
Ralph and his deck specialist, a Hungarian named Szolt, had already welded together the individual “planks” which make the bulk of the deck itself. I arrived today to witness the making of the so-called “kingplank” (sometimes it is also written apart, “king plank”), as this is the single most deciding detail when it comes to yacht decks. It´s the “cherry on top”, if you will, the tour de force for any serious craftsman who is into boat decks. But what makes it so special?
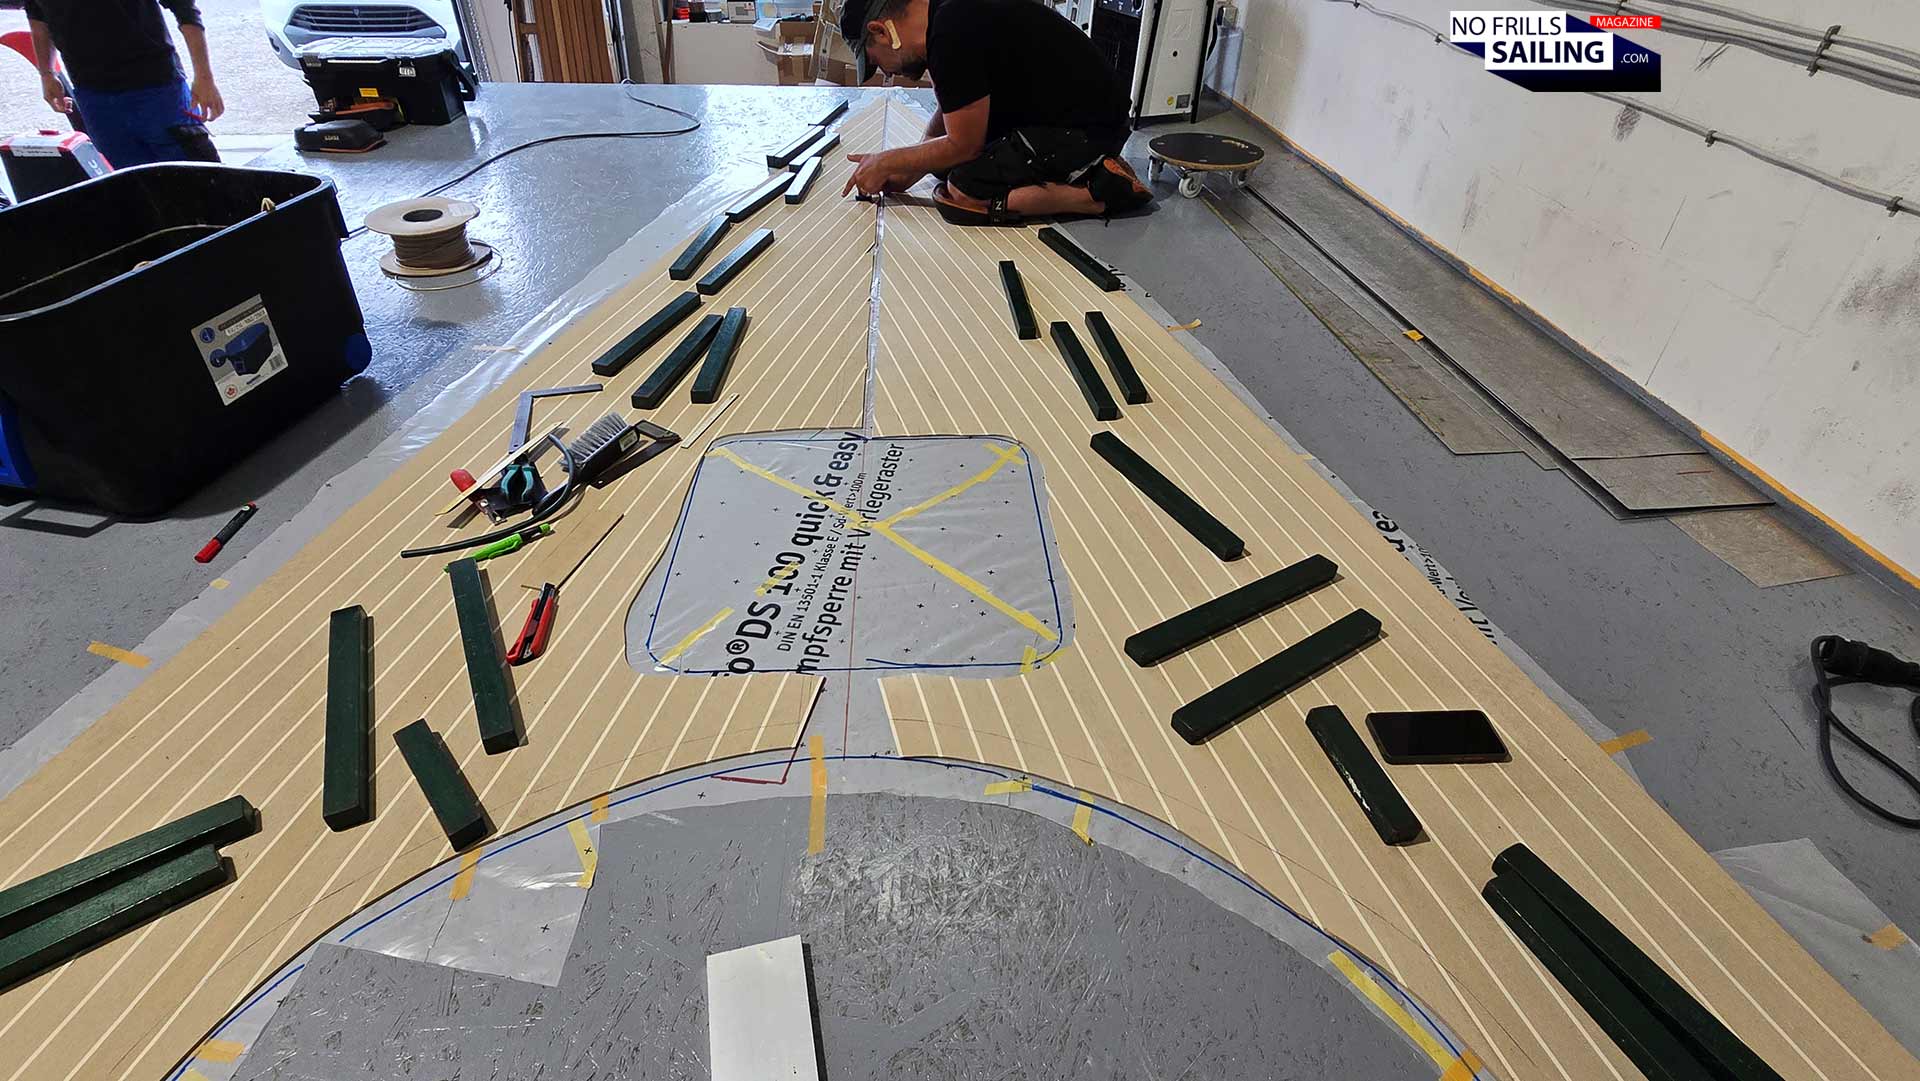
This is where the kingplank has to go
Kingplanks in classic shipbuilding, I mean the real classic, the Golden Age of square rigged sailing ships, were very important for ship´s decks: These central planks acted as a string central spine for the ships, reinforcing the deck´s structural integrity, where stresses from the rigging, the anchors and capstans and the bowsprits where the highest. These helped to tie together the deck as a whole and distributed loads into the ship´s structure. In order to do so, kingplanks were usually thicker and also wider as the ordinary deck planks, a detail that is important still nowadays.
Kingplanks in shipbuilding
Another reason for shipwrights inventing the shape of the kingplank was the curved nature of any ship´s deck. Even I got it unconsciously wrong when I sketched up my ideas for the Omega´s deck when the project started: Sketching the deck planks along the longitudinal axis of the yacht (see the picture here) which is of course utterly wrong! The deck planks follow the curved shape of a ships outside edge. In order to make the joints, the ends of the planks needed a special shape.
Marking the outlines
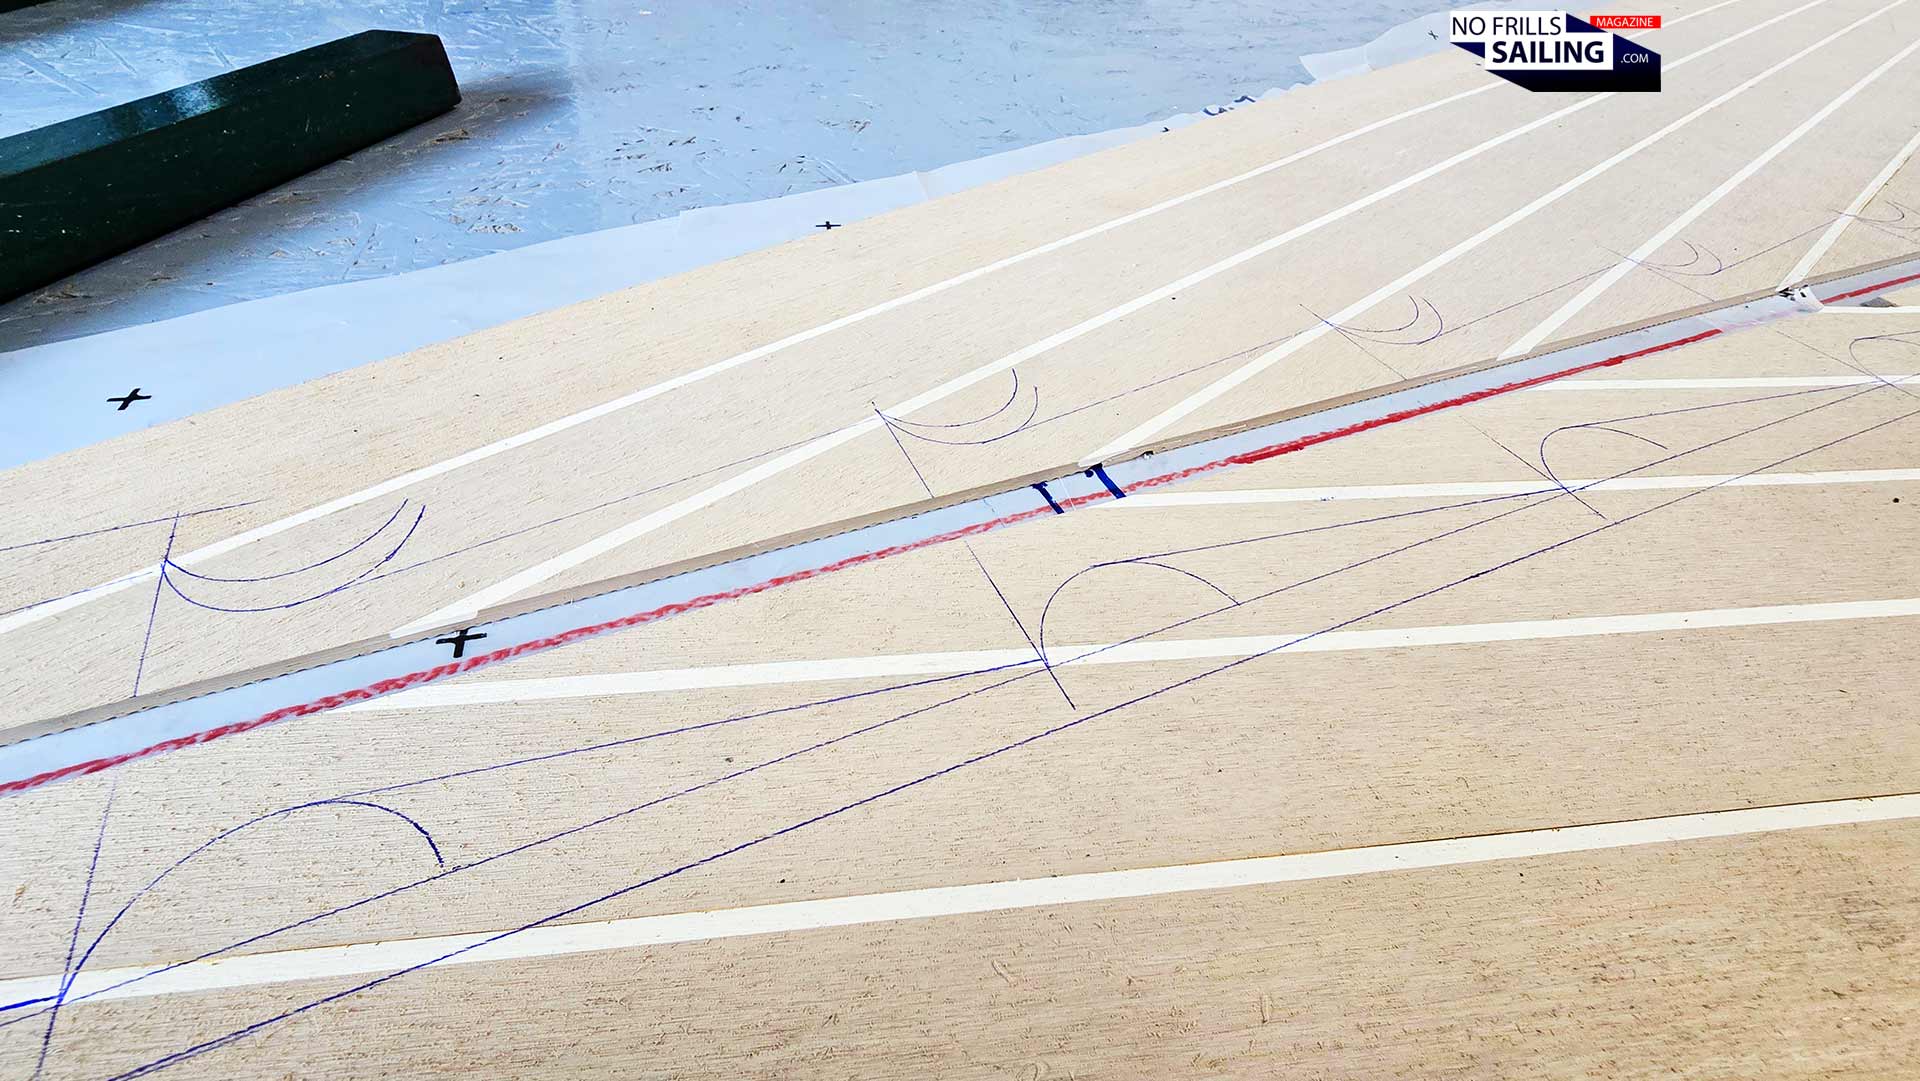
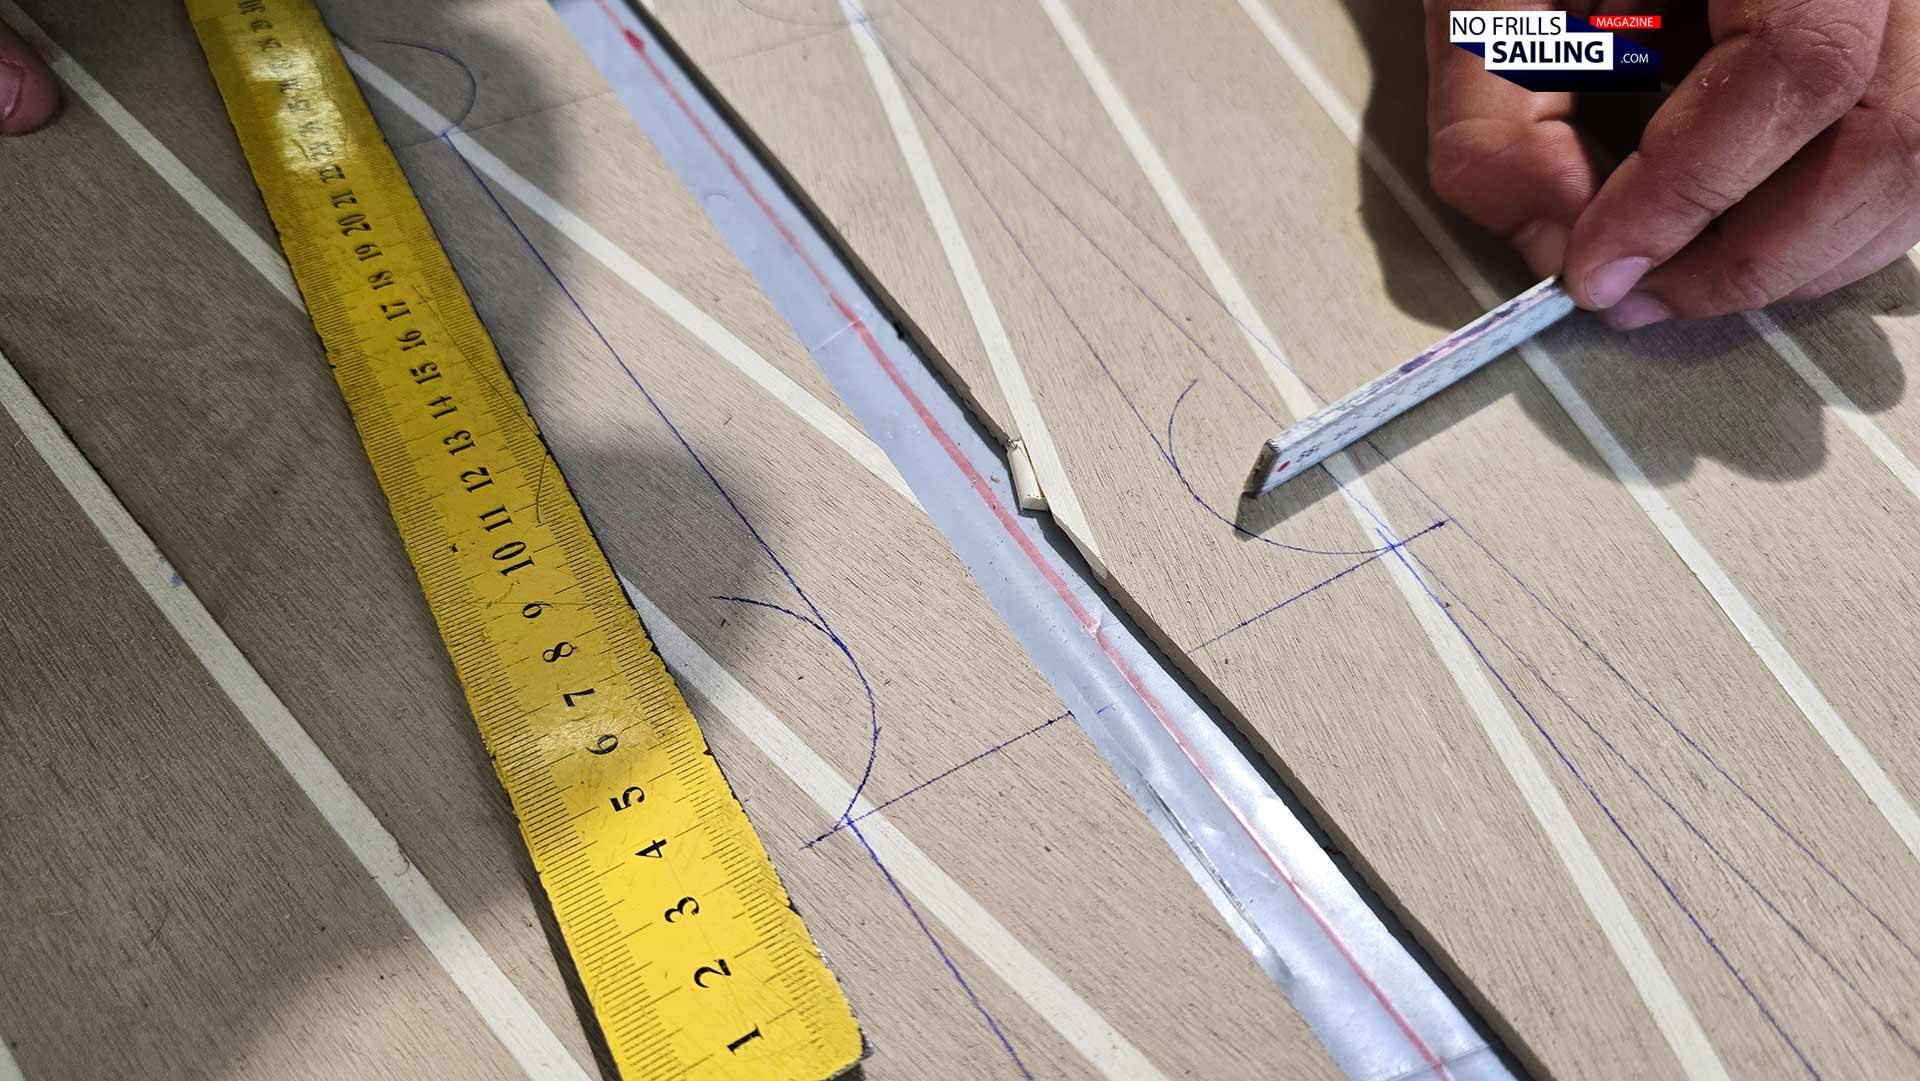
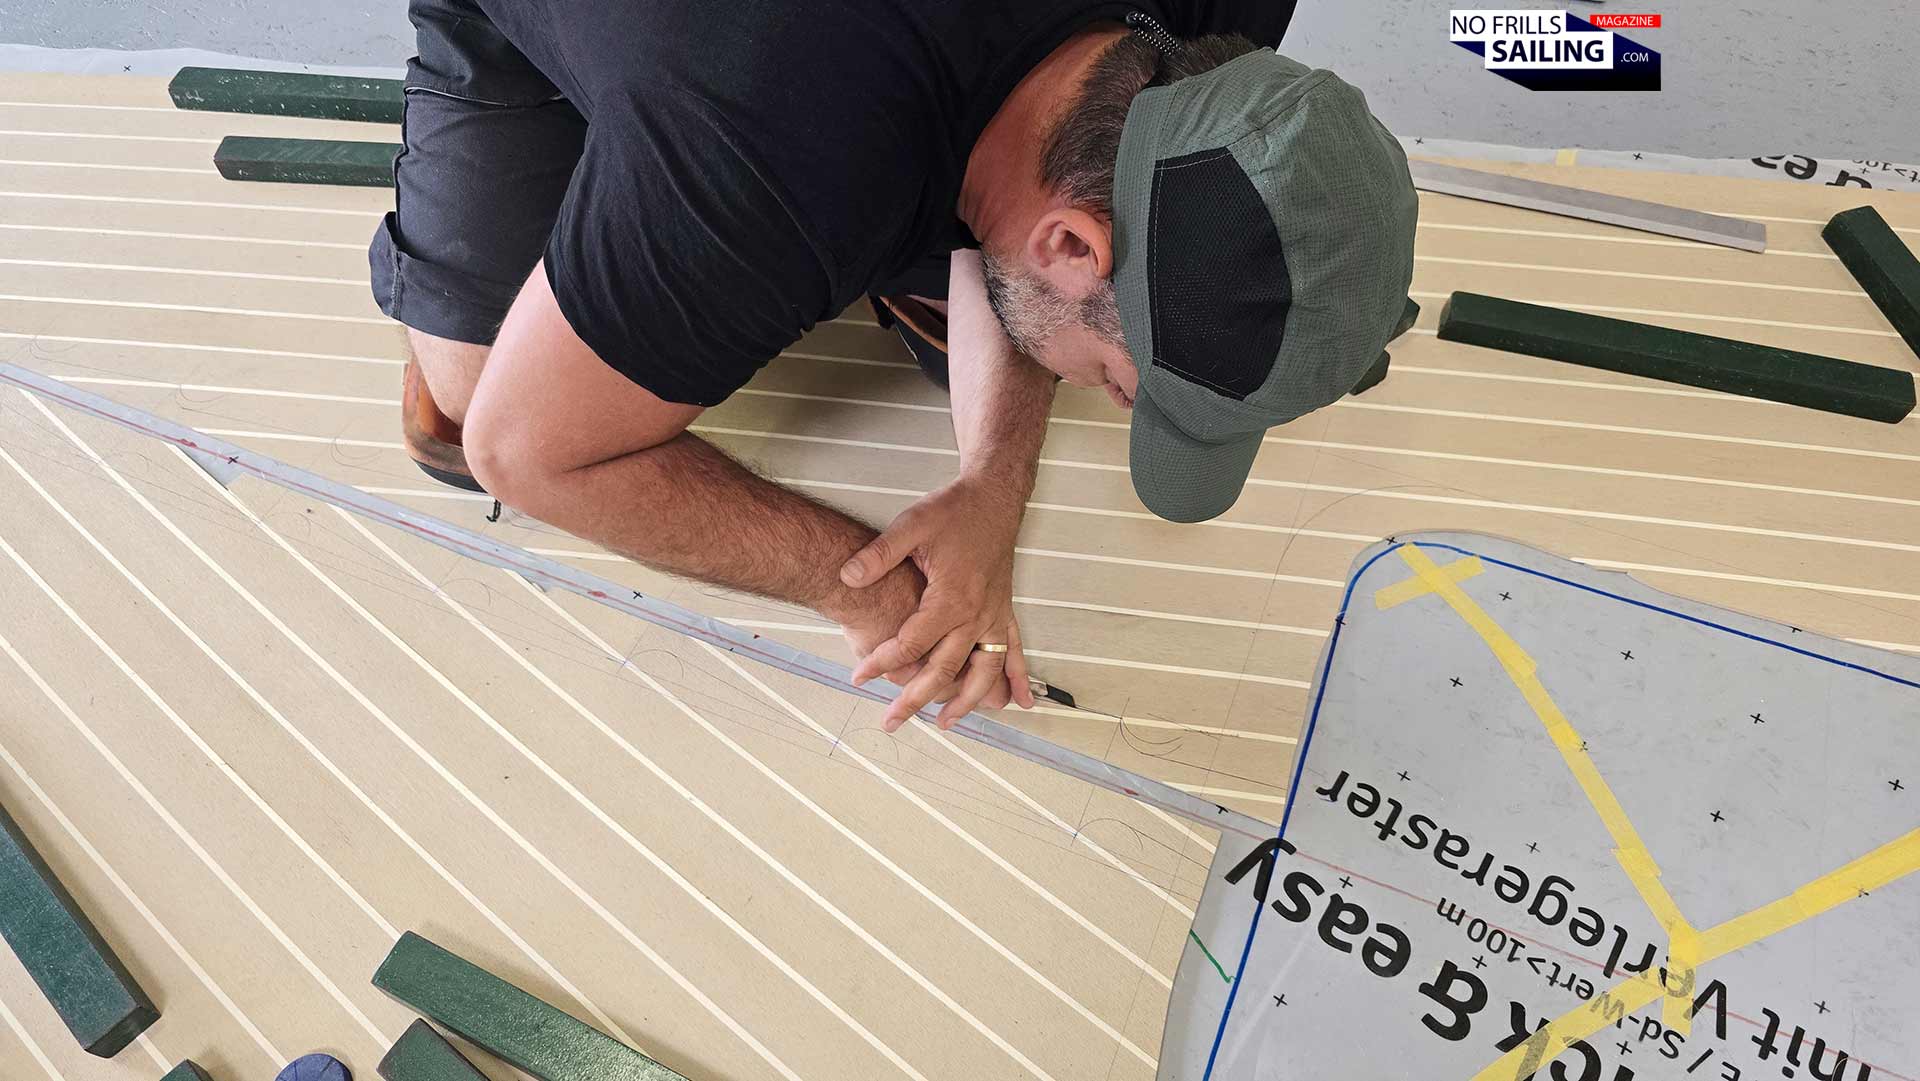
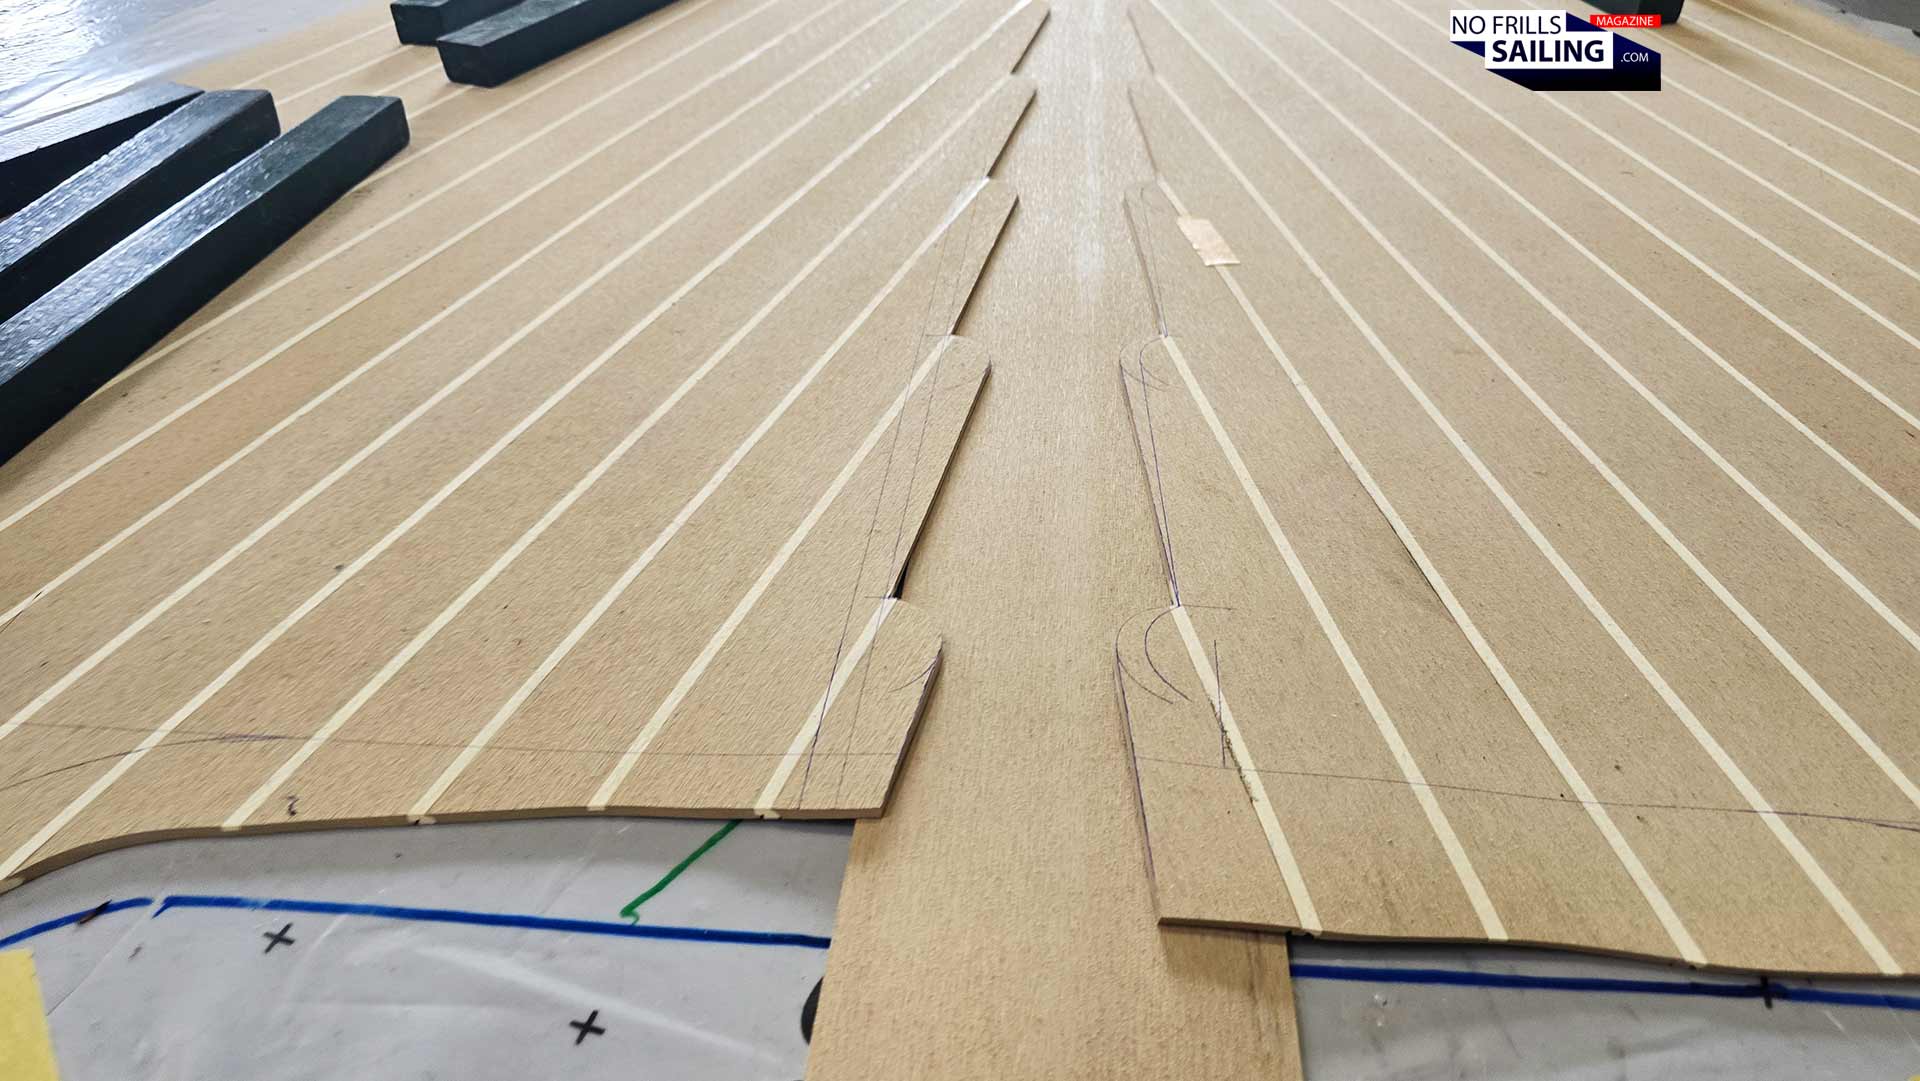
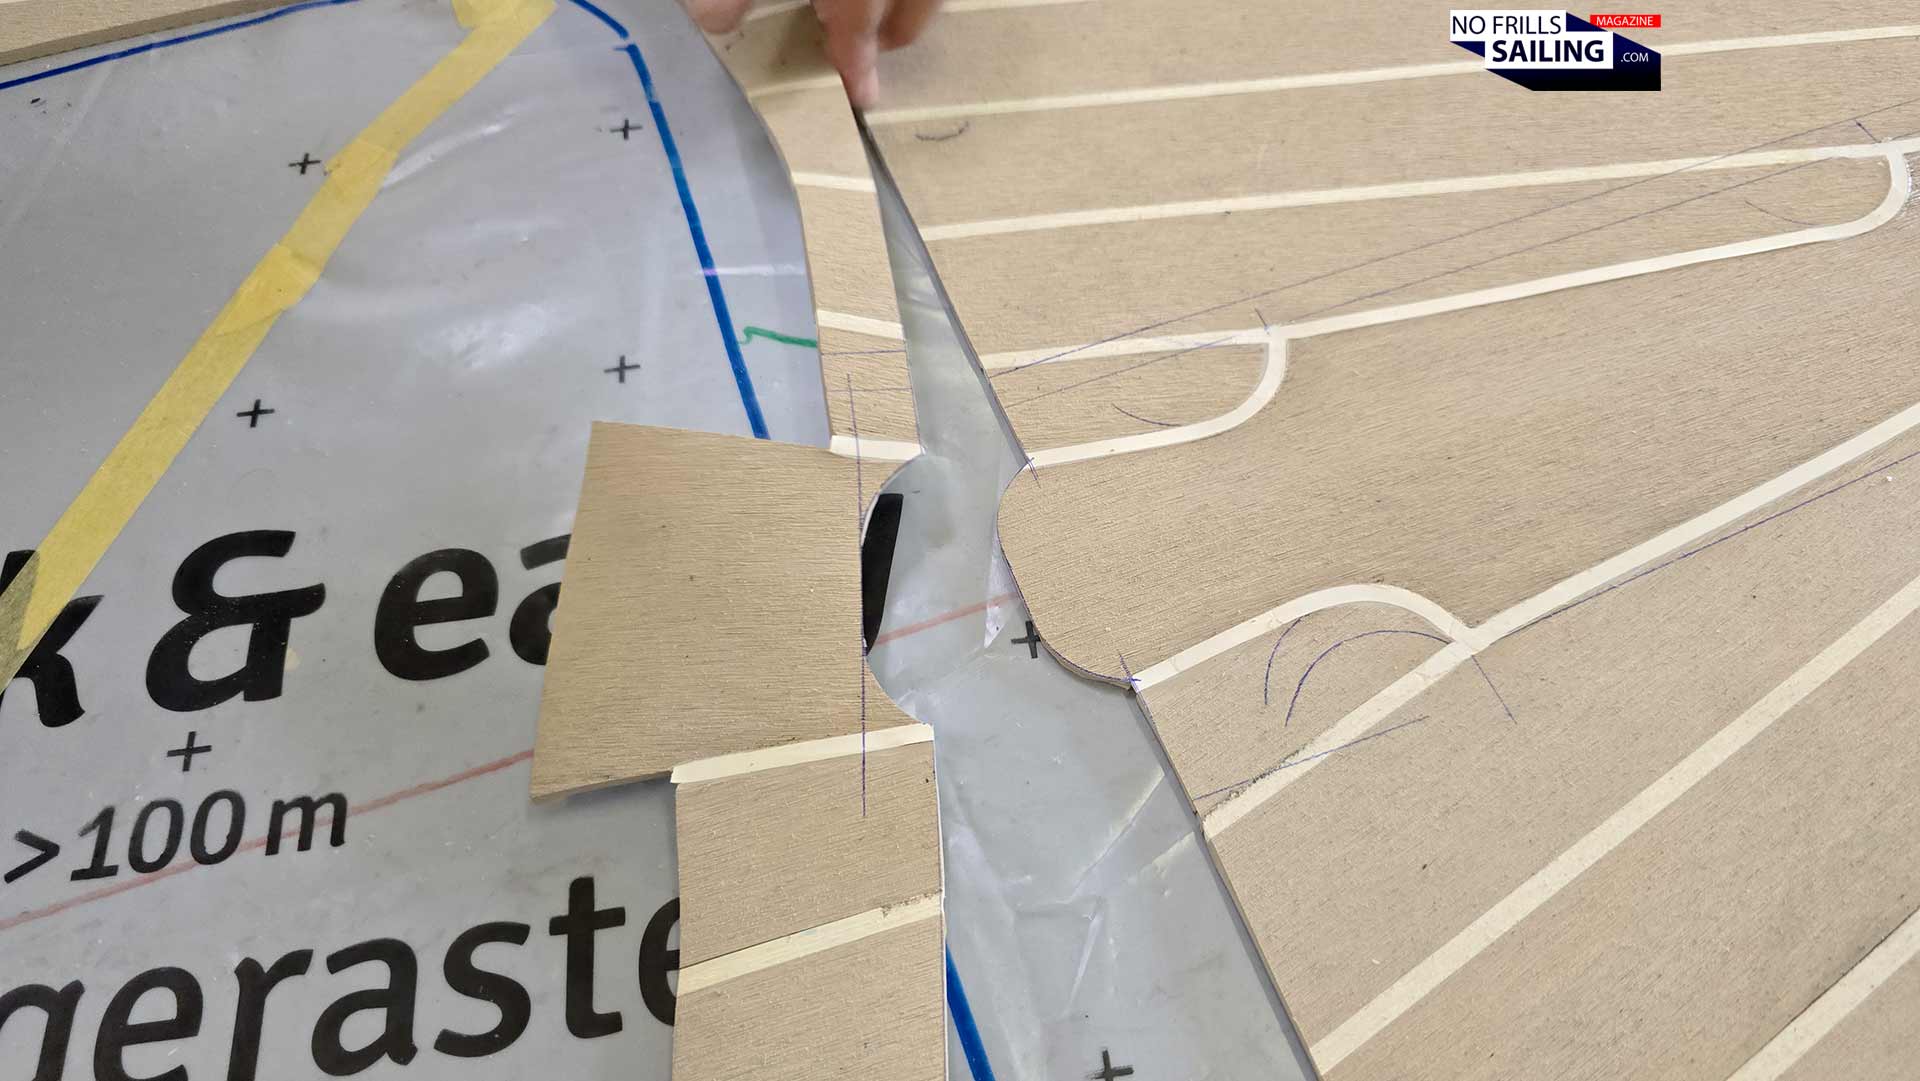
Why? Because if a ship´s joiner would just cut the planks to form pointy ends, these would splinter easily, even break and – most important – never form a force-fit joint with the central plank. This special shape at the ends of the deck planks is called “butted” or “nibbed”. And this is what Zsolti, as he is nicknamed, was starting to do when I arrived. These nibbings follow a century old tradition of how these should look like. Zsolti started with semi-circles along a central longitudinal reference line, running through from bow to end.
Accuracy is paramount
The semi-circles met with another marking from the start of the butted end of each deck plank. In this, a very interesting dance of markings began to form before my eyes. Zsolti, as Ralph told me, was a specialist in this area: It took him no twenty minutes until the outlines of the kingplank had been fully marked on the deck. Apparently, in my head the first big learning of today´s visit at Rosch Yachts had formed: This is 100% pure handcraft! Up until now I had thought that PVC-teak decking and “fake” teak means … well, it means something like “already made”, finished, like a sticker. Ready to put on. Well, nope! As it turns out, there isn´t much difference to working with real timber.
“There are no templates!”
Ralph smiles when I told him about my excitement. That´s a real problem for him, because many boat owners think that way. They believe that the fact that these synthetic decks are made from “ordinary” PVC – plastic, in the end – makes them cheap and easy as well. But it isn´t! There aren´t any templates or ready-made prefab parts he can magically pull out of his storage room. The kingplank, as is the decking itself and all of the margin boards, are custom made – each single one made to custom fit the boat´s shape.
Hard work cutting the deck
So behold: If you think opting for synthetic deck material instead of real teak will save you money, that´s a fallacy. It will, surely, as the good, marine-grade real teak from Burma isn´t legally available anymore due to sanctions (at least for the EU), PVC-decks and other substitute synthetic materials are indeed cheaper, but only to a certain extend. In essence, making a fake teak deck and making a deck from real teak requires the same steps and almost the same efforts. Both is 100% handcraft.
Removing the offcut
A proper kingplank, as well as nicely done covering boards, requires a lot of talent and know-how. Spoiler: It will take experienced Szolt almost three hours of carefully craft out the kingplank for my boat. Yes, you can have a cheap PVC-deck, but it will certainly also look like this. For a classic yacht design like my Omega 42, it was of no question that I would go for a classy, beautiful kingplank! Even if it meant to be spending some more budget. Many modern cruising yachts have a central kingplank nowadays, but a simple straight one (see picture here). I don´t know, but this does neither look modern nor good. It´s more like a faint, uncomplete and uncapable descendent from the real thing.
… can you see it?
Which brings us to the reason why kingplanks survived in boatbuilding even after the Golden Ages of square rigged ships had long passed. There is no practical need for kingplanks anymore, yet sailboats still sport them. And many owners pride themselves sporting most beautiful specimen of those kingplanks on their yachts. It´s a must, an aesthetic staple for any nice yacht´s bow section and even poop deck. And at the end of this article, when it is finished, you will hopefully understand why.
Experience, visual judgement and a sense for a yacht´s beauty
After having hand-drawn the outline of the kingplank onto the deck planks, Szolti for many, many times got up and took a few steps back. Looking at his work, he regularly checked from a bigger distance if his work turned out to be looking good. Ralph, the boss, frequently joined in to double-check as well. At last, it´s a handcraft job, requiring a lot of visual judgement complimenting mathematical accuracy.
That´s the shape we want!
This is needed because even if a shipyard is trying hardest as it could, boats are never really 100% symmetrical! Even nowadays when the molds in which boats are laminated are high-precision CNC-milled by industrial grade robots, it´s still a work of handcraft in the end. Hence: Never really symmetric. Even a fraction of a millimeter in deviation at the bow could mean that a full centimeter of surplus arrives back at the stern. This is why Szolti is checking so many times from afar if his work still matches the overall looks.
Beautiful, right?
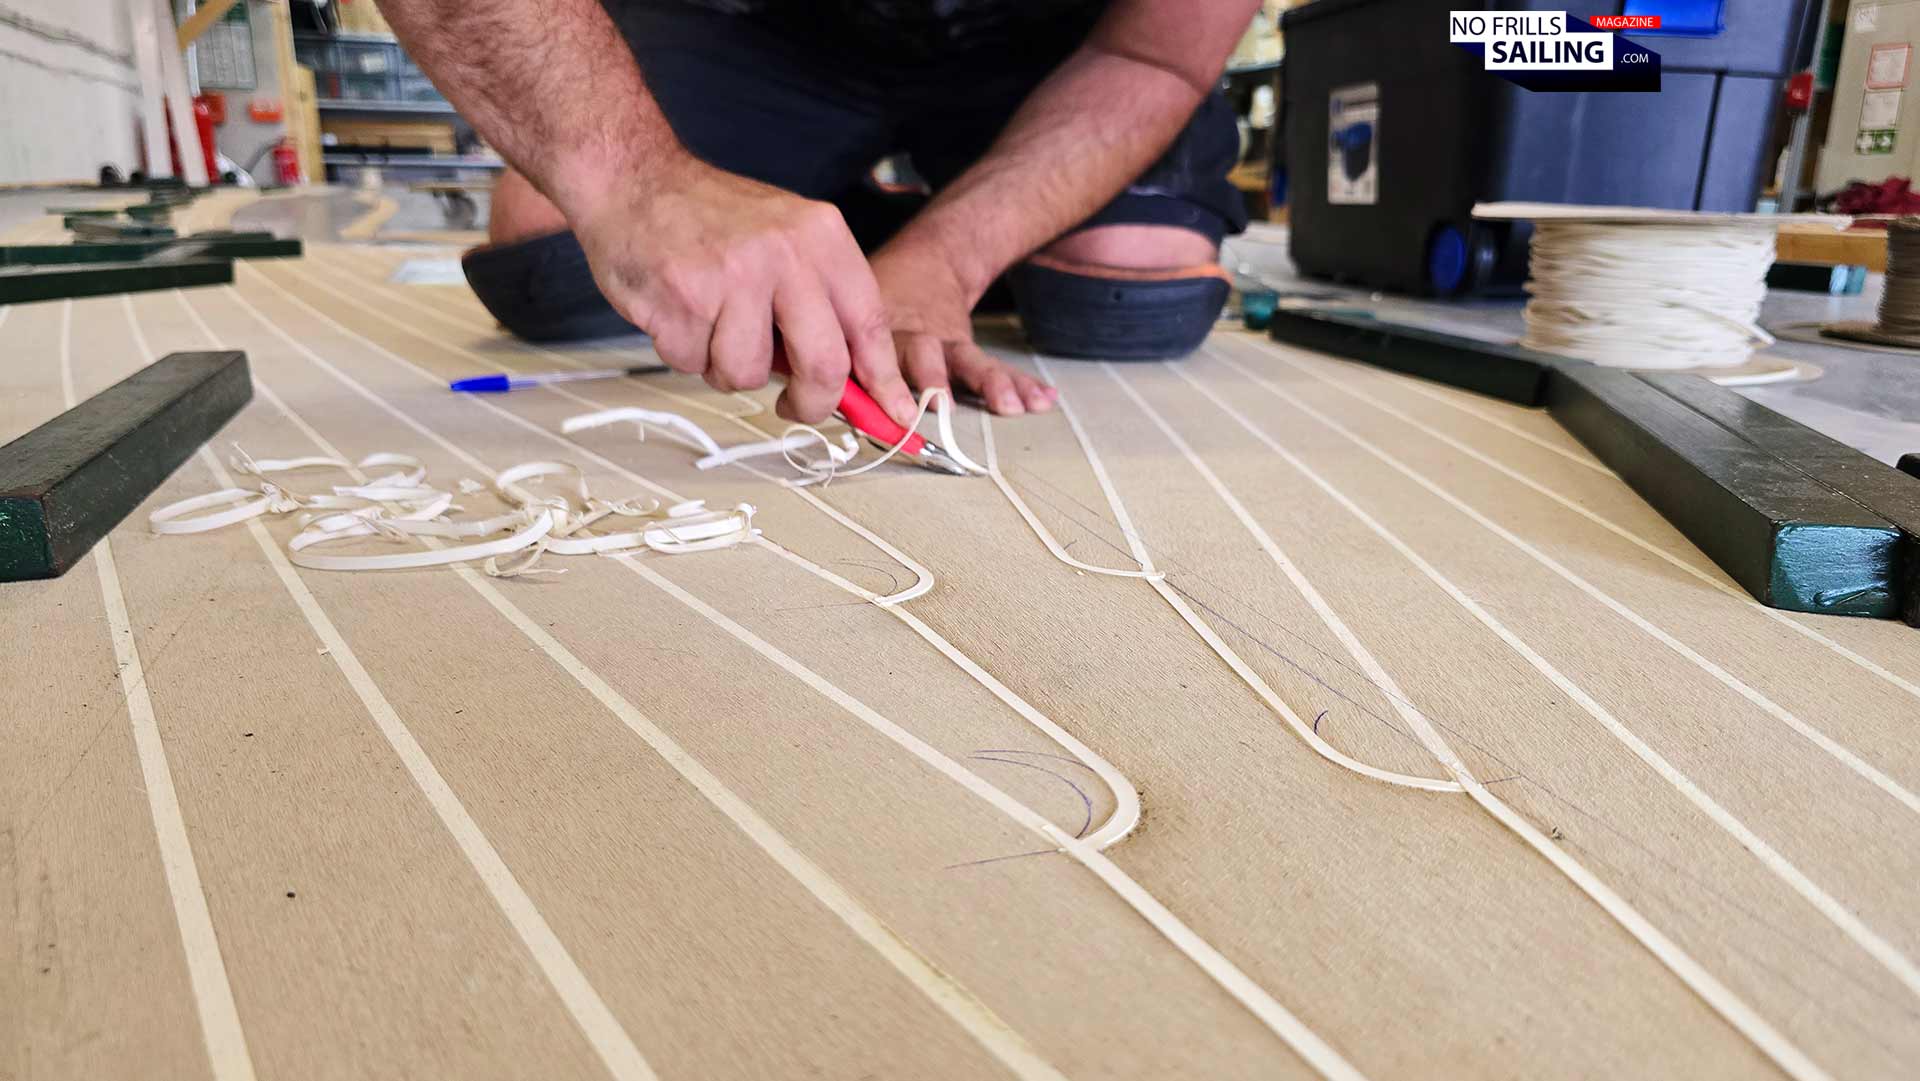
He has to apply a few corrections here and there to balance smaller inaccuracies of the deck itself. But finally, the shape is finished. Now the hard part starts: Cutting the deck planks. The PVC-material of the deck may appear to be somewhat “soft”, in fact it is a semi-hard plastic compound that should mimic the hardness (or softness, depending on how you see it) of real timber. But when it comes to cutting, it really needs raw muscle power to do it. Instead of a special tool, I am astonished that Szolt takes out a simple ordinary carpet knife to start cutting.
Let´s make the kingplank
Down on his knees, he follows the markings on the deck to carefully cut along. He has to get down to his knees, bend over and relocate much of his upper body´s weight onto the carpet knife´s blade to achieve a clean, straight cut – with one trial. You don´t want to have a zig-zag nor any fraying caused by multiple cuts. This takes time. And requires a lot of power. Szolti regularly stretches his body and tries to counter-act the stresses. It´s real craftsmanship, with lots of sweat and hard work! Cheap plastic deck? As if!
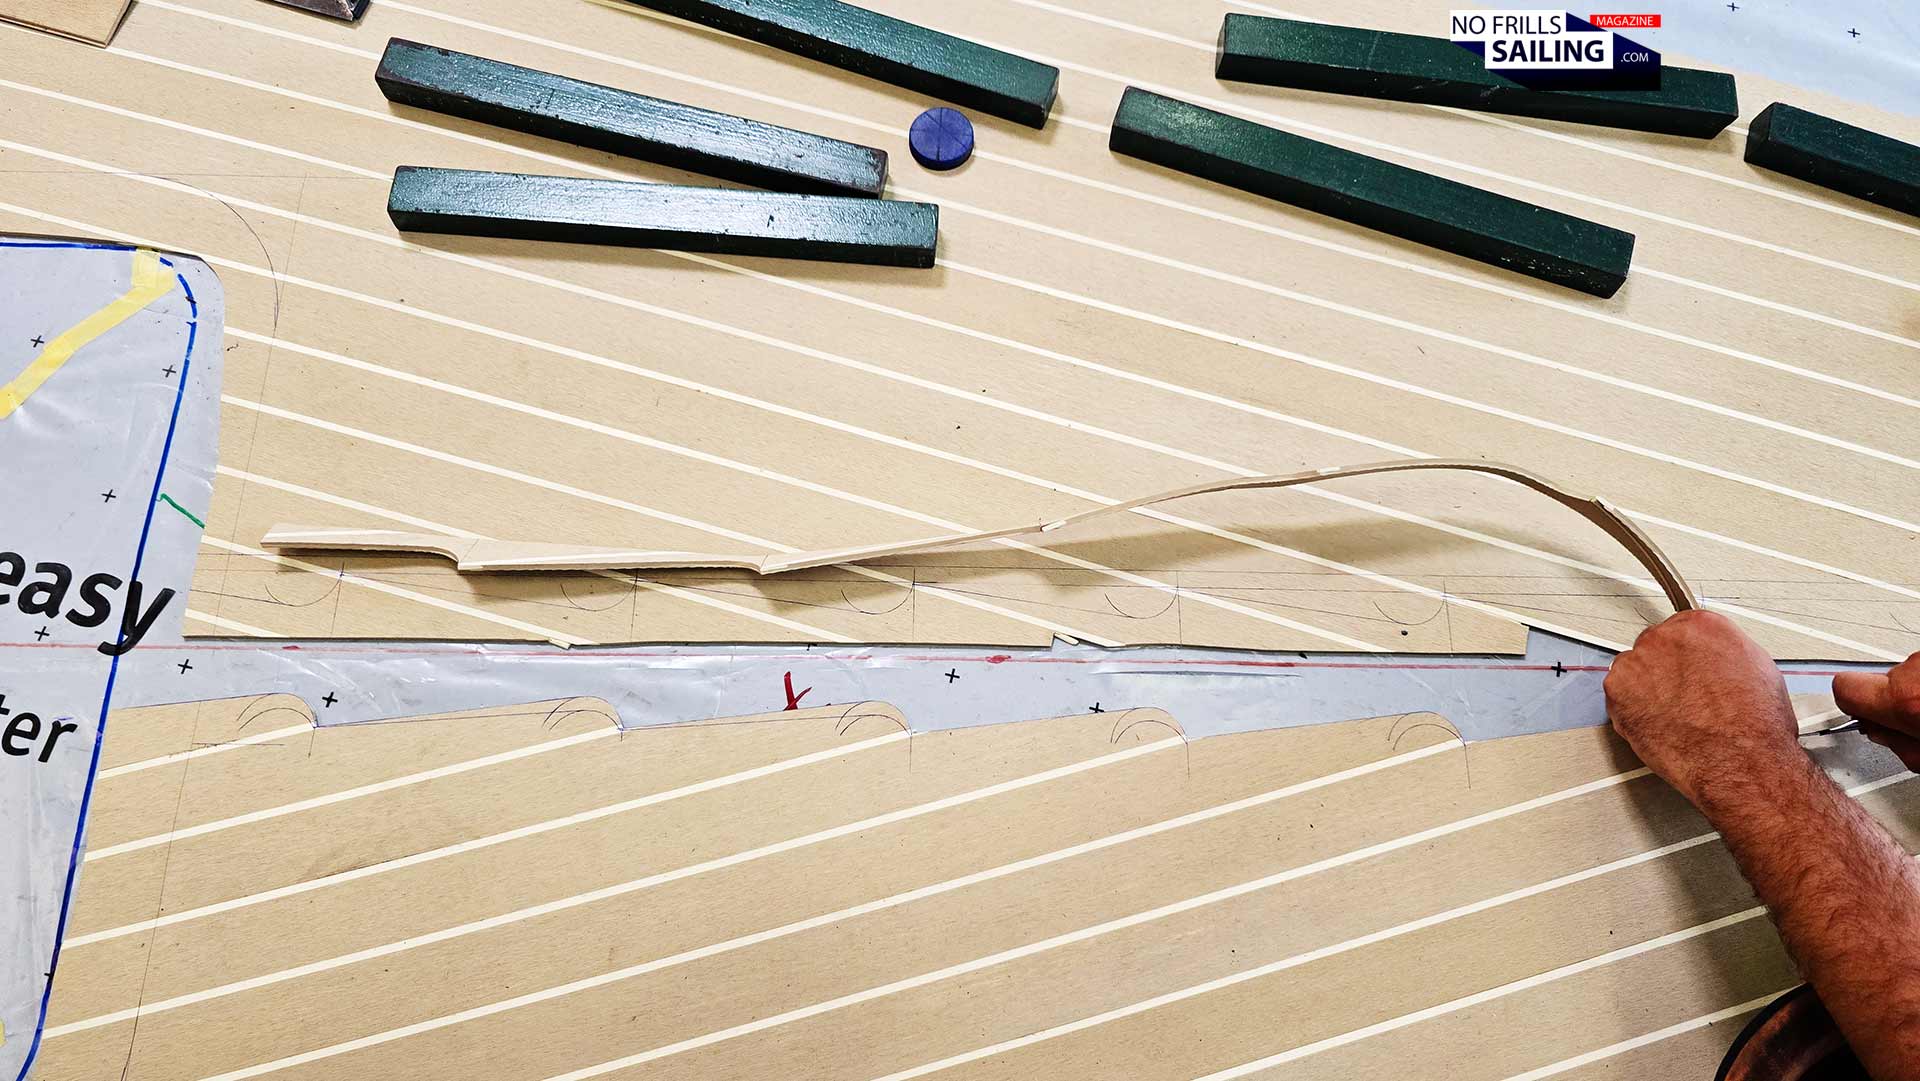
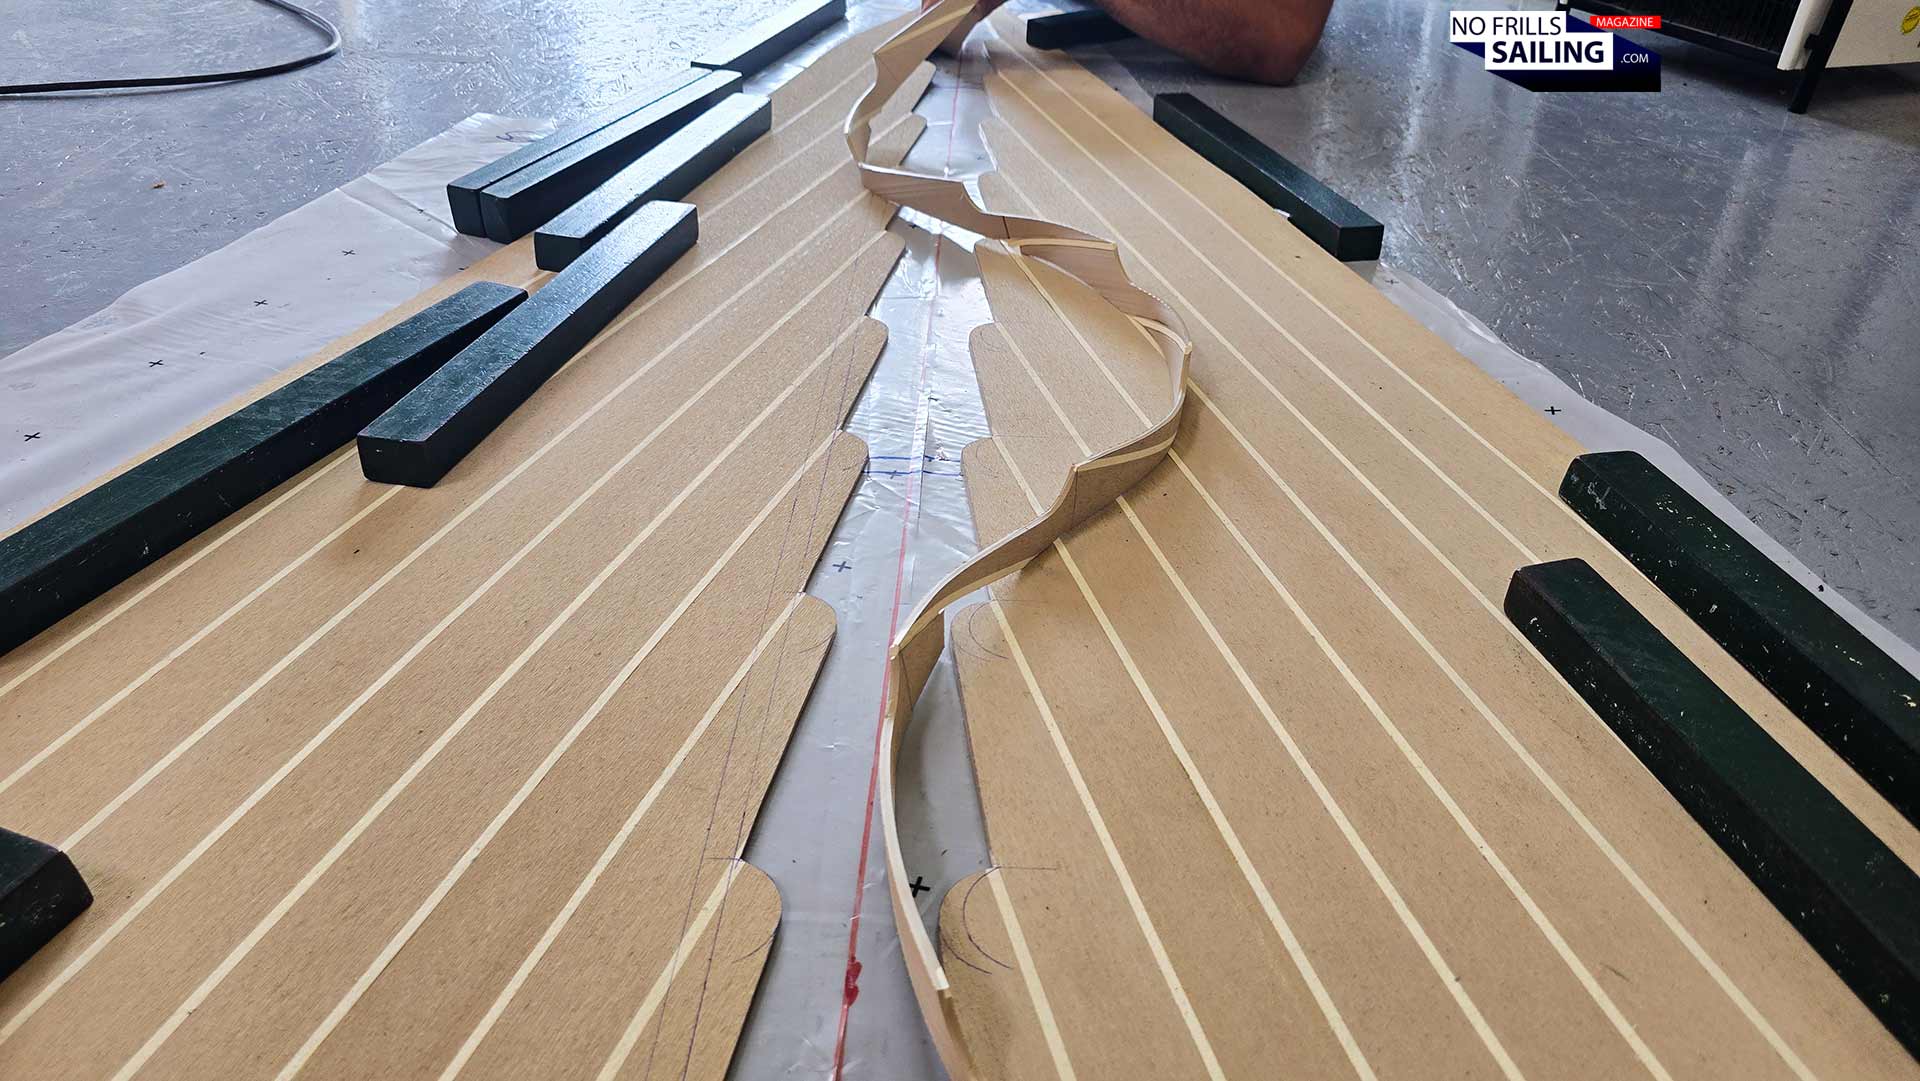
Making the central kingplank
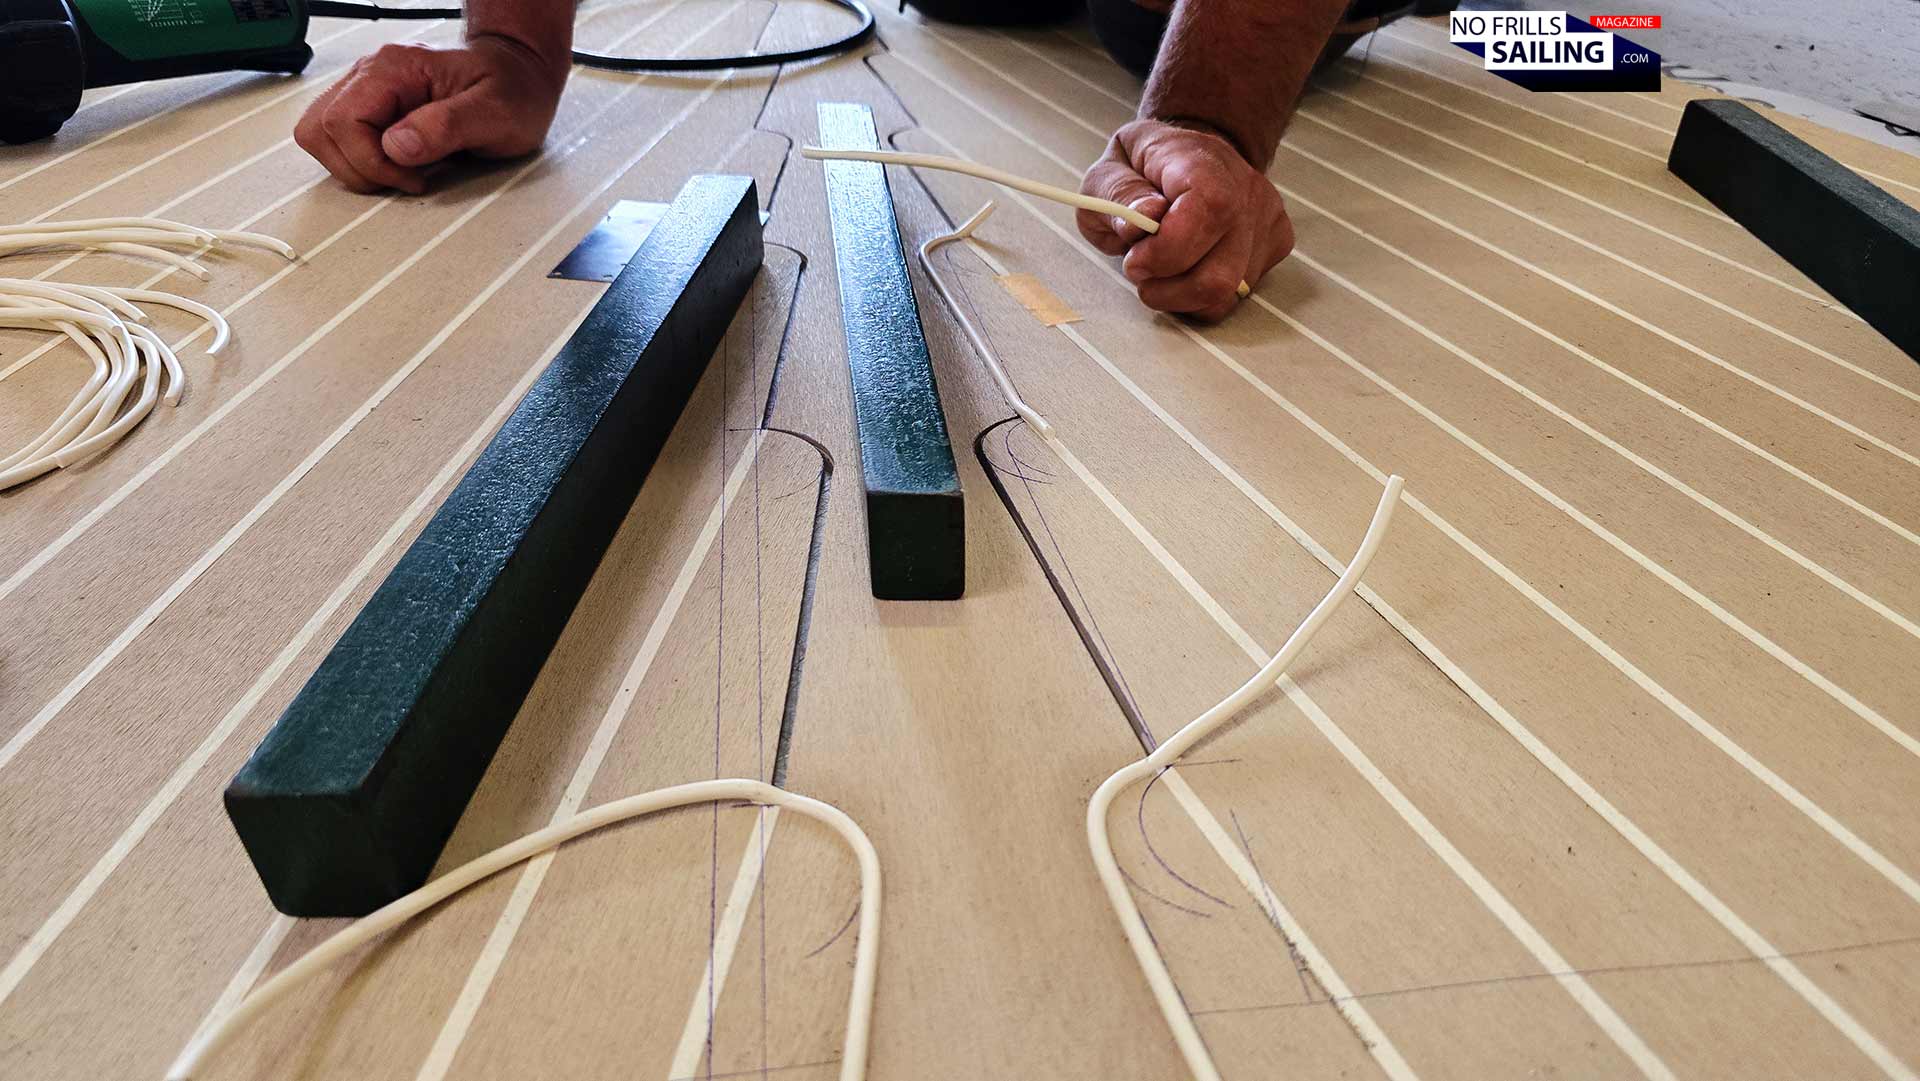
After some twenty minutes or so the cuts had been done to both sides of the deck. Removing the offcut, I can now see the – still empty – space for the later kingplank in full beauty. It´s really a cool sight. The botted ends of the deck´s planks arrive at the central spine, just as if they had been individually cut to do so in the first place. What´s up next? The making of the kingplank itself! Szolt disappears into the storage room in the back of the shed, only to arrive with a coil of PVC.
The raw kingplank
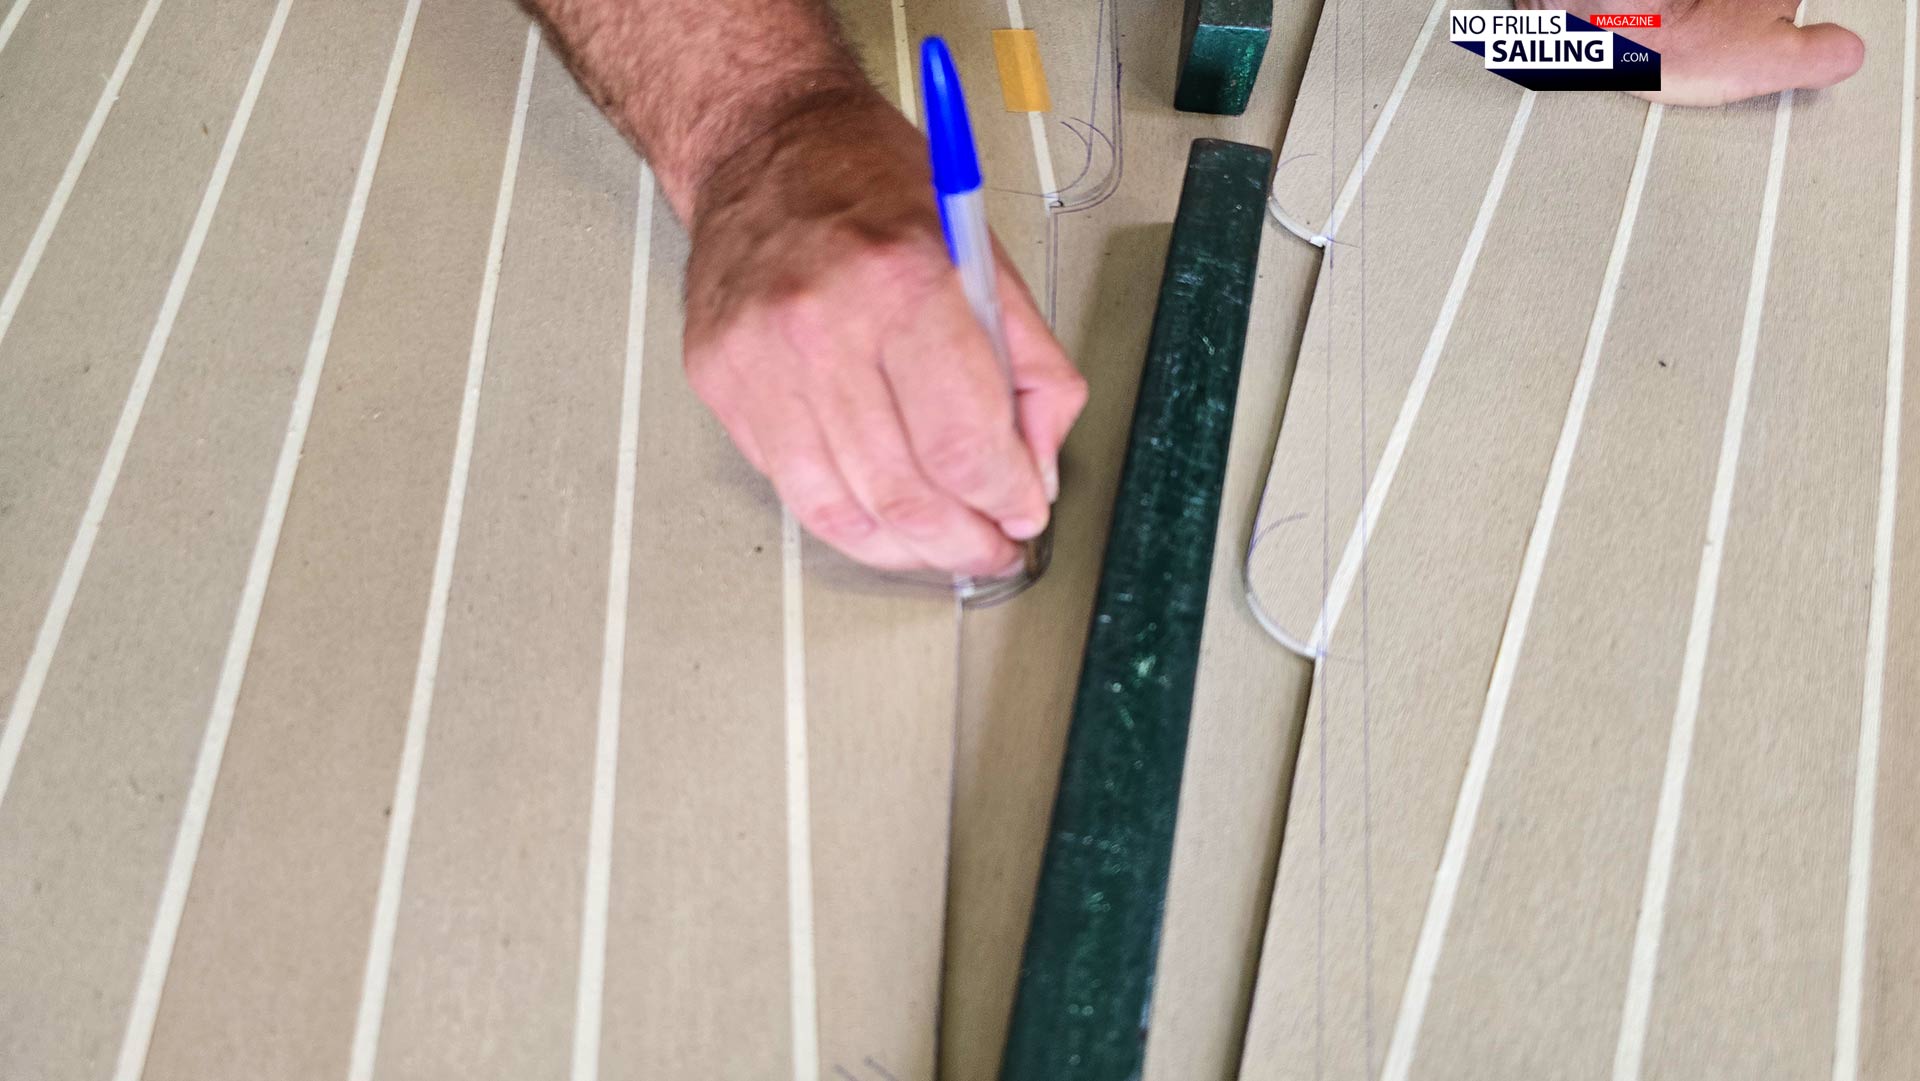
As said, the kingplank needs to be thicker and wider than the ordinary deck planks. In fact, for a PVC-deck it does not need to be thicker in terms of material strength, but it must be wider. Szolt chooses almost double the width. Unrolling the coil and cutting it´s length to roughly fit the size, he threads the raw kingplank underneath the deck, sliding it on the floor all along till it reaches the top of the bow. Now he carefully aligns the texture of the “grain” of the fake timber to the centerline of the deck and puts iron bars on top to fix the central spine in place. Back down again on his knees, he pulls out the biro again.
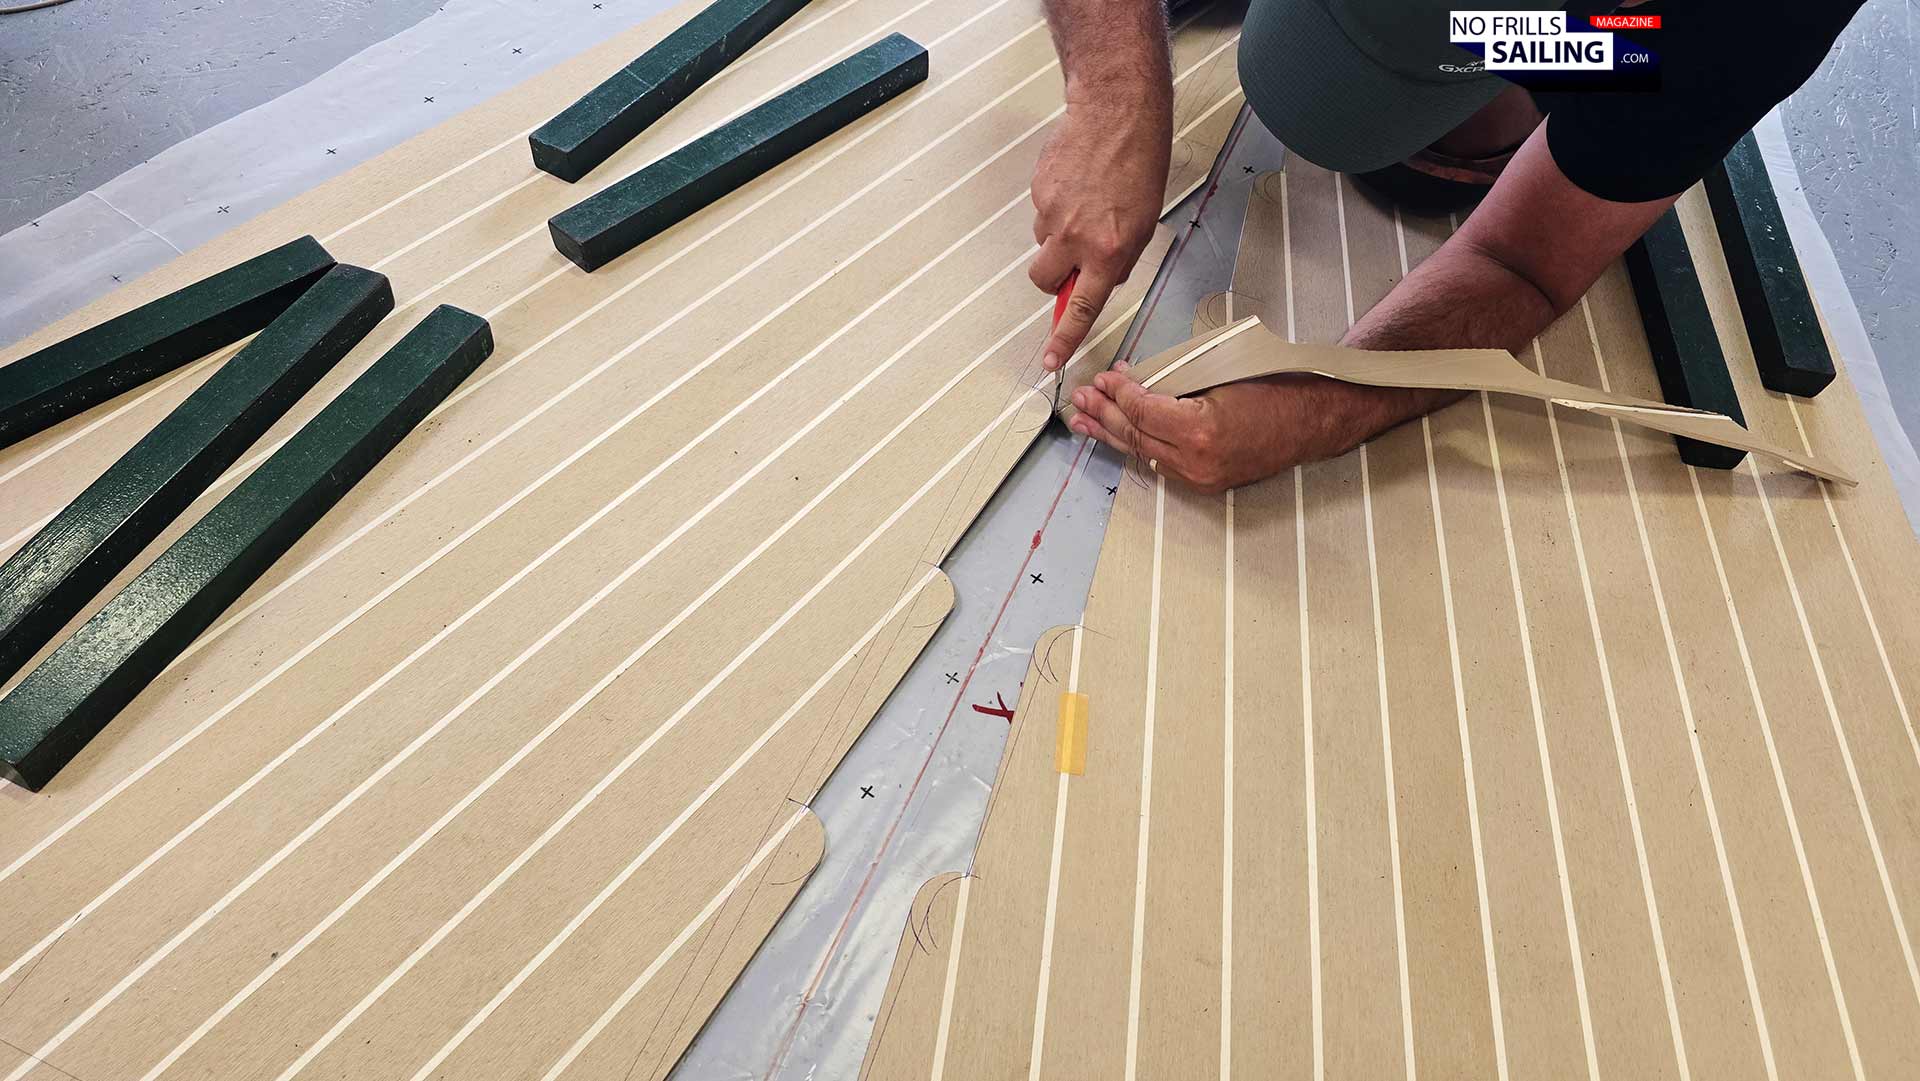
Marking again
Marking along the outline of the nibbed deck planks, he accurately transfers the shape of the joints onto the raw kingplank. But behold: In order to have enough space for the later seam, he has to leave a little space of a few, let´s say 2 or 3, millimeters. Otherwise the kingplank won´t be able to being welded to the deck anymore. In order to pull off this feat, lots of experience is needed. This is the reason why Ralph lets his employer do these things, Szolti, as he tells me, really has an eye for this stuff!
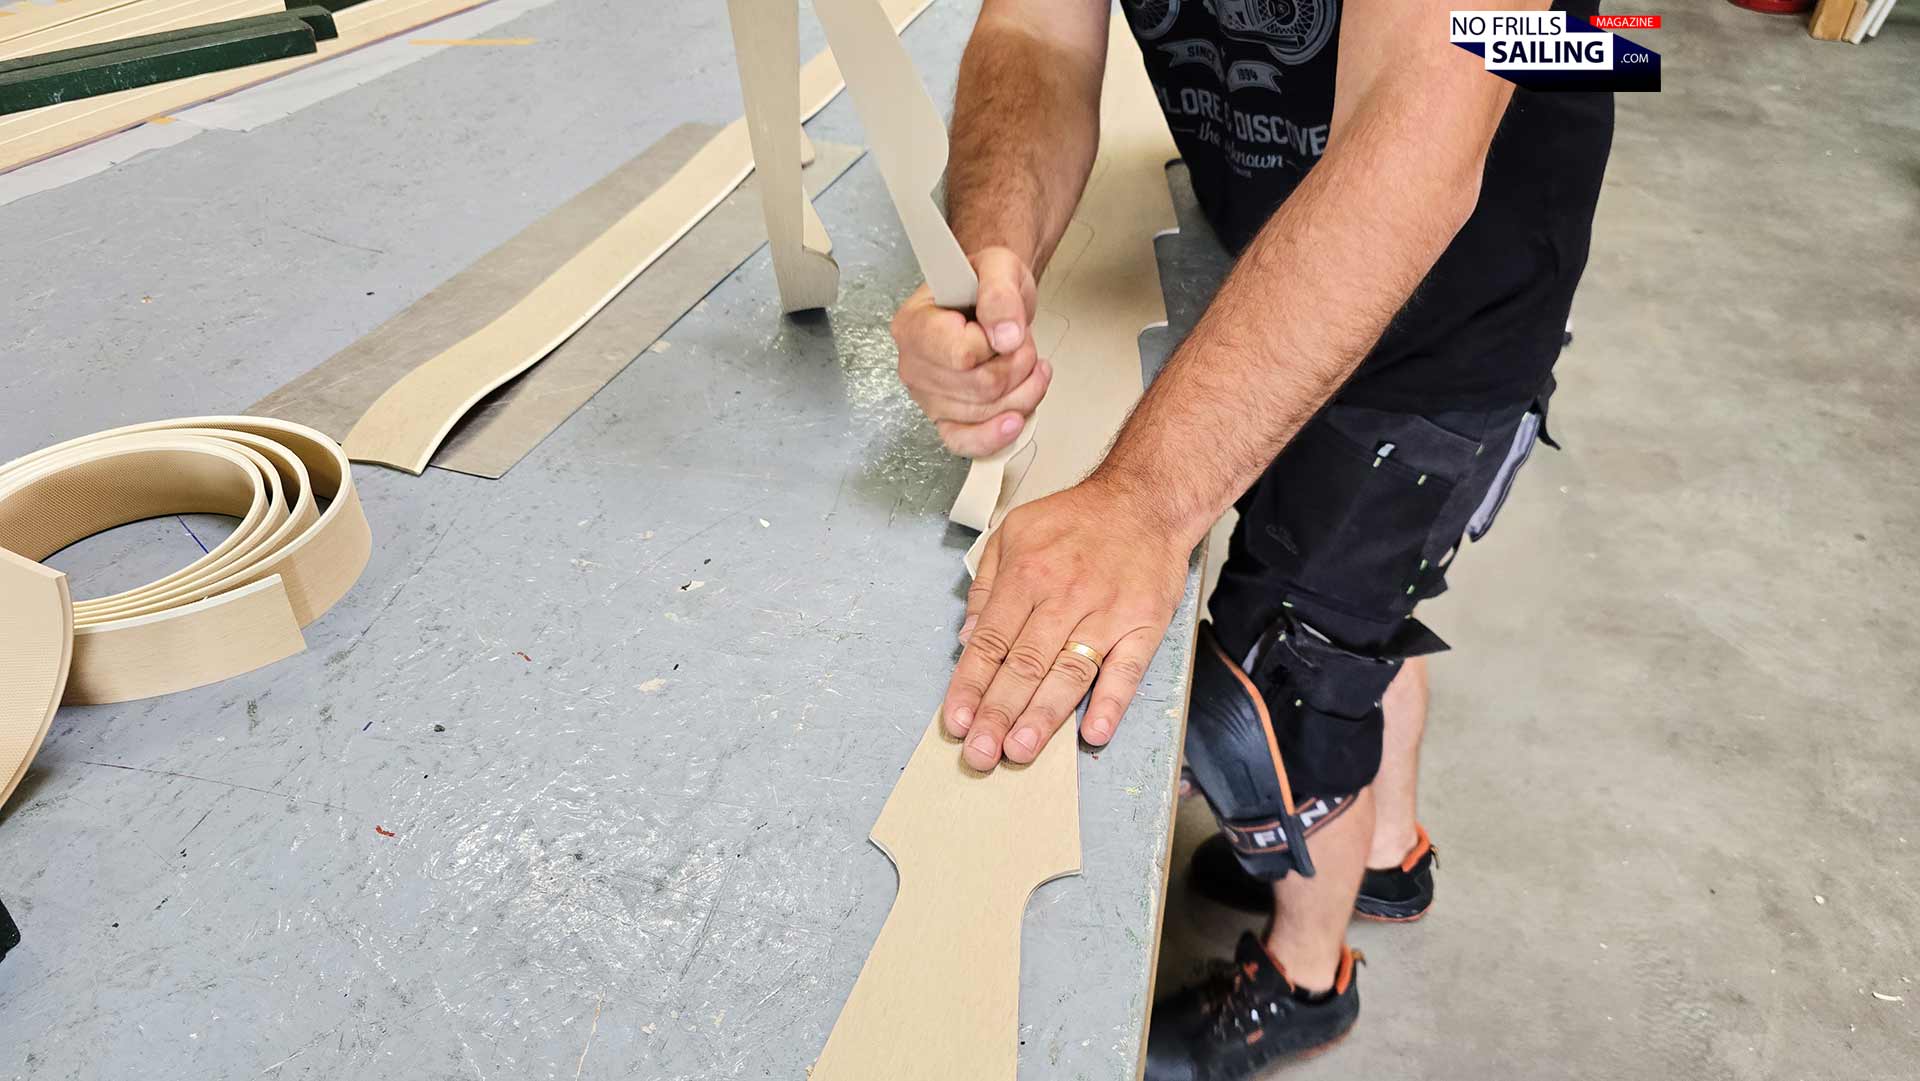
Rip it off!
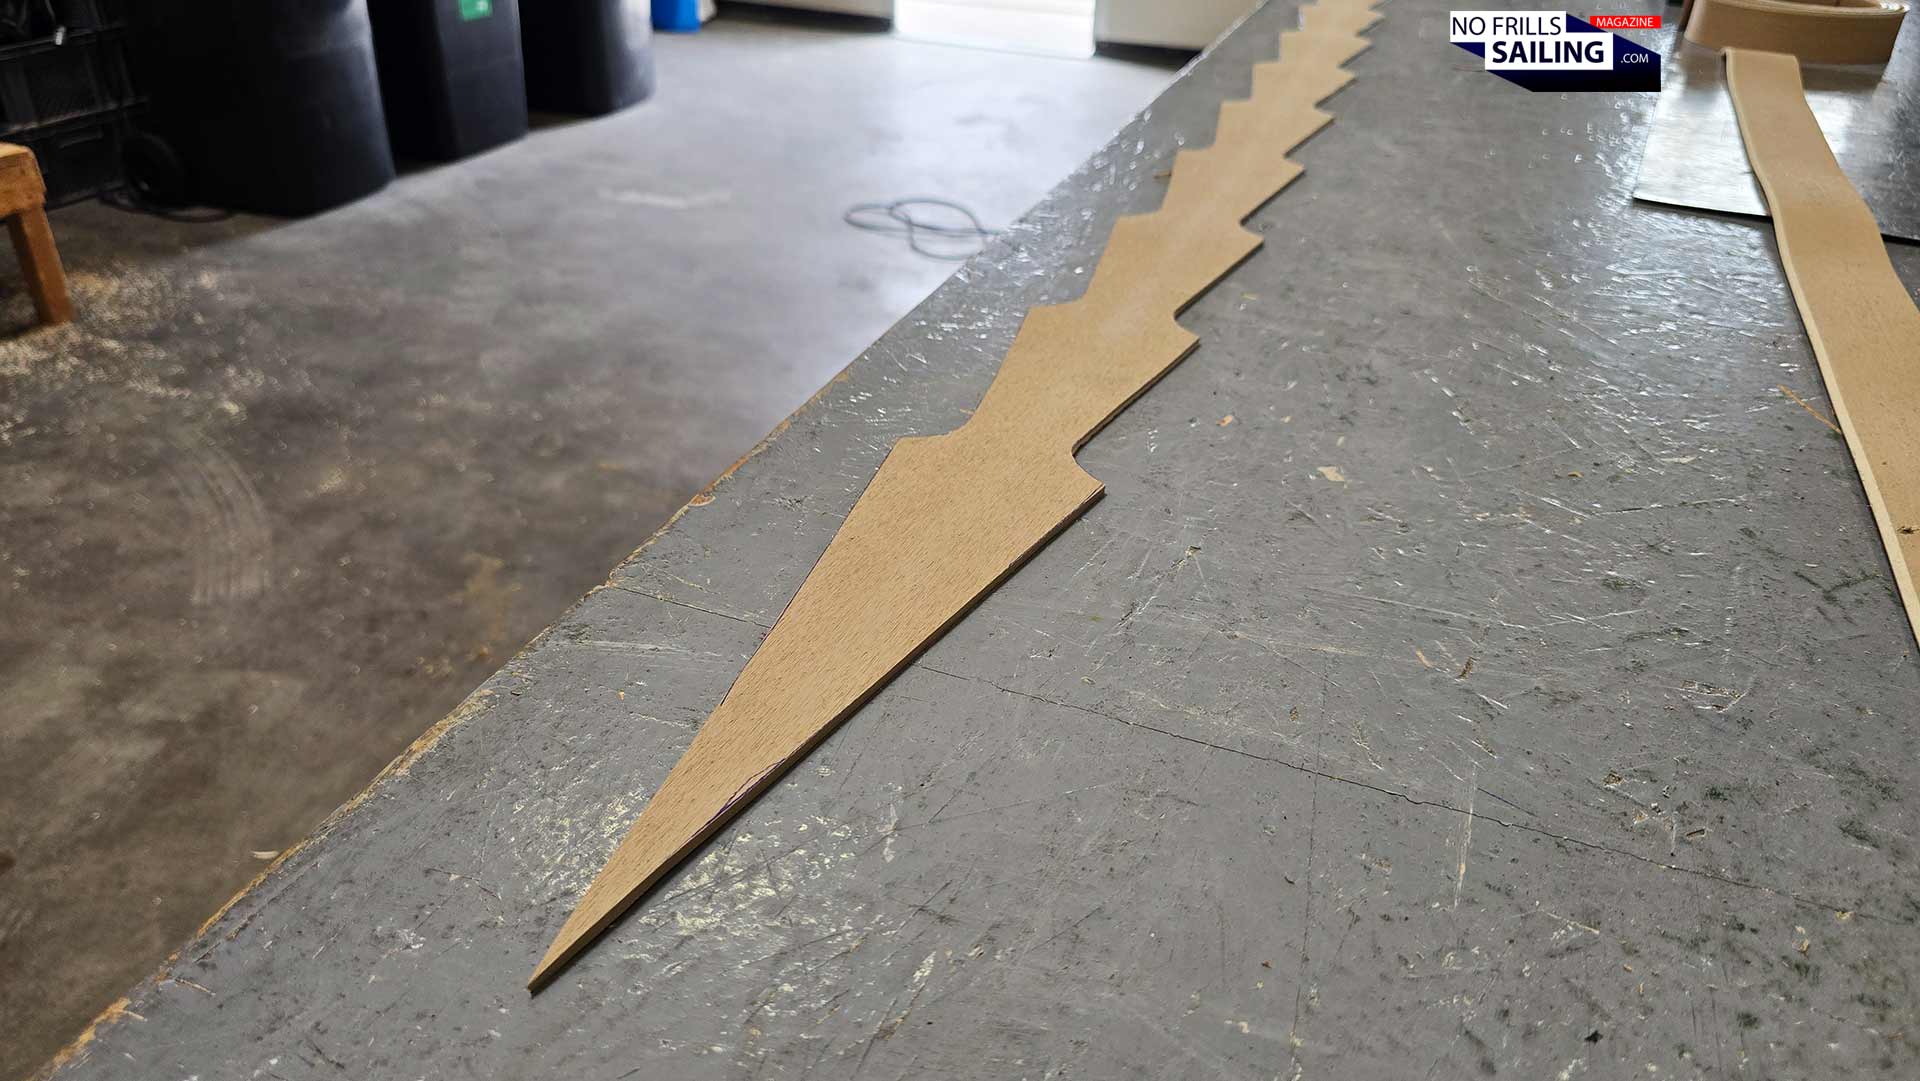
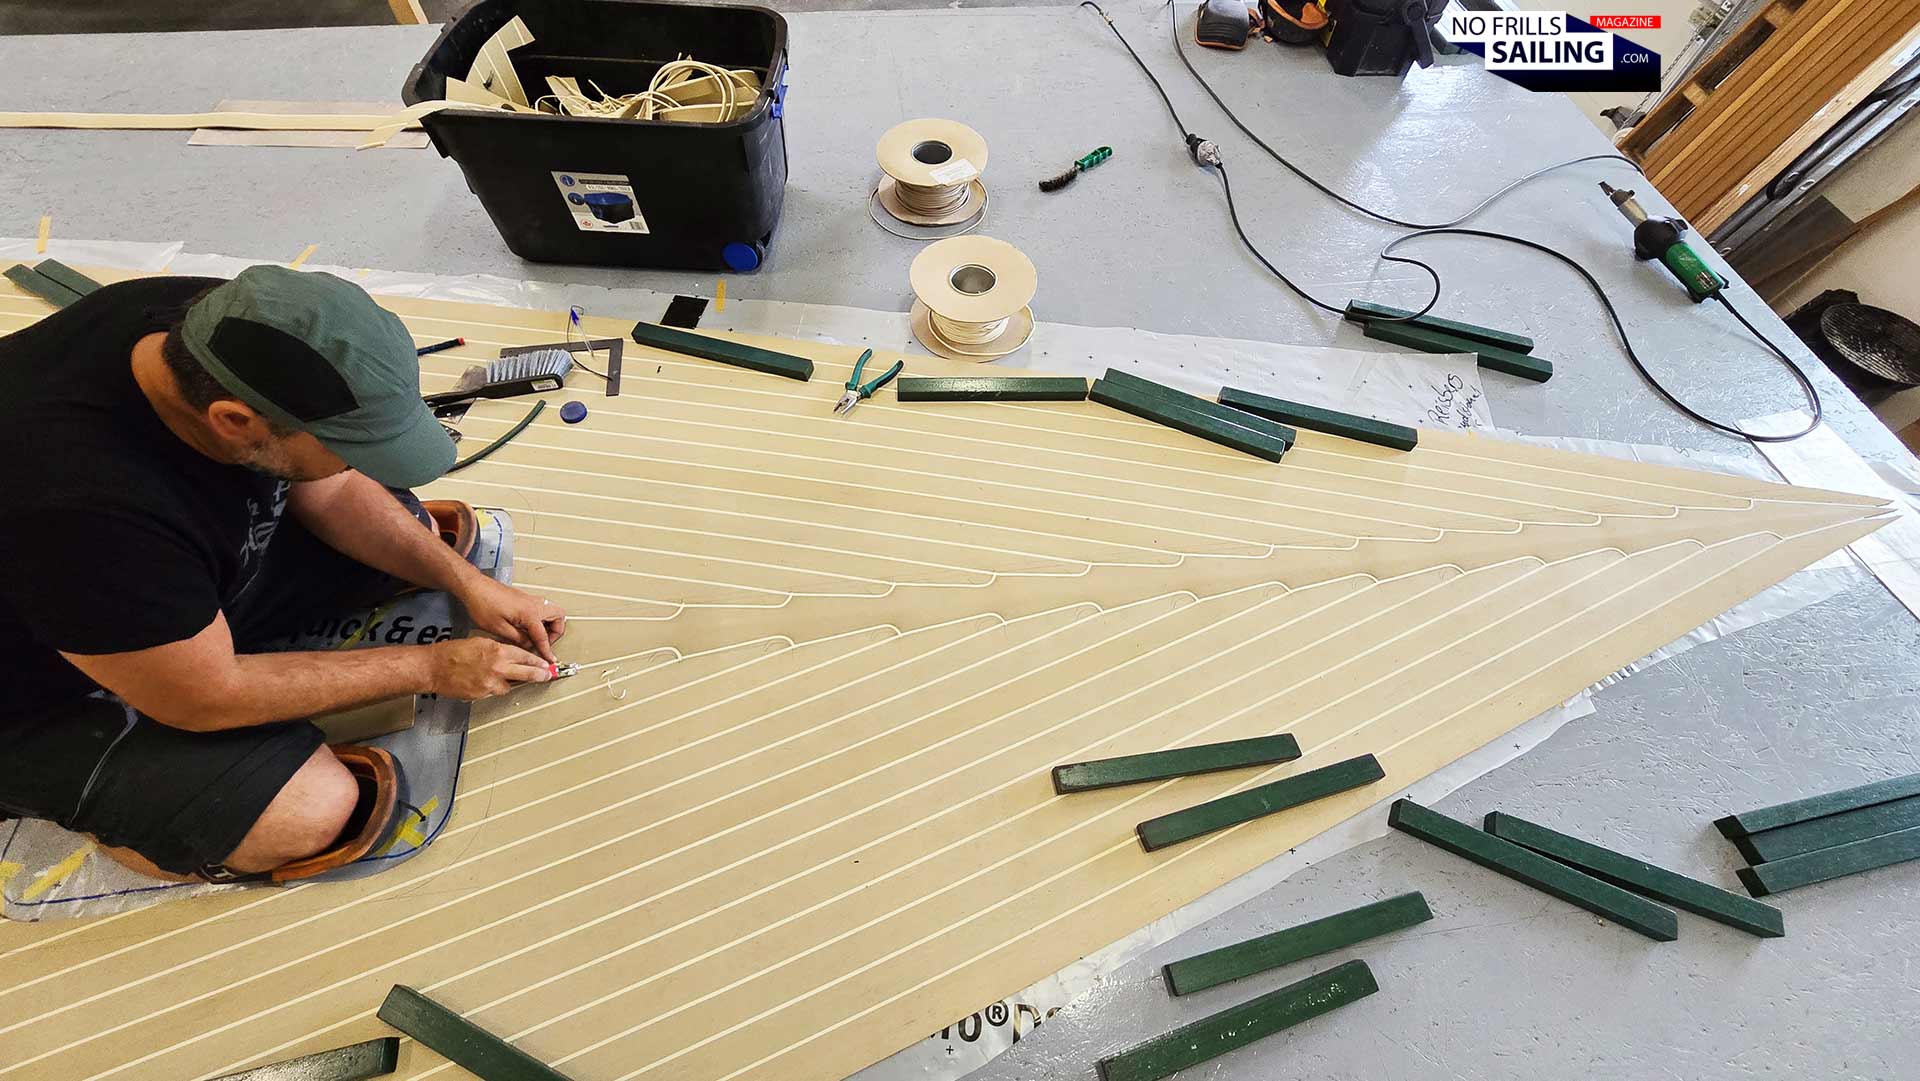
And he indeed has! After marking the plank, he pulls it out and again has to work hard to cut all along the marked line. This way, slowly, cut by cut, stroke by stroke, the finished kingplank is carved out of the blank. Carefully taking away the long garland of offcut material, there it finally is, laying before me: The highly appreciated central kingplank of my boat´s new deck! It looks like an oversized cocktail skewer though …
Very pointy, nice!
This was exciting. And revealing: Thinking that somehow the making of synthetic decks for sailing yachts (or power boats) only requires cheap materials or pre-fabricated templates is a complete fallacy. See, this is why I love to do these trips, to go where the magic happens and really witness how professionals are producing all the things which in the end make up our boats. This is insightful and helps so much to appreciate their efforts and, in the end, understand why this sort of high grade craftsmanship requires the high budgets.
A little trick!
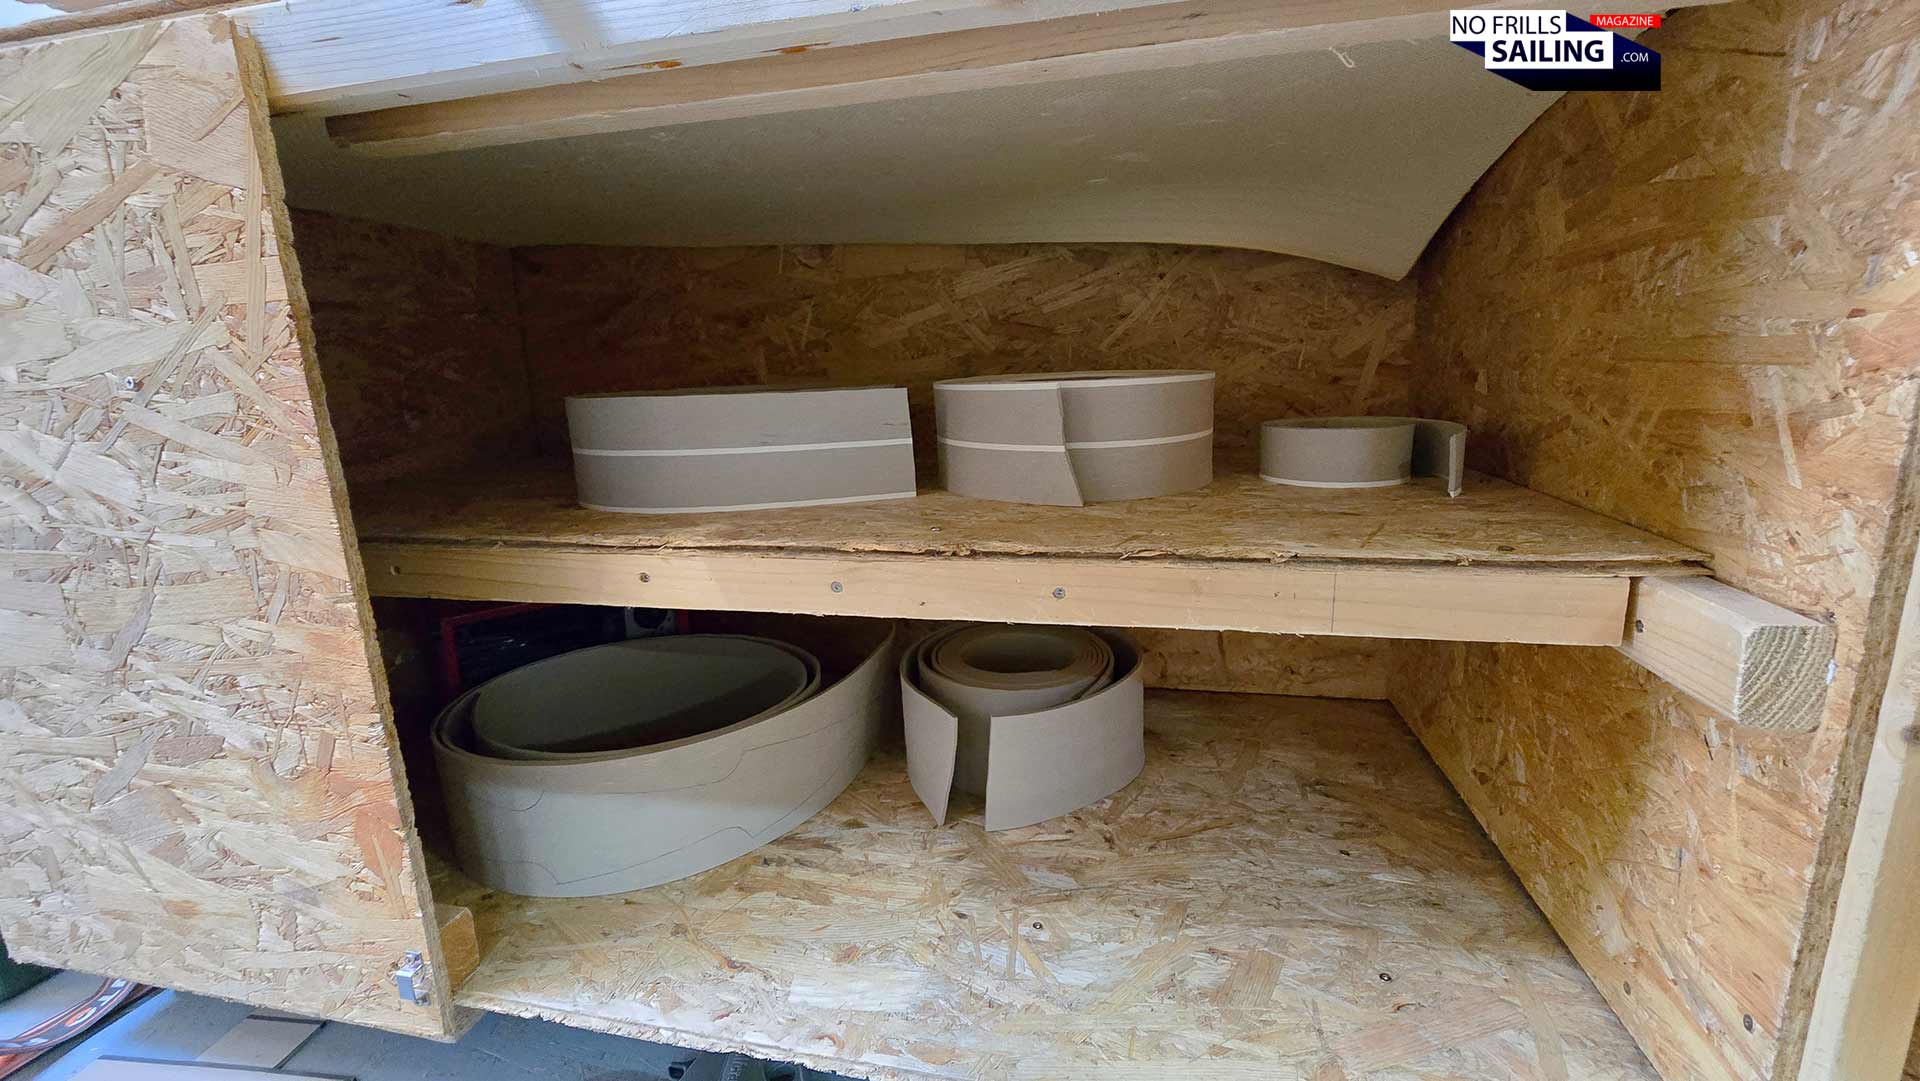
Instead of immediately bringing together the kingplank and the rest of the deck, Szolti – after stretching for a few minutes – coils up the party skewer and puts it into a wooden cabinet. I haven´t really take notice of this thing, as it has been bolted together like a makeshift storage for something, I thought. I opened the lid and saw the kingplank, together with some other coiled up PVC-planks for other projects, sorted inside. What was that? After a few seconds, a puff of hot air reached my face so suddenly that I nearly startled a bit. A hot cabinet?
The self-made hot cabinet
Szolti explains that before welding together the PVC planks, this material is heated up. Just a bit, as he insists: Their home-made hot-cabinet pre heats the material so that later the welds would stick together better, enabling the guys to turn down the heat of the welding machine just a few degrees, protecting the material from burning and heat-shrinking. There we have it again: Experienced craftsmen coming up with their own proprietary tricks and hints. So, let´s see what the last step in faux teak deck production has for us!
Welding: Butted planks and kingplank come together
When beginning this article I skipped the welding of the individual deck planks. Firstly because I haven´t been here to take pictures, and secondly because I think that this process may not be exciting enough for a whole article. Tell me if I´m wrong about that. Anyway, I want to show you at least with the help of the final inserting and connecting of the kingplank how the welding process of a PVC-yacht deck is made.
Preparing the welding action
First of all, “welding” is a bit exaggerated: The tool needed to melt the plastic “braid” which will later become the caulking between the individual planks, does not exceed 400 to maximum 500 degrees Celsius, so it´s way below classic metal welding temperatures. Nevertheless, 500 degrees Celsius is really hot indeed as well. So the first think Szolti does is to plug in the welder into the power grid. It instantly starts to heat up, which is accompanied by a loud noise, apparently from a ventilator inside.
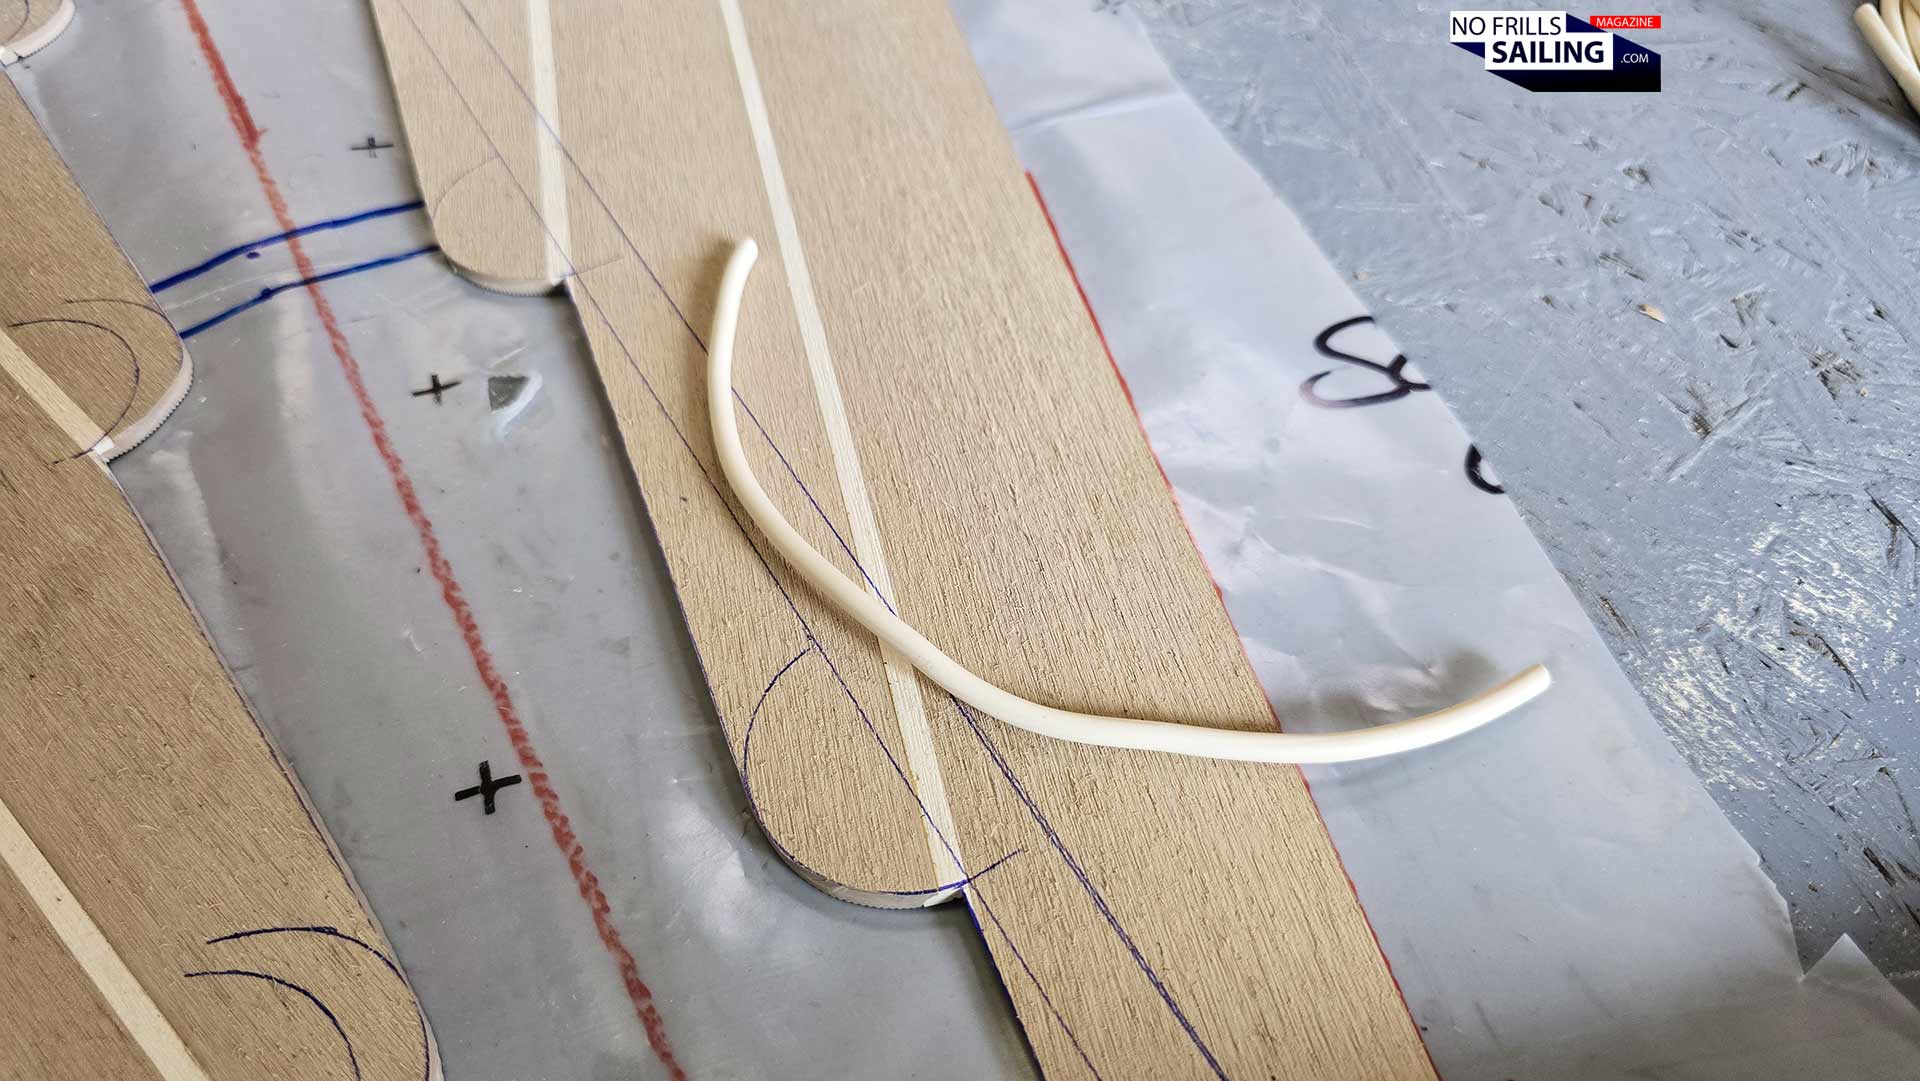
Here we go
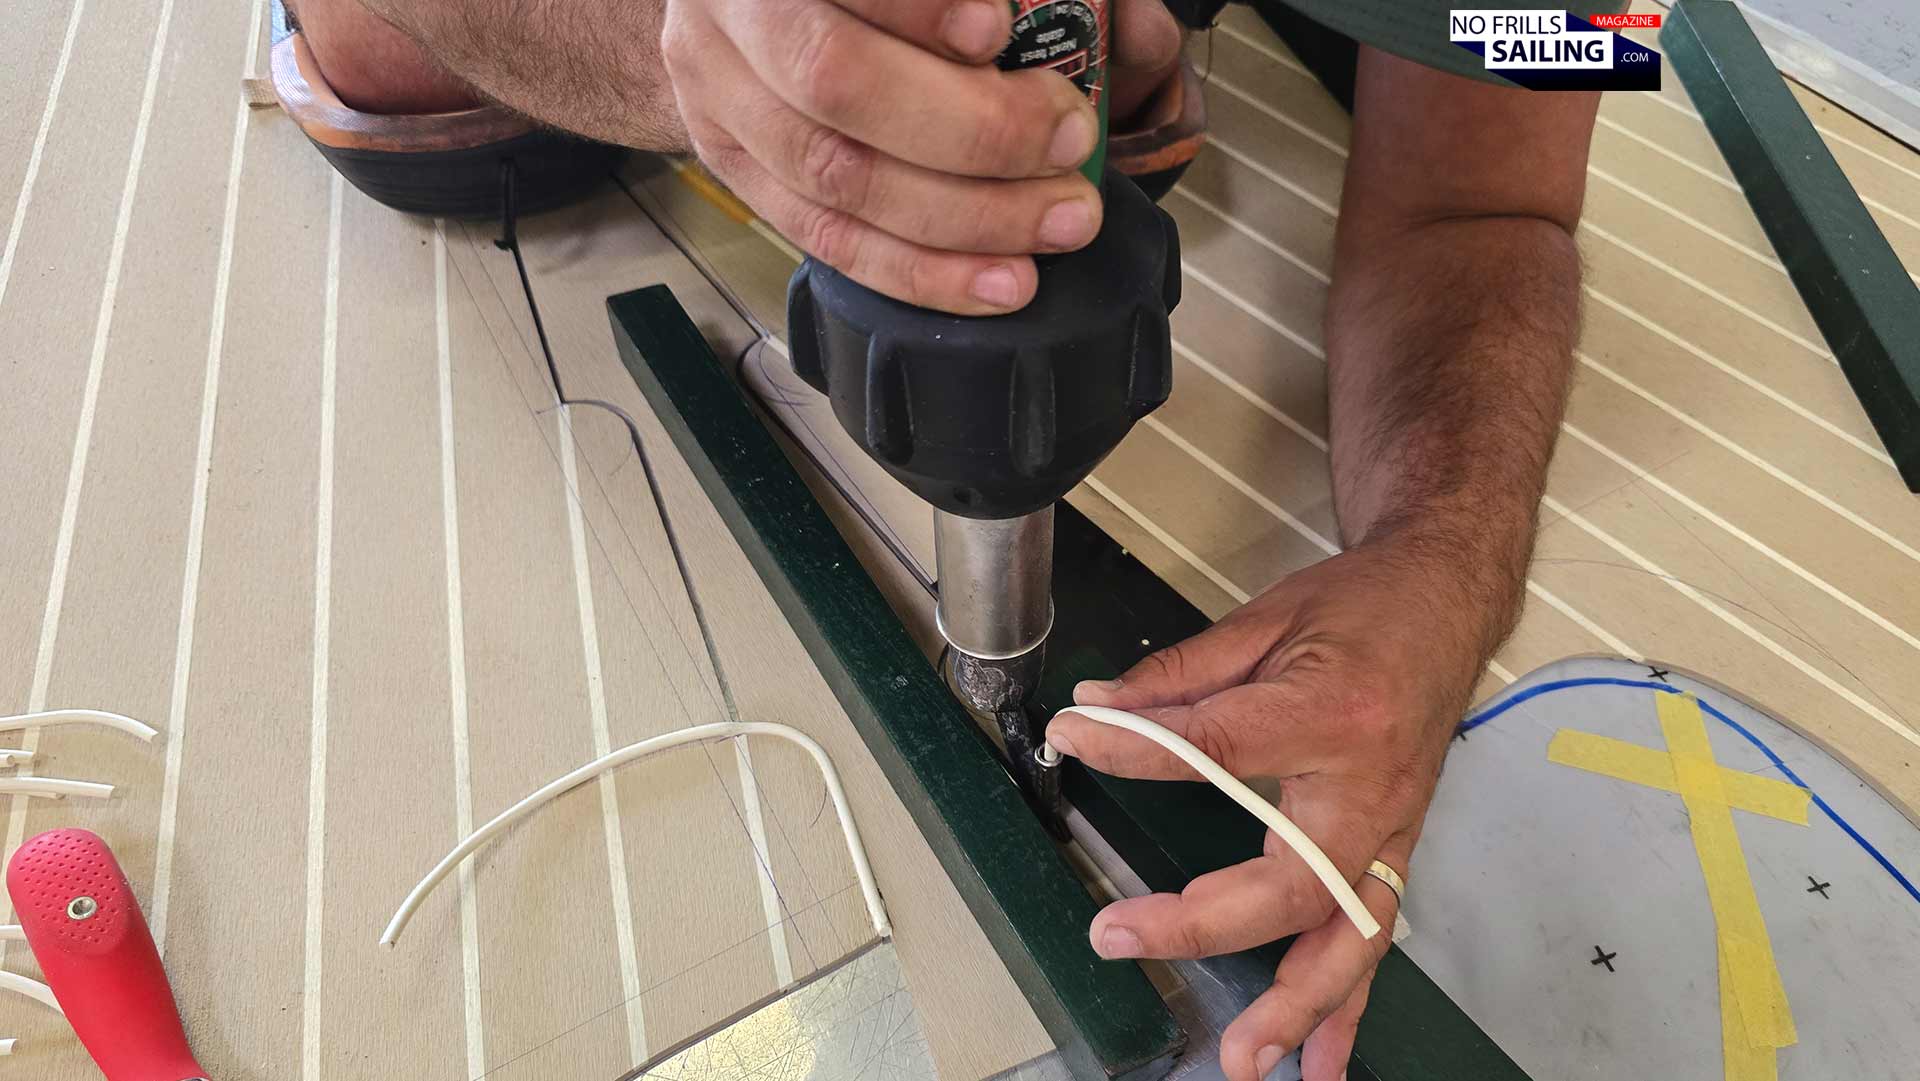
Whilst the welder heats up, he cuts down individual parts of white braid. He explains that each braid is meant to join one butted end of a single deck plank to the central kingplank. I don´t get it at first, but we will later see how it works out. Then he starts: Kneeling down, taking the baking hot welder into hand hand, feeding the braid into the hot outlet with the other. Slowly he moves the welder all along deep inside the seam.
Decisive, swift but accurate work
Too slow, and it will literally burn and melt the deck. Too fast, and the connection will not be sufficient in the end. In all of this, he has to match exactly the shape of the seam, its curvature. The welder works ingeniously: It´s hot tip´s outer side slides all along the kingplank and the deck, thus melting the material. Inside the ring, the white braid is melted as well – as Szolti is pushing more and more braid, the molten material exits the welder at the downside, meeting the molten edges of the deck and the deck. These molten parts meet, mix and immediately cool down, forming an inseparable unit. Voilá!
Some more tricks …
Szolti is a real pro. Apparently, he goes through the welds like Michael Schumacher in his best days. It takes him minutes to apply one weld after another. What grabs my attention is the fact that he leaves out every second plank and on the first run only welds together the odd numbered planks. Arriving at the bow´s end, the tip of the kingplank, he returns where he started and takes out two specially shaped tools. He now starts to cut down the excess braid material.
Only every second seam
As the angles between the planks and every second joint of the seam are too steep, this way of conducting the weld has turned out to produce much better outcomes. When taking away the offcut, the odd numbered planks already have a completed weld. Now it is much easier for Szolti to weld the even numbers of planks. Again, after arriving again at the tip of the deck, the excess material is removed. The whole operation lasted no longer than half an hour: Backbreaking, but the outcome is just beautiful!
Making it even
With the second, much finer special cutter, Szolti now removes unwanted braid material from the seam. The caulking process is finished and it looks absolutely awesome! There is absolutely no way to distinguish a proper modern PVC deck from a natural deck material. In fact, I once mistook a brand new real teak deck on a Solaris for PVC! I also notice that at least the product utilized for my deck does not stink, which bothered me on other yachts and for a long time made me kind of despise faux teak. Well, not here.
Awesome beauty: Perfect outcome!
Szolt is crawling over the deck and nitpicks a few things here, removes a few things there. After carefully going over the newly welded seams with a meticulous eye for details, he stands up and takes a bird´s eye view. Ralph joins him to check as well. Not that they could change it now if something would have gone wrong: In this case, the whole thing must be cut open again and re-worked from the start. But better to check now than noticing any faults when glueing the deck onto the boat. Or even worse: After attaching it to the boat´s deck!
Last touches …
I just think it looks absolutely beautiful! I walk around and take pictures – many, many more than you can see in this article! – and try to look at the deck from many perspectives and angles. What I do notice though is that the color of the material really changes and varies, depending on the incidence and angle of light. Also, when writing this article and working on the photographs taken in Photoshop, I notice that literally on every single picture the color looks a bit different! In reality, this deck looks much better than here, in the digital realm.
Just awesome!
Was it worth it? That was the question I started in this article. Disproving the fallacy that plastic decks are cheap both literally and figuratively, but rather explaining that a faux teak deck required skilled craftsmanship, lots of experience and dedication to make in the first place. It is a time consuming and arduous work that should be carried out by skillful craftsmen, just as you would wish for working with real teak on your yacht. Was it worth to pay the extra amount for this kingplank? Absolutely! I am sure, this conclusion will be even more fortified when you see the finished margin board around the whole deck and the hatches. And moreover, when this deck is finally glued to the boat.
Advertisement
What´s next for my Omega 42 deck?
I am puzzled, excited and very happy. I´ve learned new things today and clearly judge the topic of synthetic deck materials with a new set of knowledge. There are indeed cheap looking, ugly and negligently botched together OVC decks for sailboats, no question. But if you want to have something that looks good and will last longer, as with everything, you need to go for the good stuff – and have it done by true professionals. Pros like Ralph and Zsolti, whom I wholeheartedly thank for this crash course in PVC decking.
Now for the embrasure
The two will go on preparing the deck material: That´s the embrasure covering the hatches and outside shape of the whole deck, the cockpit benches and the cockpit floor as well as the bridge deck. This will take a few more days. Seizing the opportunity, we as well talk about finding dates for the application of this deck to the boat itself, which will presumably take place in three to four weeks, mid-June. Ah, perfect!
X
You should, if you haven´t already, subscribe to the monthly newsletter all the while. This way, you shouldn´t check up on NO FRILLS SAILING frequently to see if there´s a new article covering a topic that suits your interests. Rather check the monthly email which will contain all ten articles published the past month. So convenient! I say goodbye to the guys and take a last look: can´t wait to see it on the boat!
Can´t wait!
Driving back home, I call the shipyard to convey the good news. Next up here on this blog is the bottom paint for the Omega 42: In this I decided to do it by myself. Not so much because I want to dodge the cost, but because I am genuinely interested in experiencing myself how it feels to produce the complete buildup of the osmosis protection and antifouling of a yacht. This will take place in 10 days, so stay tuned. Happy times, so much to cover, don´t you agree? Which type are you: Real timber, substitute materials or synthetics? Leave a comment, very much appreciated!