Many people still don´t really know how a deck for a sailboat is made: A lot of unclear and even outright false ideas are circulating. It´s even worse when it comes to synthetic decking materials, like PVC-decks, which more and more substitute real teak decks. This article delves deep into this topic, showing everything from the very floor material, to color choices and professional production techniques, which in the end make a deck that is (almost) indistinguishable from a real wooden deck.
I´ve received quite a few comments on my last article, showing how the famous kingplank was made for the new PVC-deck for my Omega 42. In this article I rather elegantly stated that I won´t talk about the making of the deck itself since I was sure that most of you have seen it already and knew what it was all about. Well, I guess I was wrong: “Show how the deck had been manufactured!”, was one of the most asked questions.
So here we are, back to the workshop north of Hamburg, where Rosch Yachts has its headquarters. This company was one of the first and is still one of the most renowned in this field here in Germany, making custom PVC-decks for all sorts of boats. From big power superyachts moored in Mallorca to repairing bathing platforms. I know the founder Ralph Schiecke for many years, and for many years I was sure that if I´d order a PVC-deck one day, it must be one of his. So, let´s rewind the story and start at the beginning …
What is a PVC-deck made of?

A bit of material science first. “Synthetic teak”, as this decking material is often called, can be bought from various makers and thus arrives in various flavors. Most faux teak materials are made of polyvinylchloride, PVC, which is a synthetic polymer. The, let´s say, mixture or detailed composition varies from brand to brand. You may choose Flexiteek, which is around since the year 2000 and is often regarded as the main, biggest and most used brand in this field. US-American boaters might be familiar with PlasDeck (or PlasTeak), which is a string US-brand. Furthermore, Permateek is another big name in the business.
As for my boat, Rosch Yachts utilizes Permateek, which they sell under their own name. There are also brands offering more “sustainable” products which use less or no crude oil or mix natural ingredients into the materials. There is for example “Bio-PVC”-solutions, but I honestly have no long-term information on these. Besides PVC-based materials there is also PU-based decking, polyurethane, which is said to be more durable and UV-resistant over decades. PU-deck is often poured, hence much more difficult to apply. Hallberg-Rassy uses this material for their non-timber deck solutions. PU is much more expensive and thus often used for superyachts exclusively.
Back to PVC-decks and their individual “planks”: The differences from manufacturer from manufacturer are miniscule, but can be deciding. There are designs which strongly look like “plastic” – no grain imitation, to variations in colors and structure, cheap looks, in the end. Also, I have the feeling that some synthetic deck materials emit a much stronger stench than others: This is from the added plasticizers, softeners or UV-stabilizers and inhibitors. On many boats with a plastic teak deck I had the impression that under strong and direct sunlight the deck would even stink unbearably over the first couple of seasons. If you look for a fake teak-brand, check thoroughly and don´t look towards the price all too much.
Building your custom boat deck
Why not choosing your PVC-deck brand for budgetary reasons first? Well, as it is the fact with most other aspects of your yacht too, cheap often and inevitably could mean that you will buy twice). That said, PVC-deck may sound “plastic cheap”, but it isn´t: Upfront costs for a well made and high-grade deck are usually significantly higher than utilizing real teak, at least for standard plantation grown teak timber. How much higher may depend from the efforts that go into your deck. But one thing is for certain: It´s not a cheap undertaking to cover your white gelcoat deck with a nice and well-made PVC-deck!

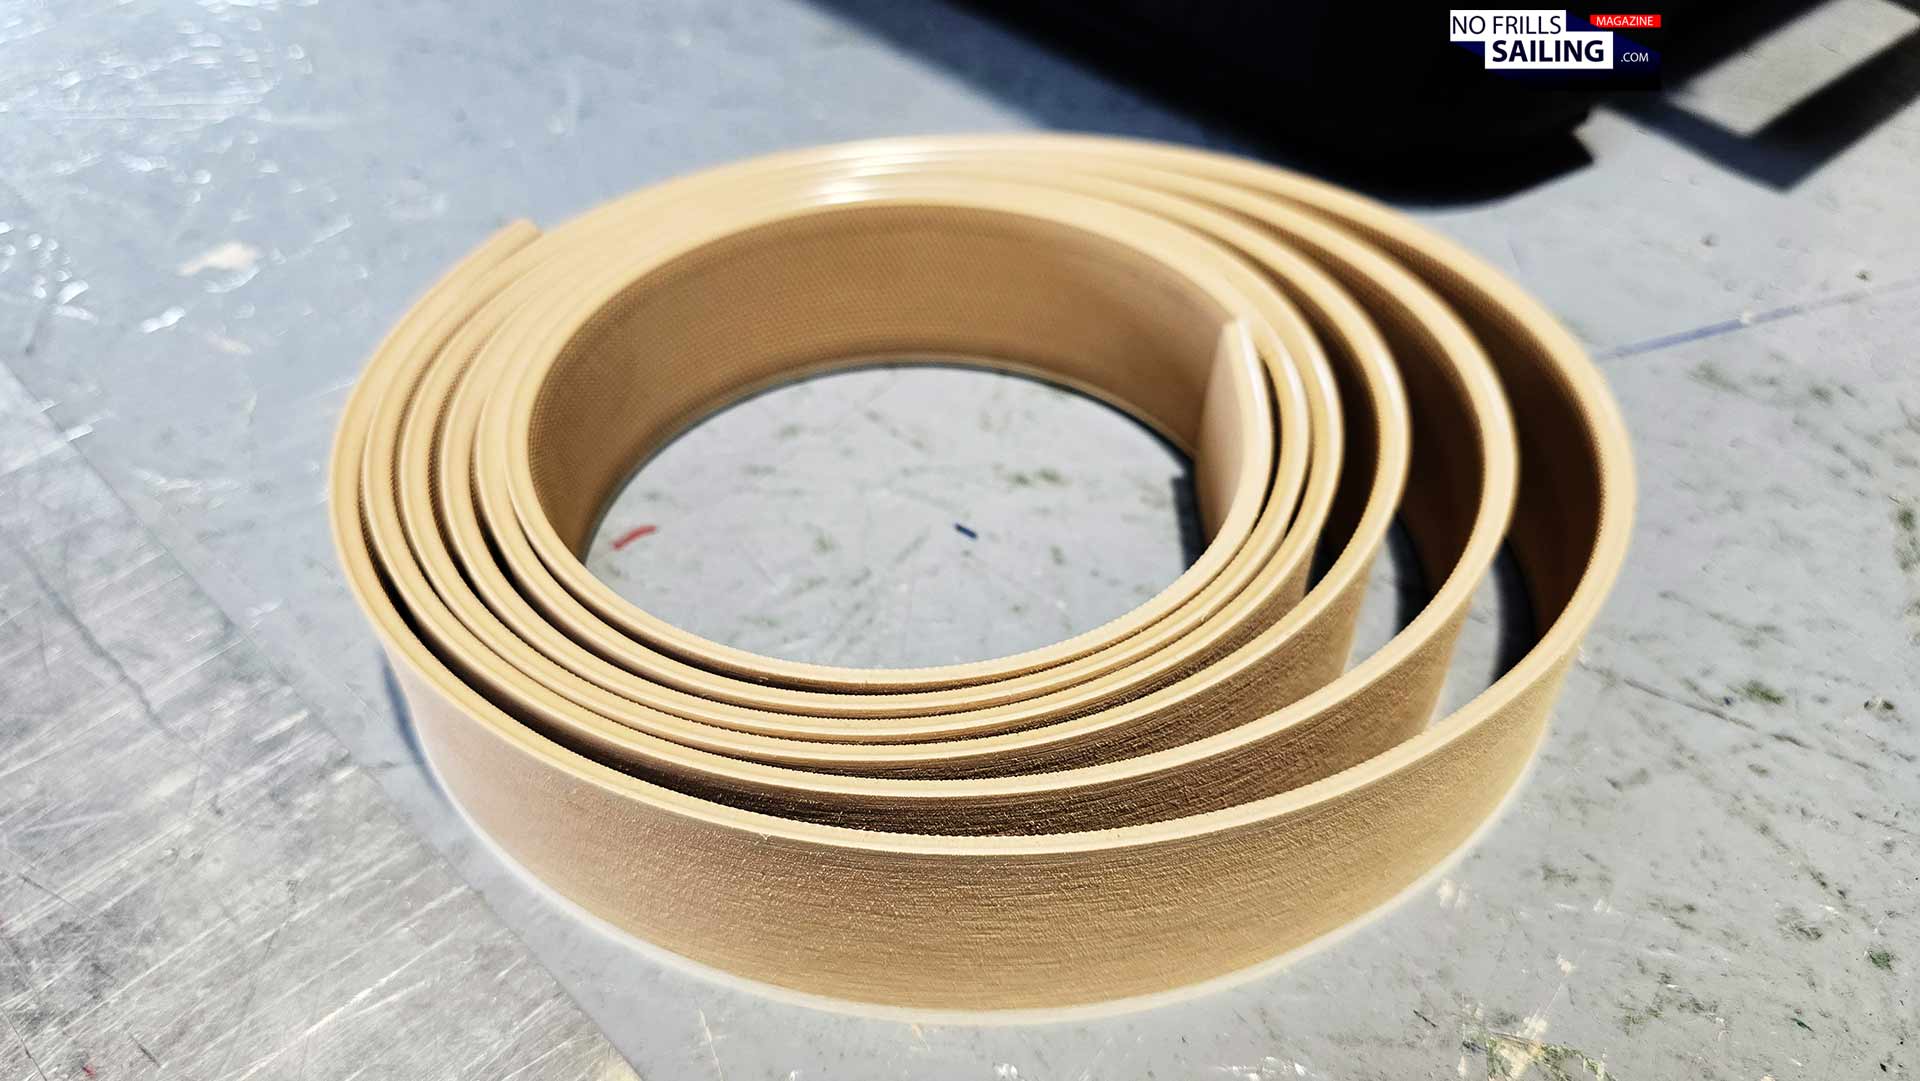
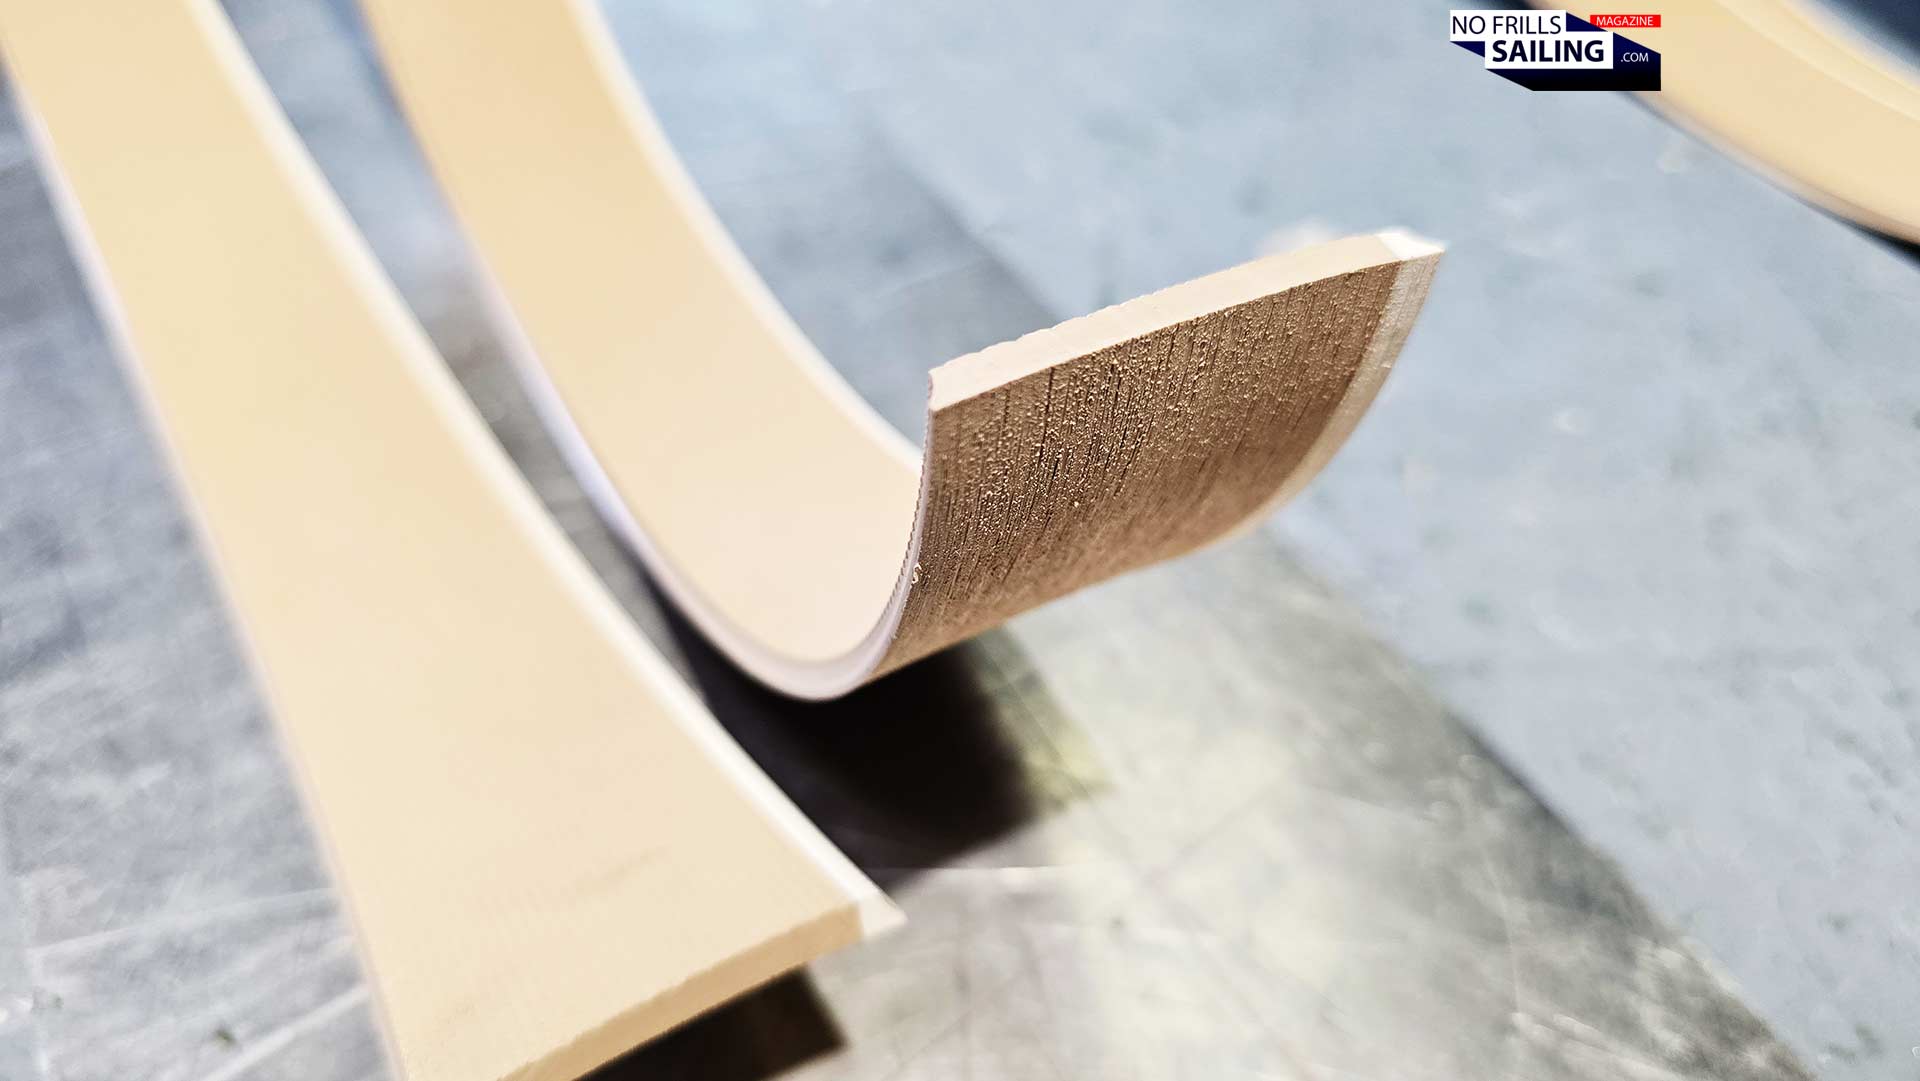
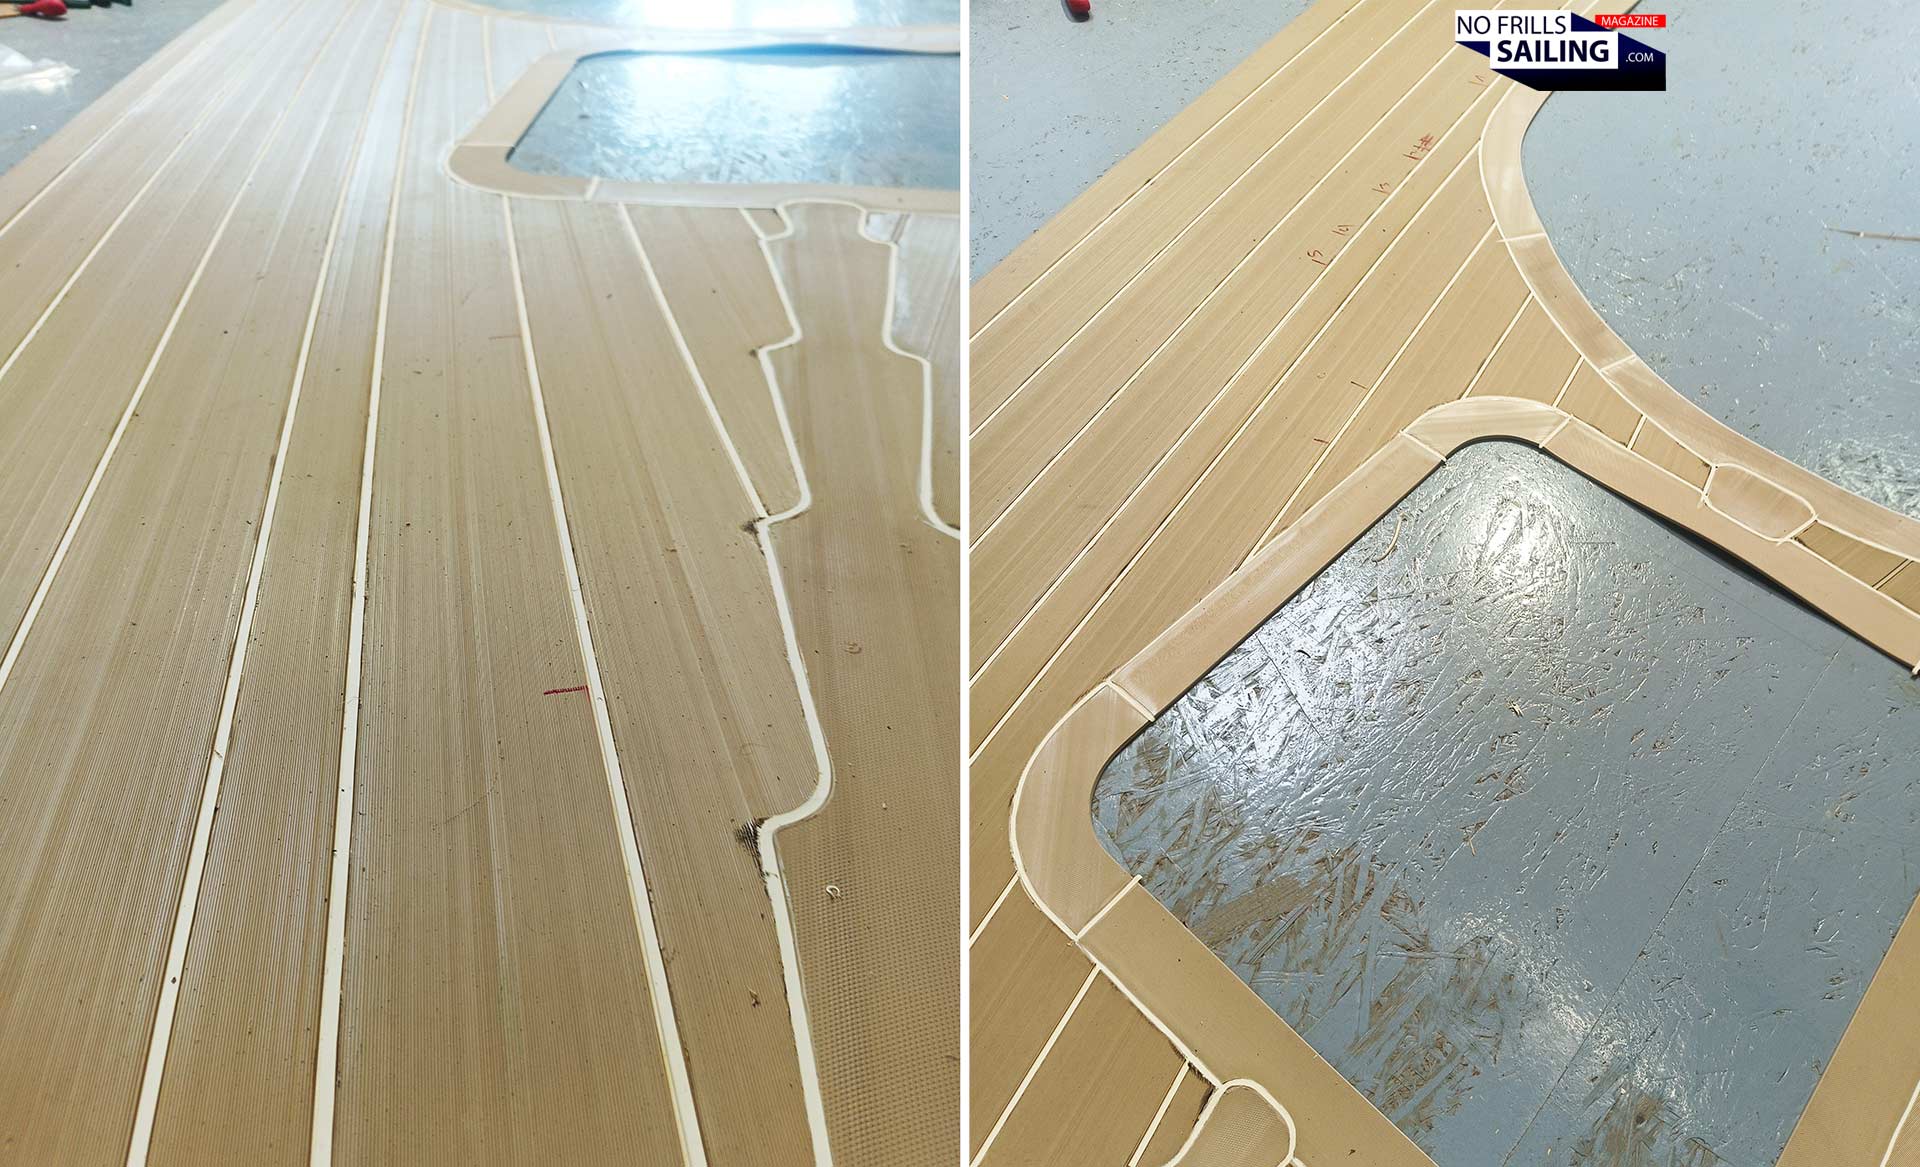
In my last article about the famous “king plank”, the cherry on top for every yacht´s deck, I only briefly showed how the planks are welded together and strong seams are made. So, in compliance with my reader´s requests, here´s the process in more detail: First of all, the “planks” are in fact up to 10, 15 and even 20 meter long coils. This way the builder can trim each plank to size individually. If you look closely onto the photographs, you will notice that the plank consists of the very plank itself but also a thin white part, running all along on one edge. This is the seam, or the “caulking” imitation. Or, one part of it.
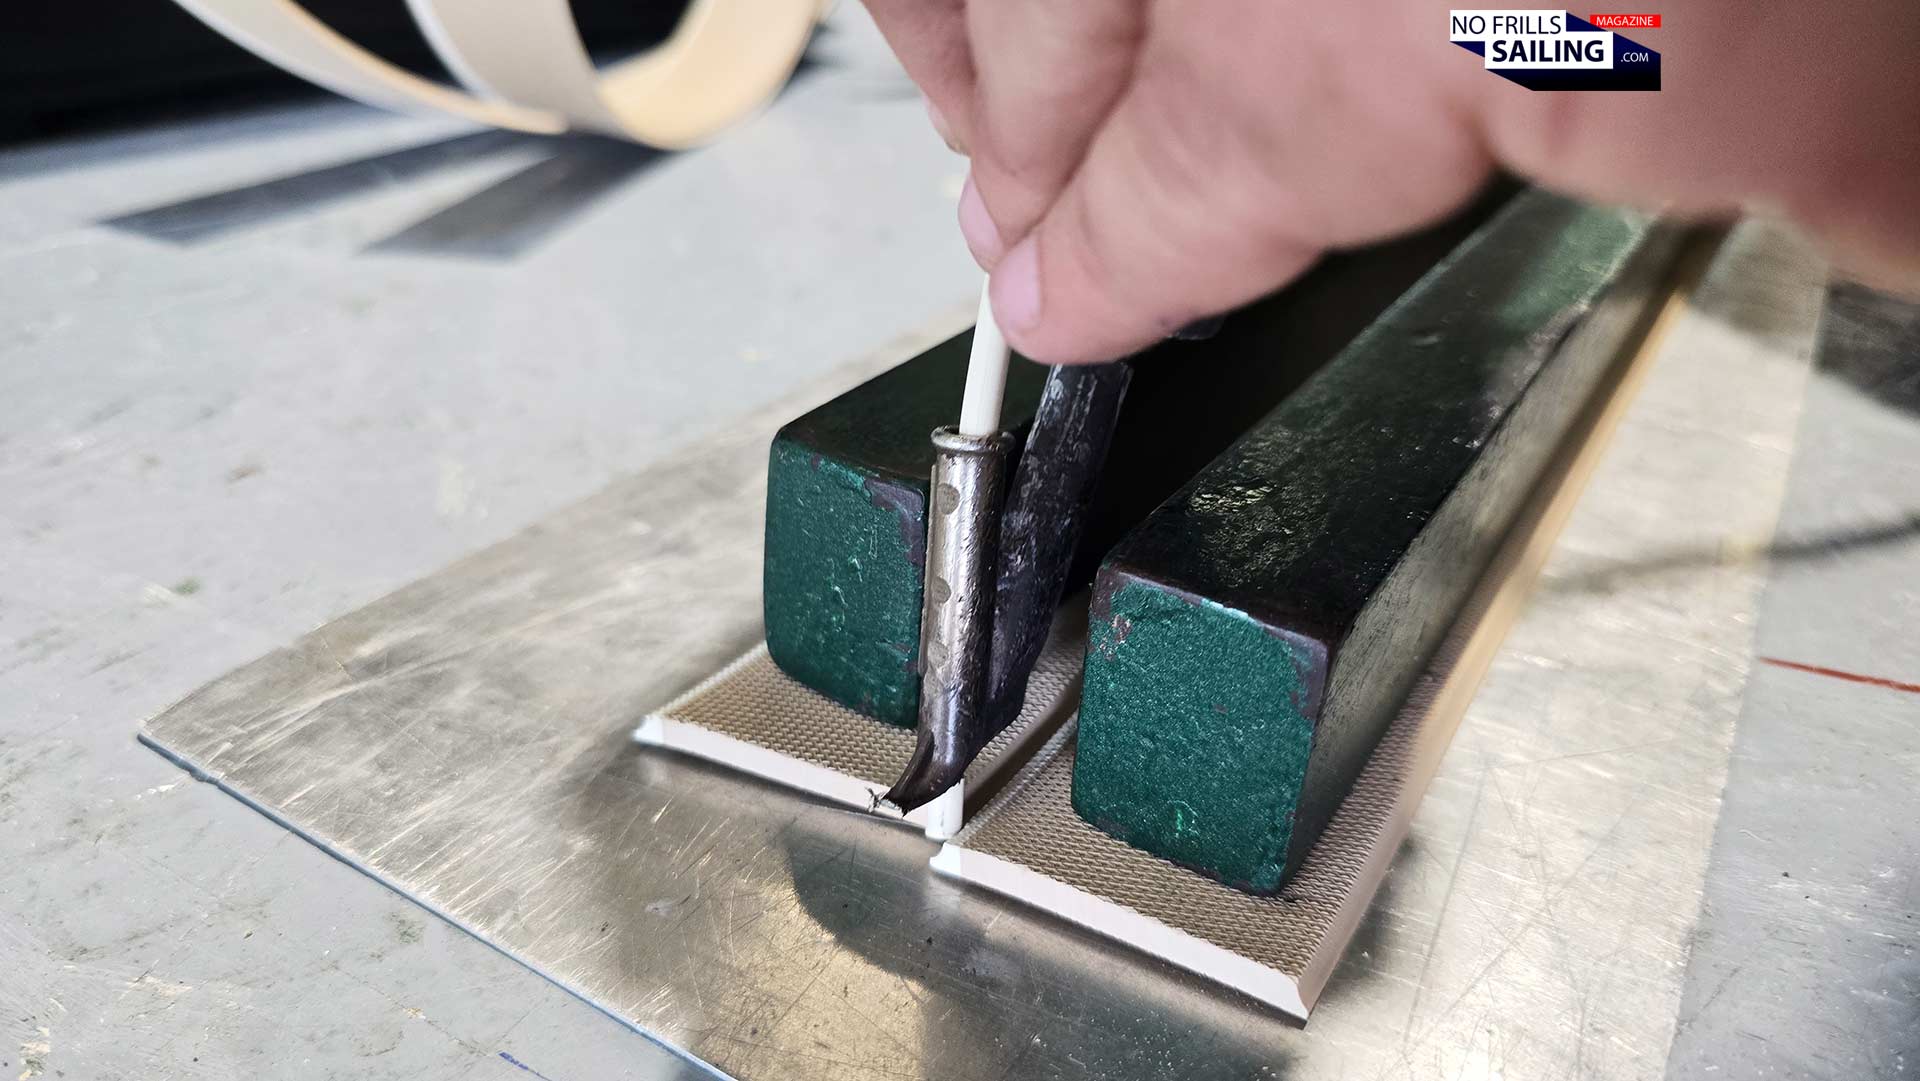
PVC planks are welded together by means of heat. Lots of it. The special welding tool generates between 400 and 500 degrees Celsius in its tip, which is accompanied by a lot of noise coming from the built-in ventilation system. 500 degrees Celsius, that´s a lot of electric energy going into this tool right there, and with it, it needs to be utilized by a skilled craftsman. As you can imagine, the burning hazard both for people and the material is high. Falsely applied, you can inflict serious wounds to yourself and of course to the material. PVC will melt and even burn if subjected to these high temperatures too long. It requires a lot of experience and visual judgement, this certain “feeling in your fingertips” to achieve a clean, proper and nice weld.
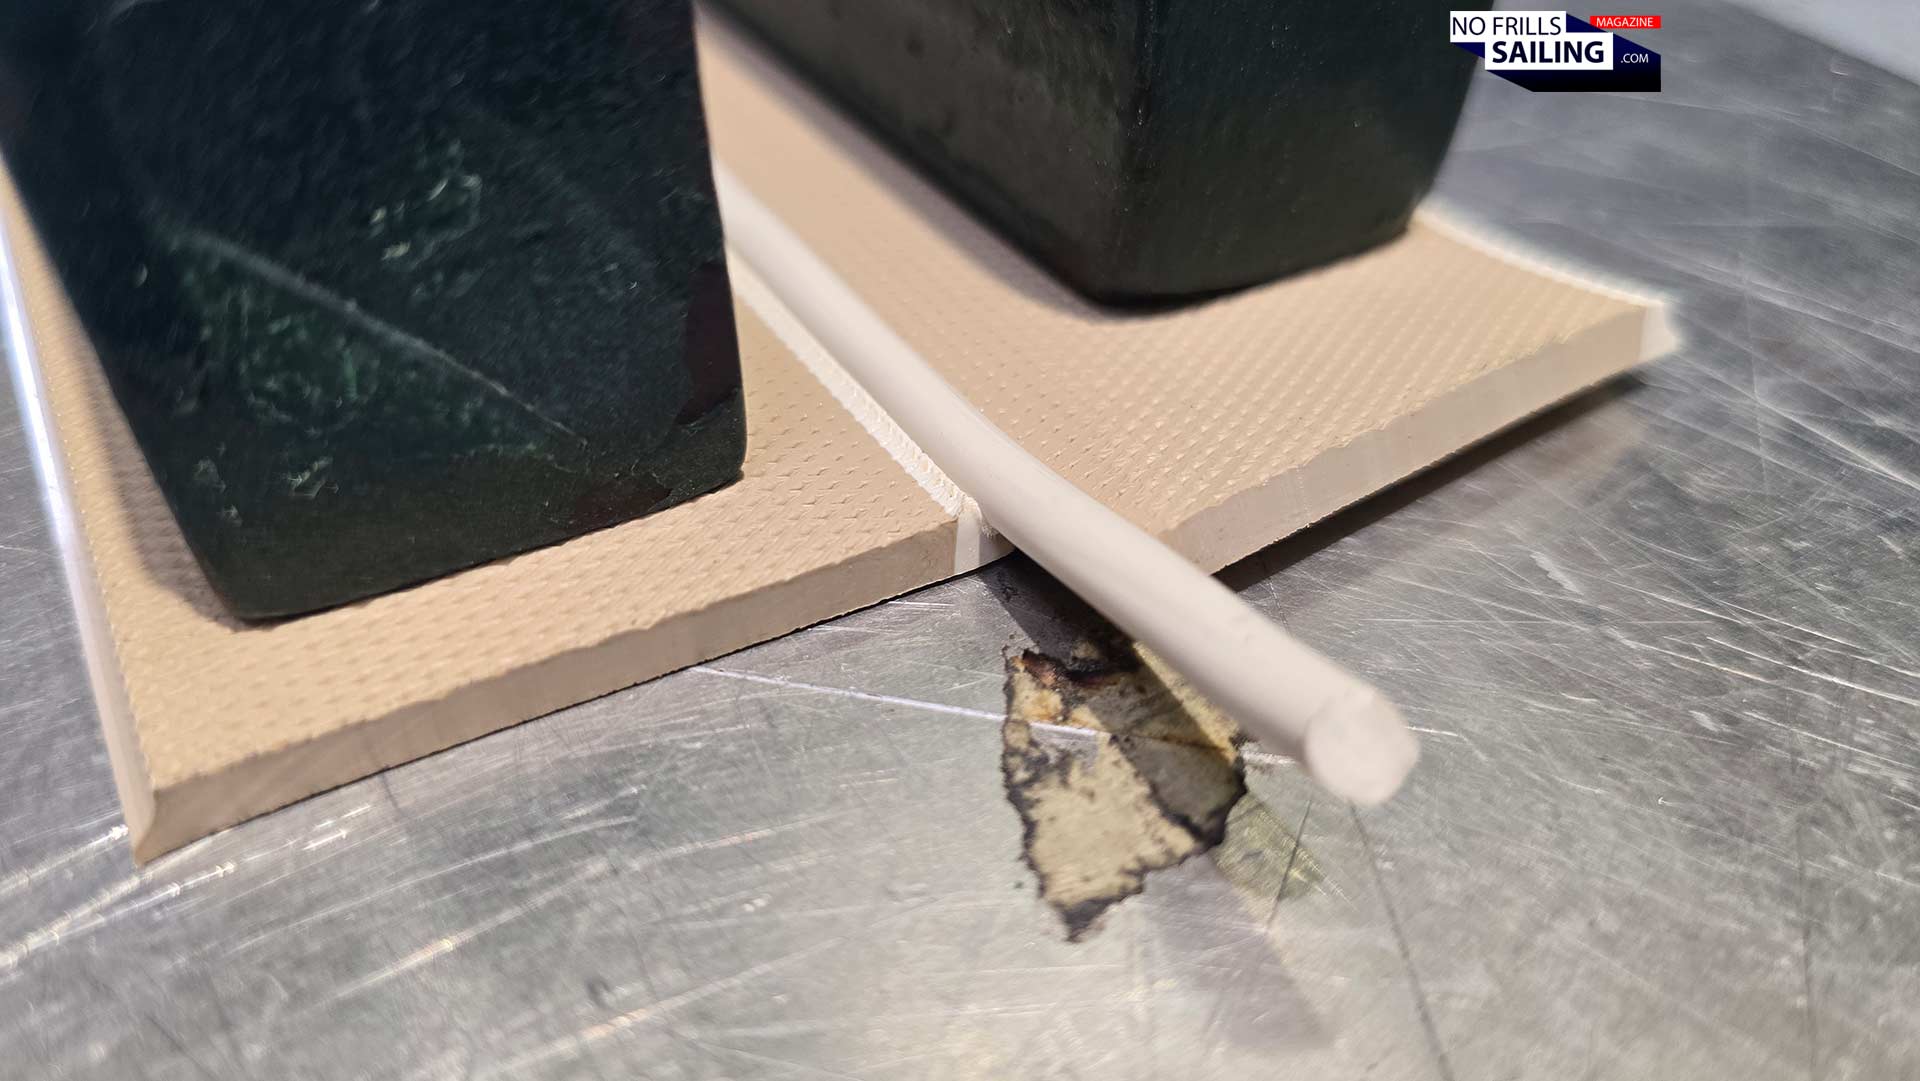
Welding is done by inserting a “braid” into the round-shaped leading duct of the welding tool. Passing through the cooking hot pipe, the plastic braid – made from the same PVC-material as the decking planks themselves too – will melt. As new material is pushed from above, the molten braid will exit the tool on its underside. Here it is “poured” into the void between the two planks. Their edges have also been melted by the tool, now connect and mix with the braid. Cooling down gradually, both the planks connect inseparably with the braid, forming a unity.
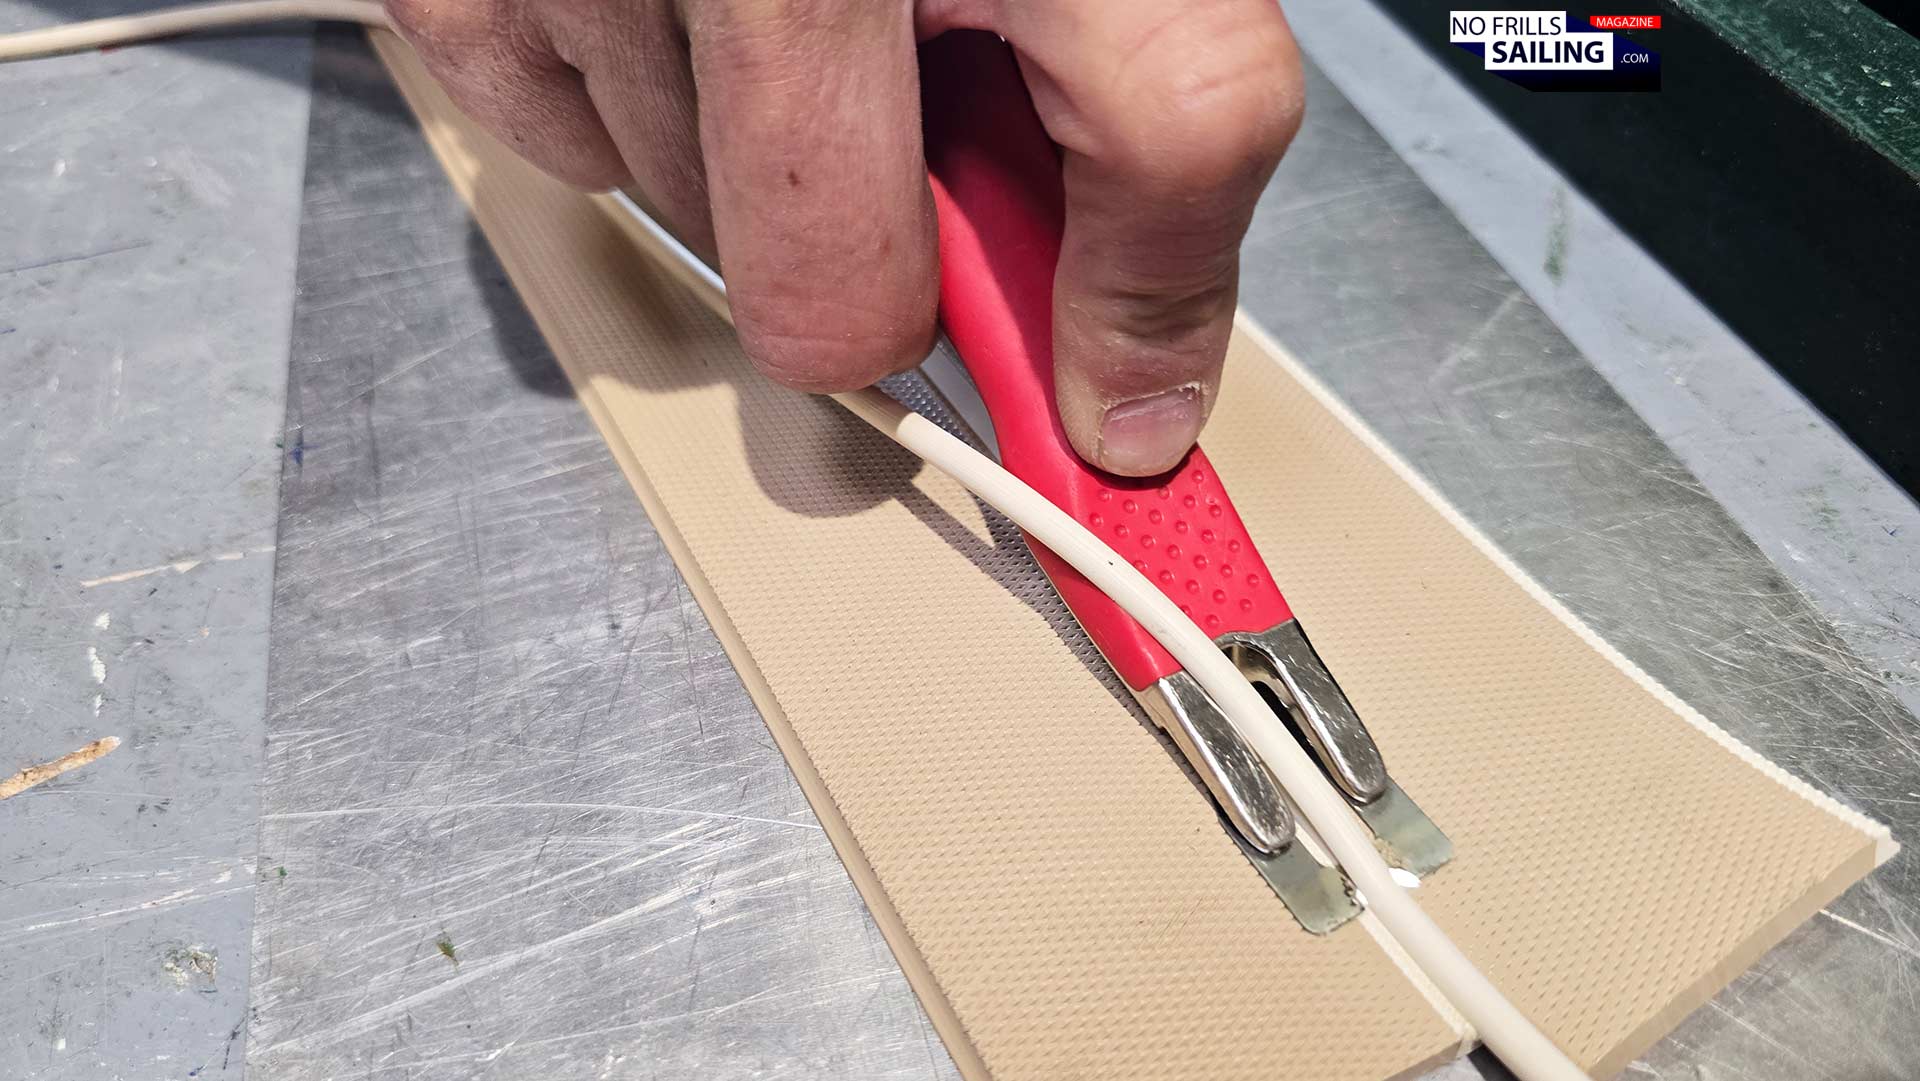
This process is a matter of a few seconds. When welding, a non-sticky metal plate is put underneath the plastics so that the molten material won´t stick to the worktop for once but also would be cooling off faster. The trick is to find just the right speed to achieve a nice outcome. Too fast, and the seam would not be watertight and get loose over time. Too slow and the material will be burning, cause wobbling and even outright melt away. This is where the expensiveness comes in: More complicated shapes – like the mentioned kingplank – make for many more complicated welds, hence time, hence more money. Making and welding a PVC-deck is extremely labor-intensive, make no mistake about it.
Color and design choices for boat PVC-decks
But you have the choice, from the start. Please check out the very first article on this matter, showing how the gauge patterns and 1:1 templates of the deck had been made in the first place, as this is usually the start of such a project. The craftsmen will visit you on your boat to produce a to-scale model of your deck. Usually, you will then talk about the style, the design and the color of the later product: And with it, each decision that makes it more intricate, more individual and more outstanding, will make it more elaborate to produce. And more costly, of course.

Let´s talk about design- and color-choices. There are so many! In fact, at Rosch Yachts I was able to choose from a showcase-fan of more than 10 colors/shades. That´s “fresh teak”, “grey teak” all the way through to lighter, darker, browner and more red tones. Depending on your boat´s character, the sailing area you are in and your individual taste, you can freely choose. Usually, colder and wetter sailing areas ask for darker colors for the deck, in sunny and warmer regions lighter colors are preferred.
I went for “Sandstone” with a white caulking. But, as you can see on the pictures, up until the deck had been ordered, even I wasn´t so sure! I remember running up to Rosch Yachts´ Boot Duesseldorf-display, meeting Ralph, and asking him if I could still change from Sandstone to an even lighter, more yellowish style. I had seen such a deck on a Solaris apparently and found it so cool looking! But apart from the fact that my deck had already been ordered and delivered (well, the base material for it) and for the fact that no matter how nice this would look on the said Solaris, it wouldn´t do so on my Omega 42, I stayed with Sandstone in the end.

Which was good, as it fits my boat´s style much, much better! That said, I can only strongly suggest to you guys, if you plan to fit a new PVC-deck to your boats, to really think twice about the color choices! Make sure to put material samples onto your boat and look at these very attentively: Not every color that looks cool in your hand will do so when applied (en masse!) to your boat! Rely on the professional´s suggestions, maybe ask ChatGPT to render a picture of your boat with the different color options. It´s really a huge decision that can lift up the visual appearance of a yacht significantly … or ruin it.
How the deck is made: 100% handmade!
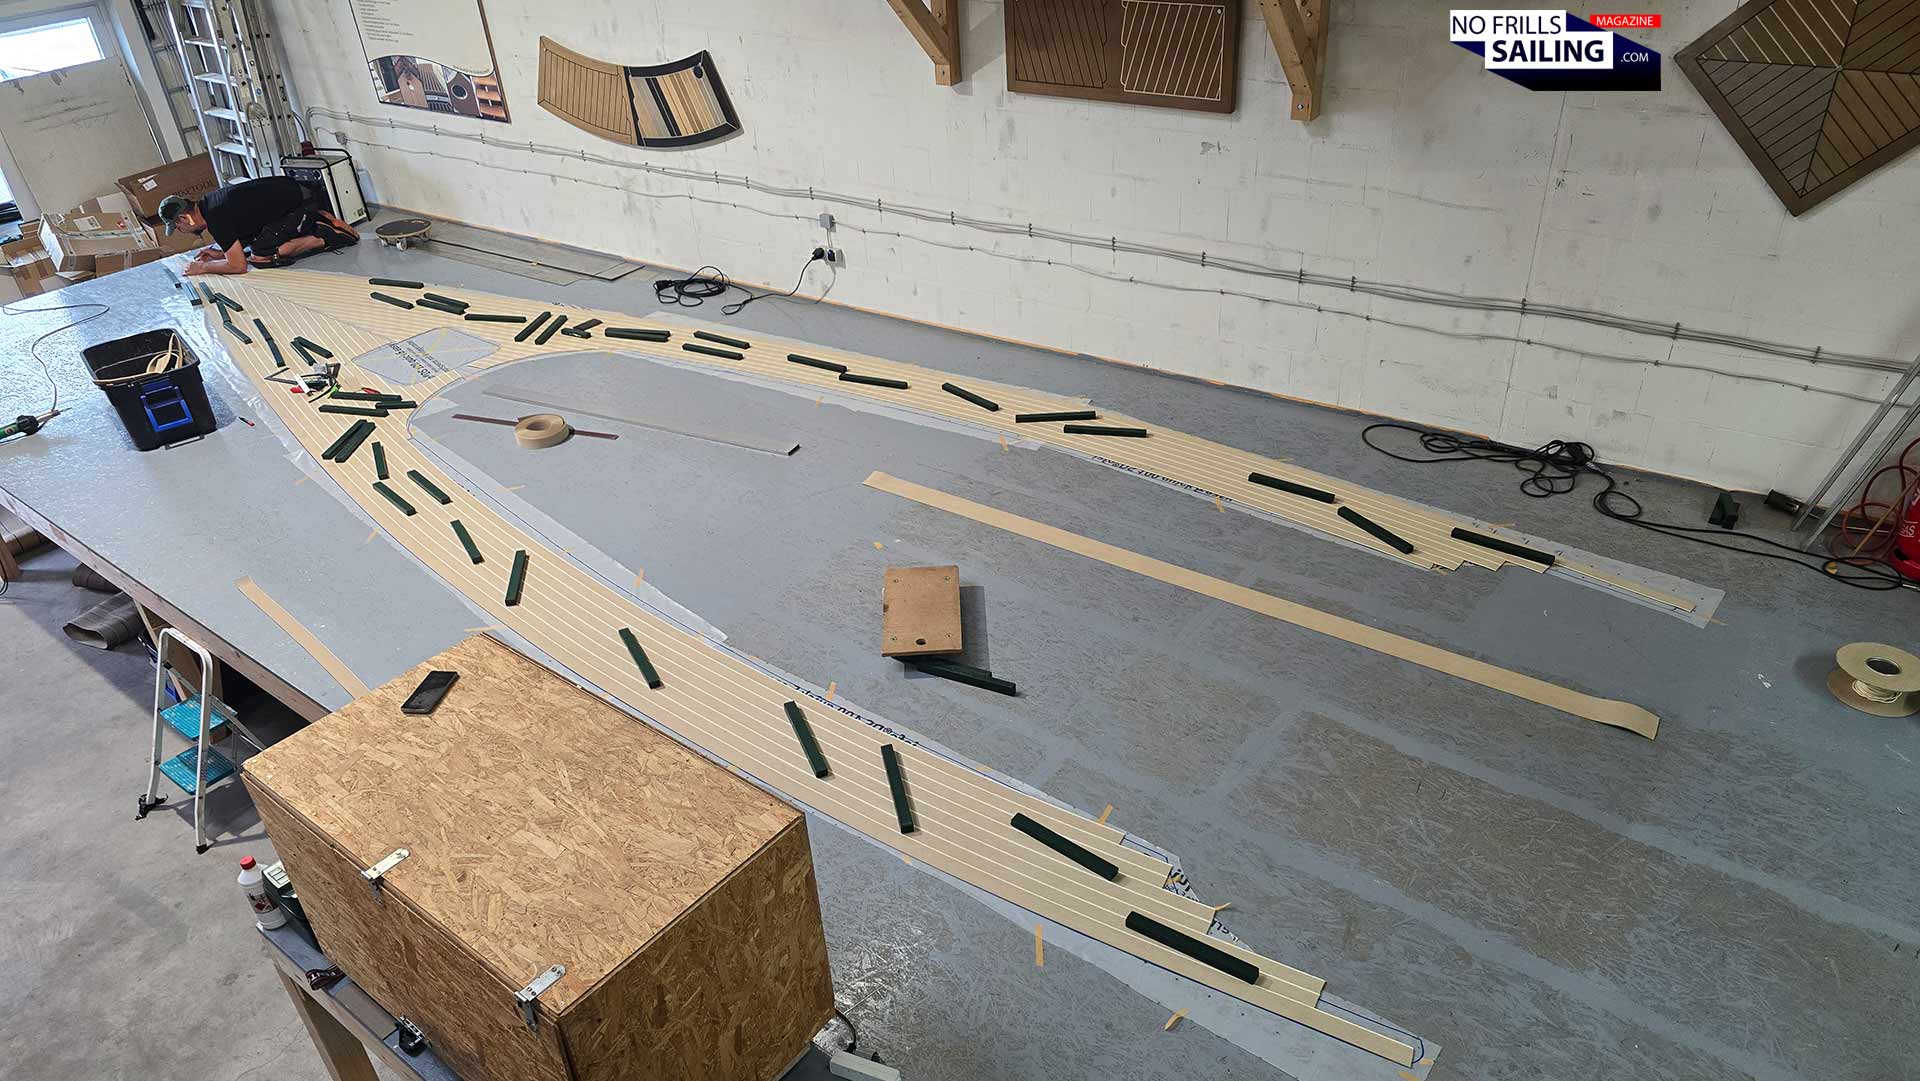
What´s next? Well, this is how the individual “planks” of the deck are brought together. First of all, sorry for the picture quality as these have been made by Ralph, not by me: It was asking for landscape format, but as usual, the quick-shot smartphone upright format was more convenient during the process. I am thankful that the guys took their time to document the making of my deck, I will put together two photographs now, so don´t be puzzled …
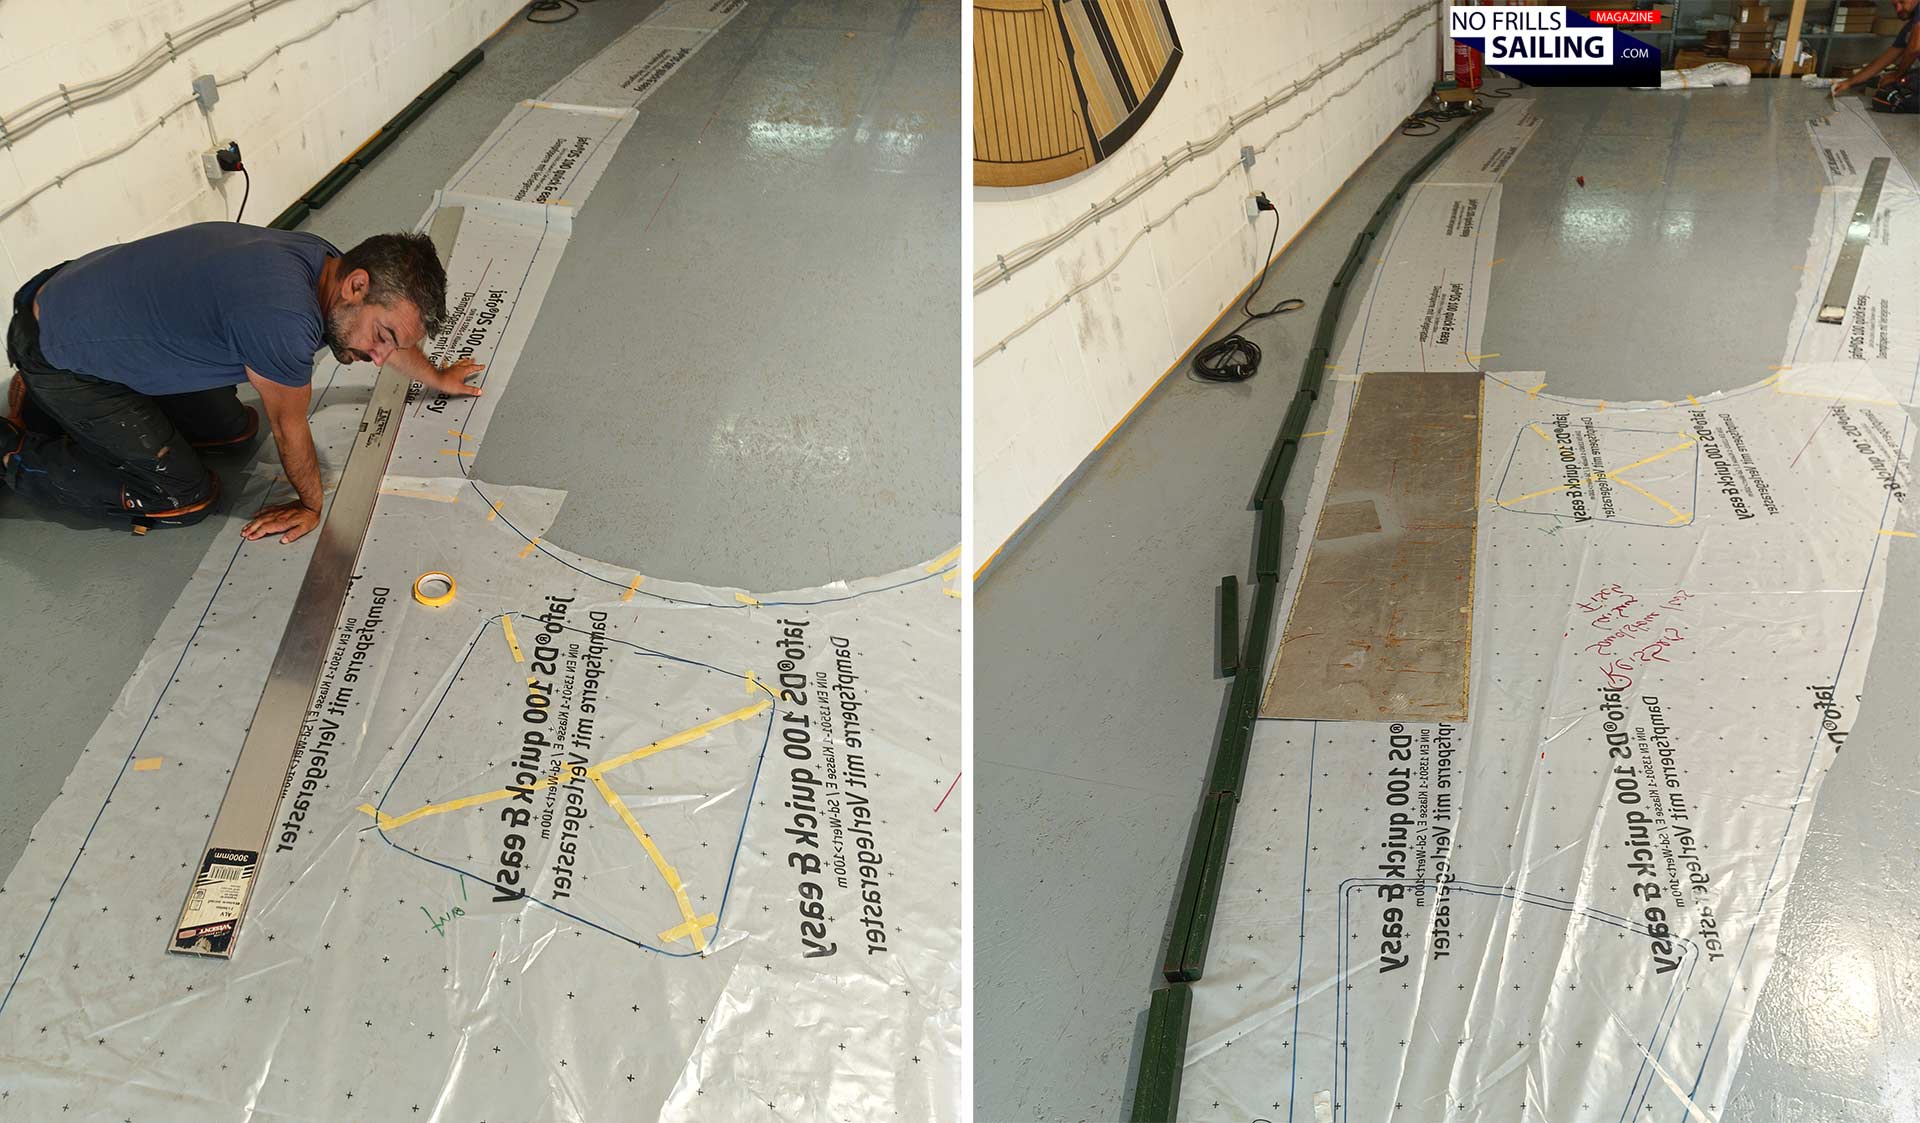
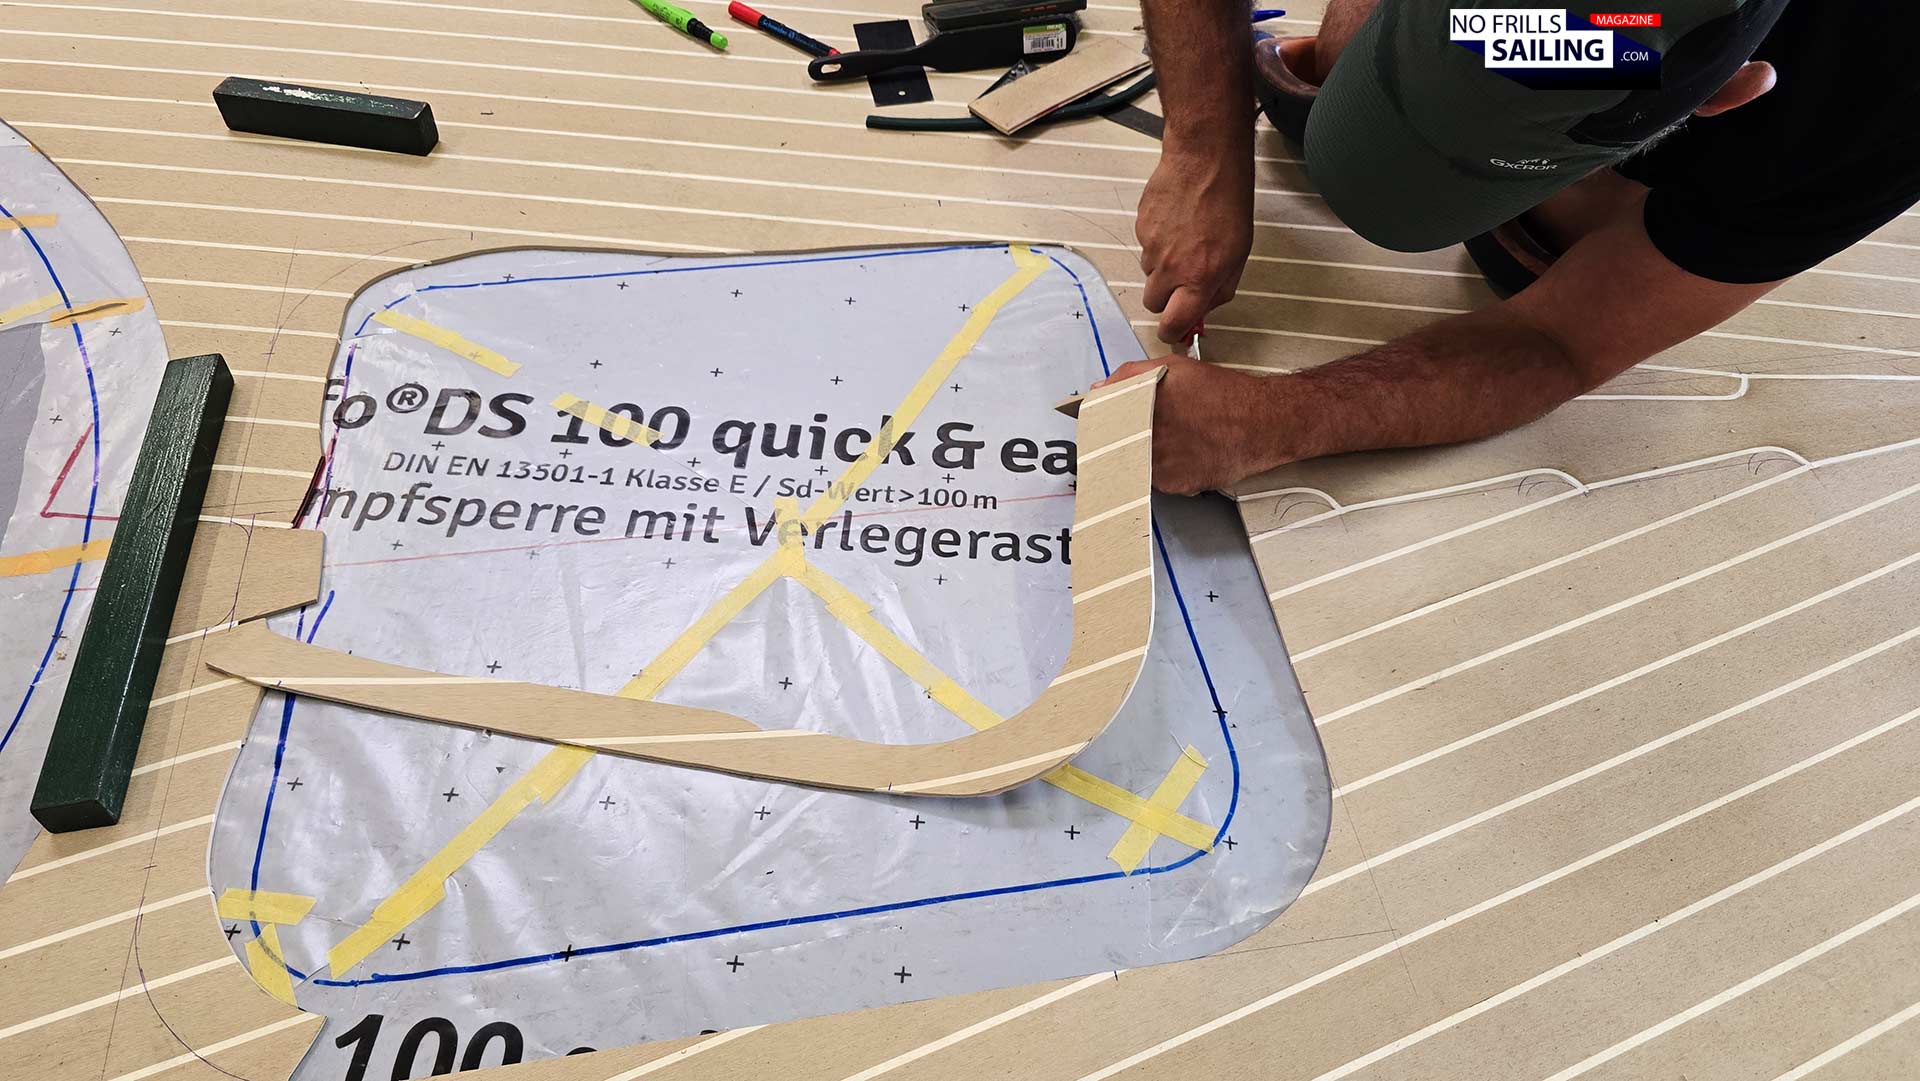
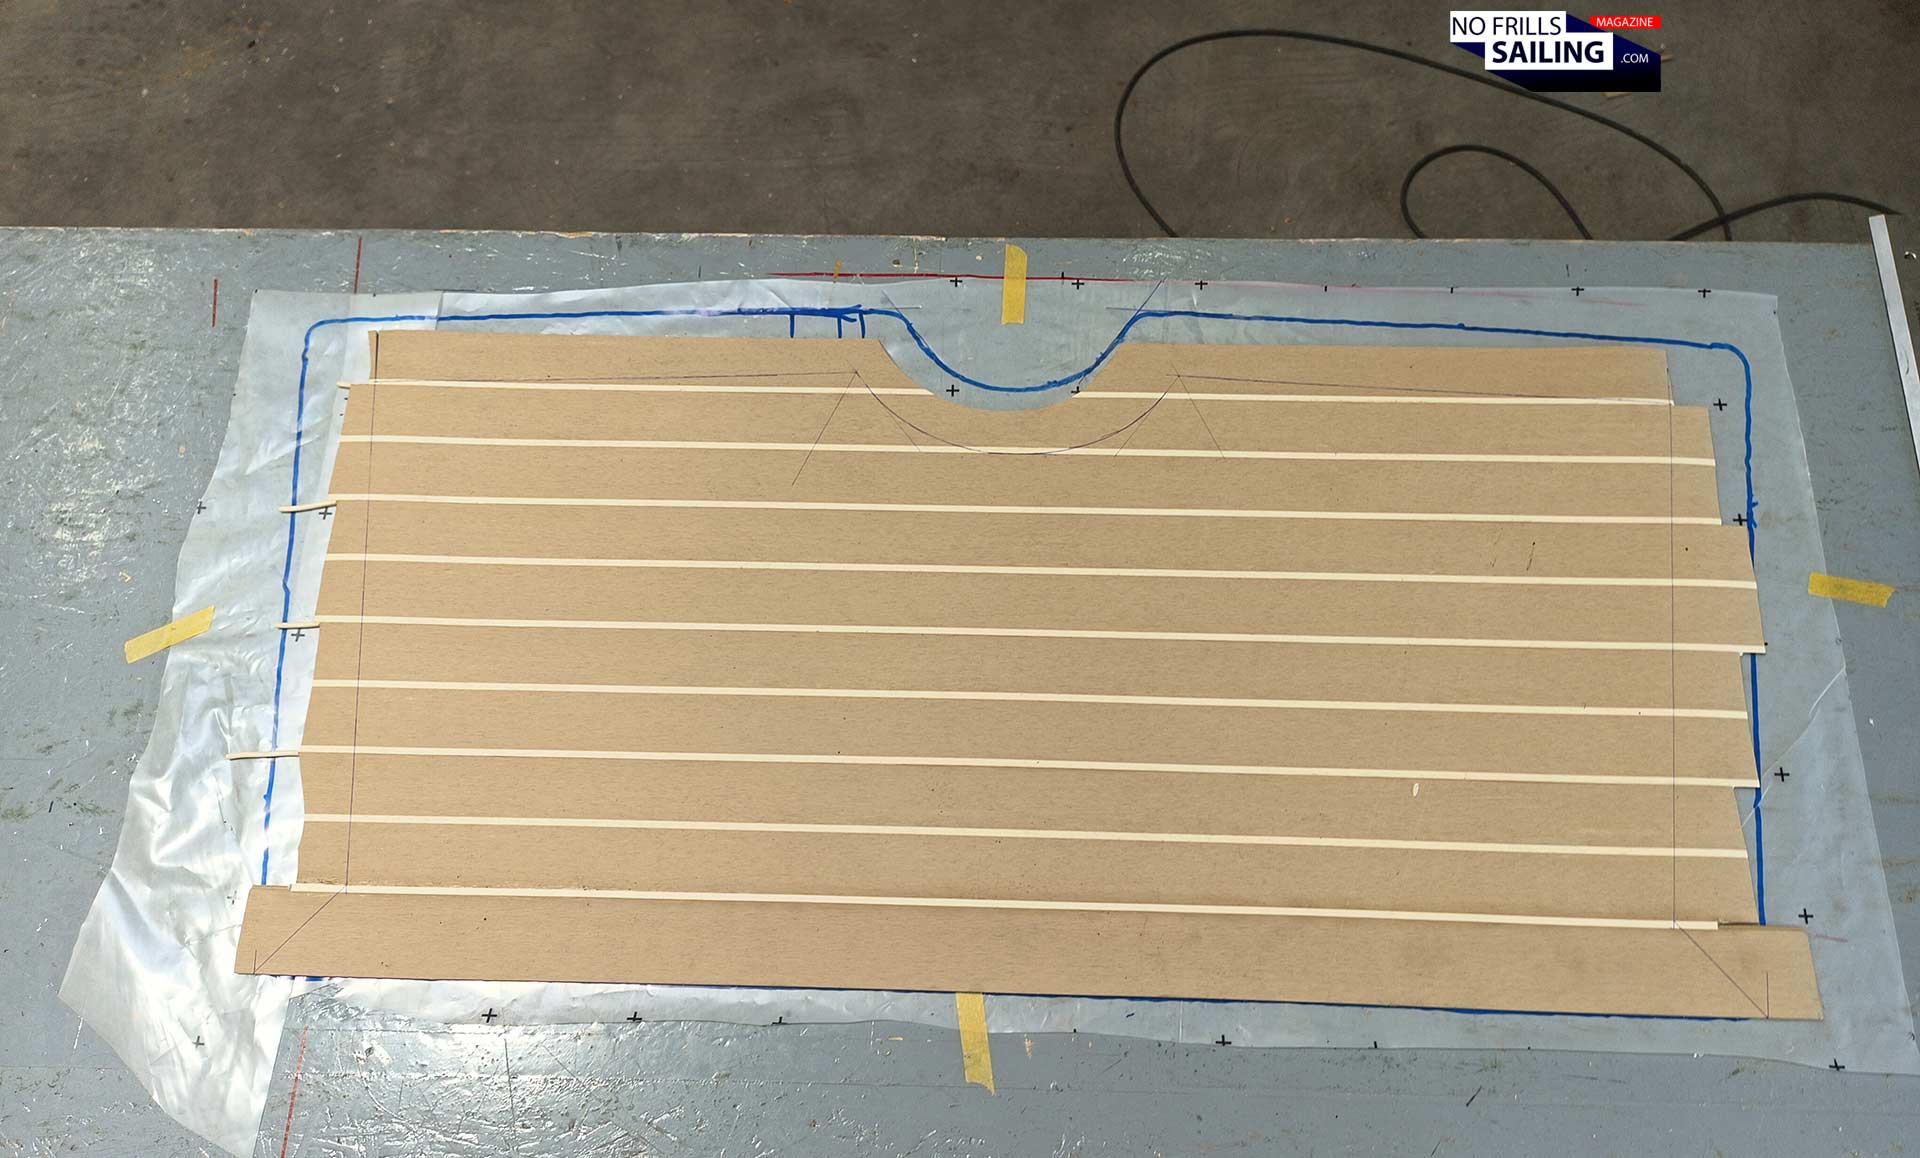
The first step in the workshop is to reproduce the shape of the deck on the big worktop-area. This is done but putting together the plastic foil templates which have been derived from the deck back in the shipyard a few weeks ago. Here, the guys have to work extremely accurate because even one single millimeter or deviation in the back could lead to several centimeters of divergence in the front! For aligning the patterns accurately, Ralph had been putting a lot of guidance-markings onto the gauge models. When finished with this step, my boat´s deck is visible now in all of its beauty and detail on the floor: The outline shape, where the coachroof is and where the hatches are located.
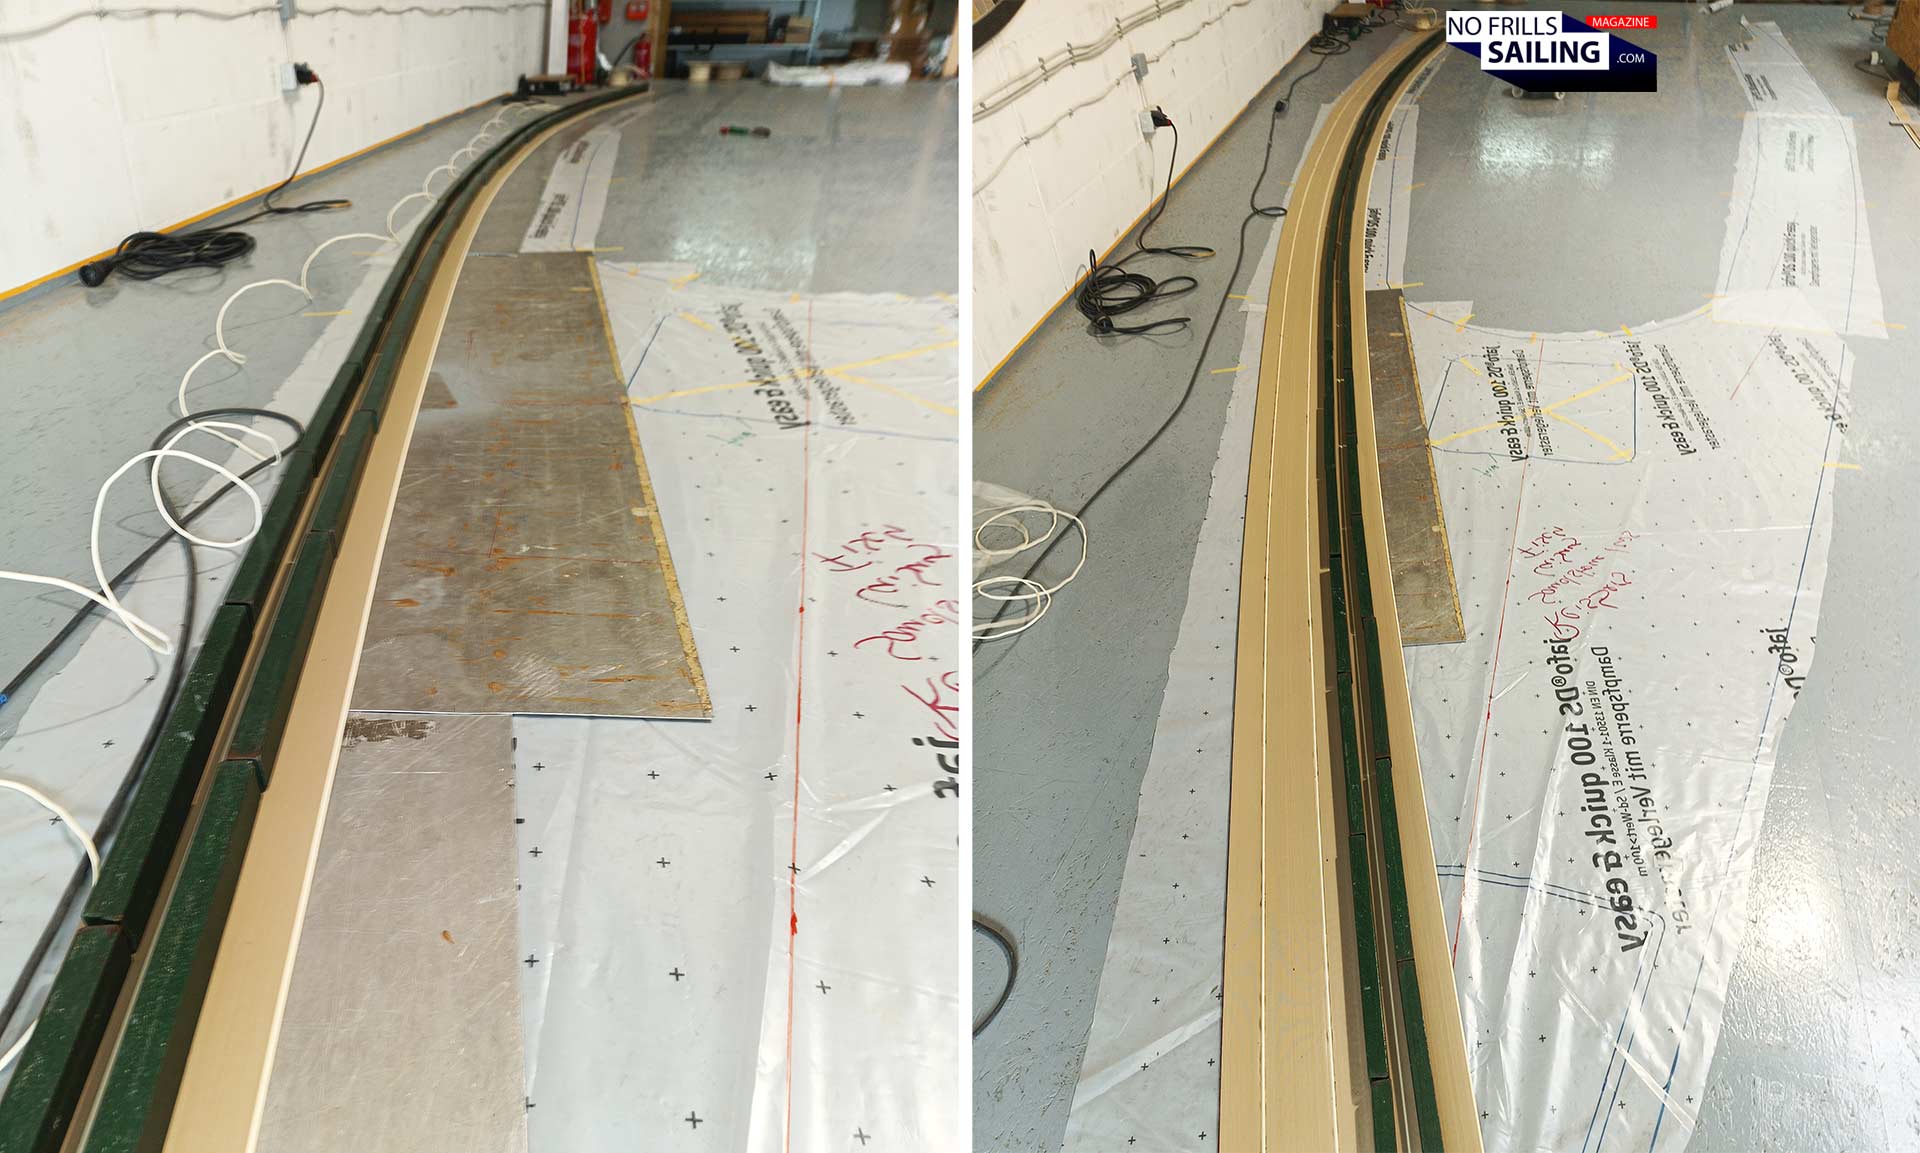
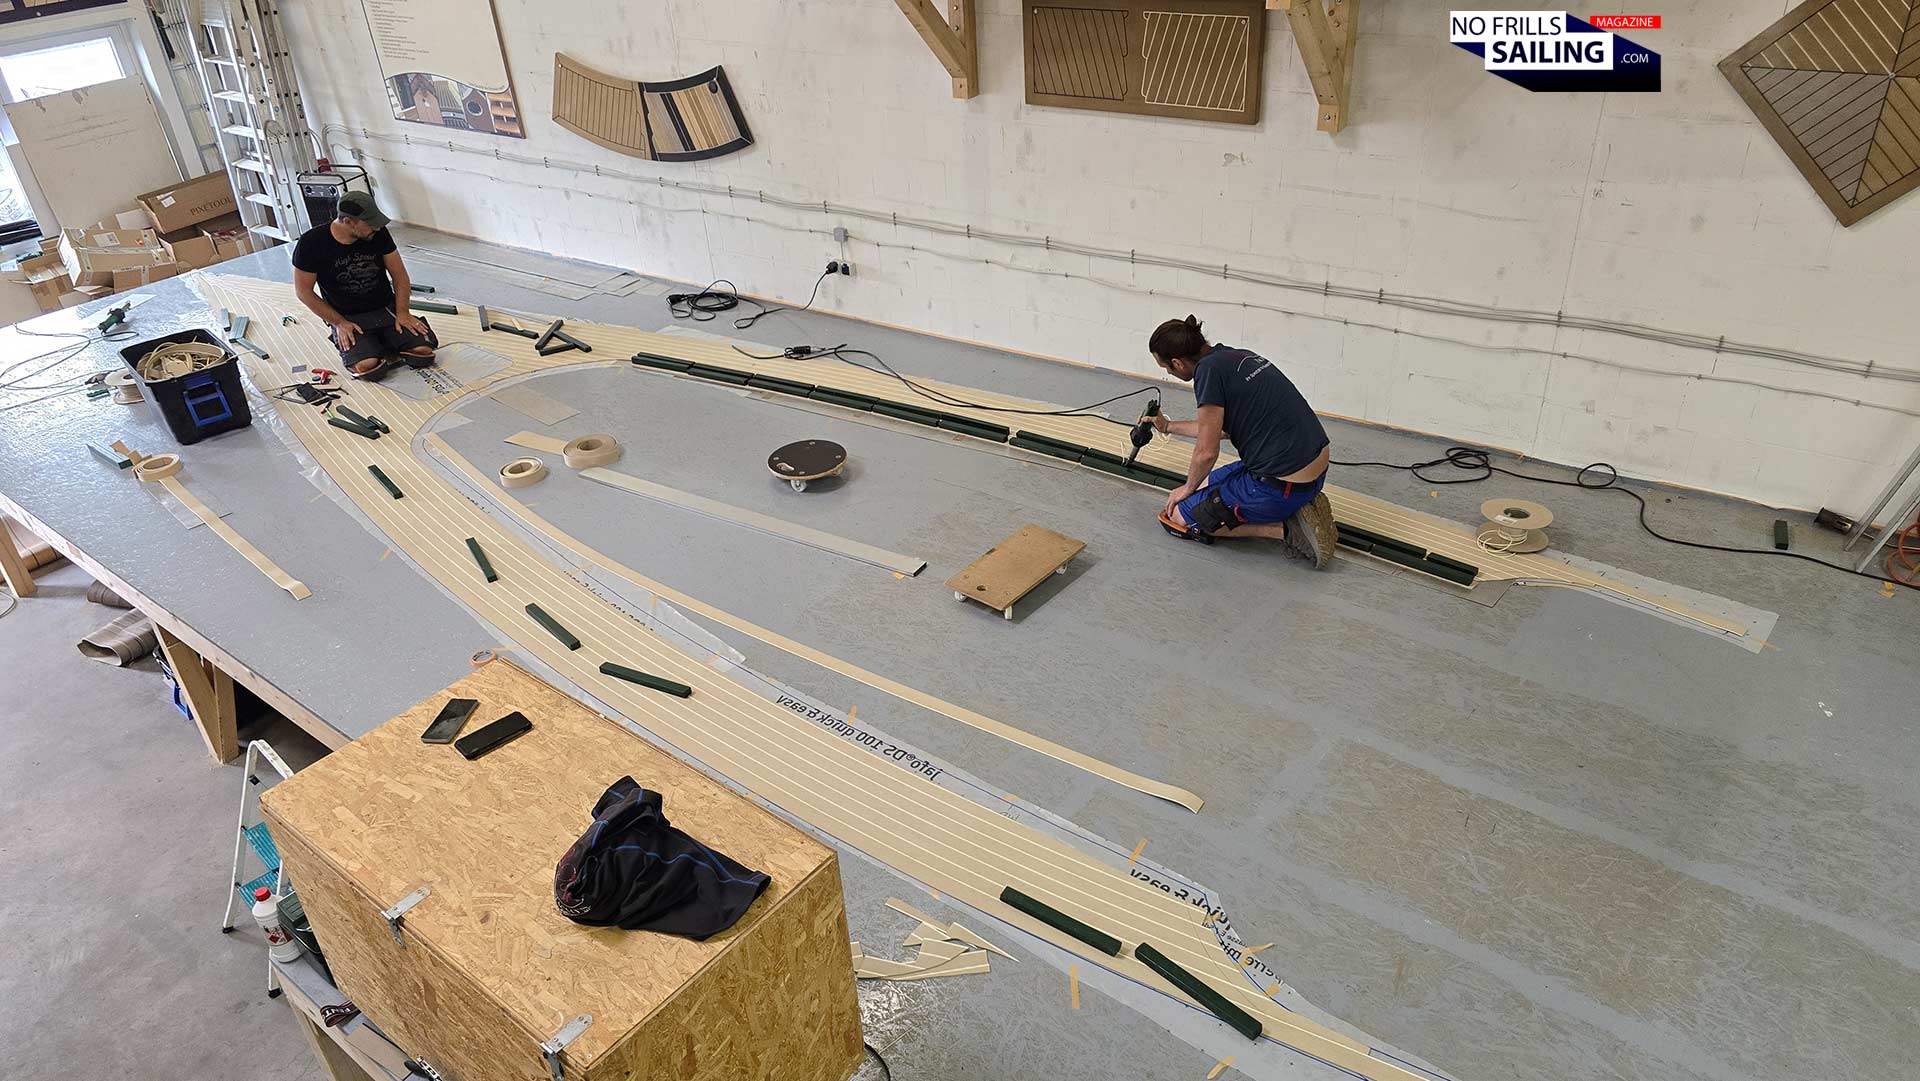
Now, beginning from the outermost plank, the PVC-“batons” are placed all along the lines. That´s the nice thing about PVC: It can be bent to quite a degree to follow certain shapes. This way, even relatively complex designs can be achieved. Plank by plank these will be cut to size, placed all along the neighboring plank, held in place by dozens of iron bars acting as balancing weight which hold the plank in place. After a new plank has been arranged in that manner, they control and check if it sits and fits right, before welding it to the other. This way, plank by plank, the principal deck comes into being. From the outside to the longitudinal central axis.

The thing is, the craftsmen working on the PVC-deck need to do it “flipped” upside down. As you have witnessed already, the welding is done on the underside of the deck, with most of the caulking already being a part of the plank – so the (in my boat´s case) white seams are not the molten braid, but the white part of the plank. This is one of the big differences in the code of conduct to working with real timber, where the boatbuilders can always see the upside, the later outcome, of their work: With a PVC-deck, they will only see the complete pictures once it´s flipped over.
The Cherry on Top: Butted planks & margin boards
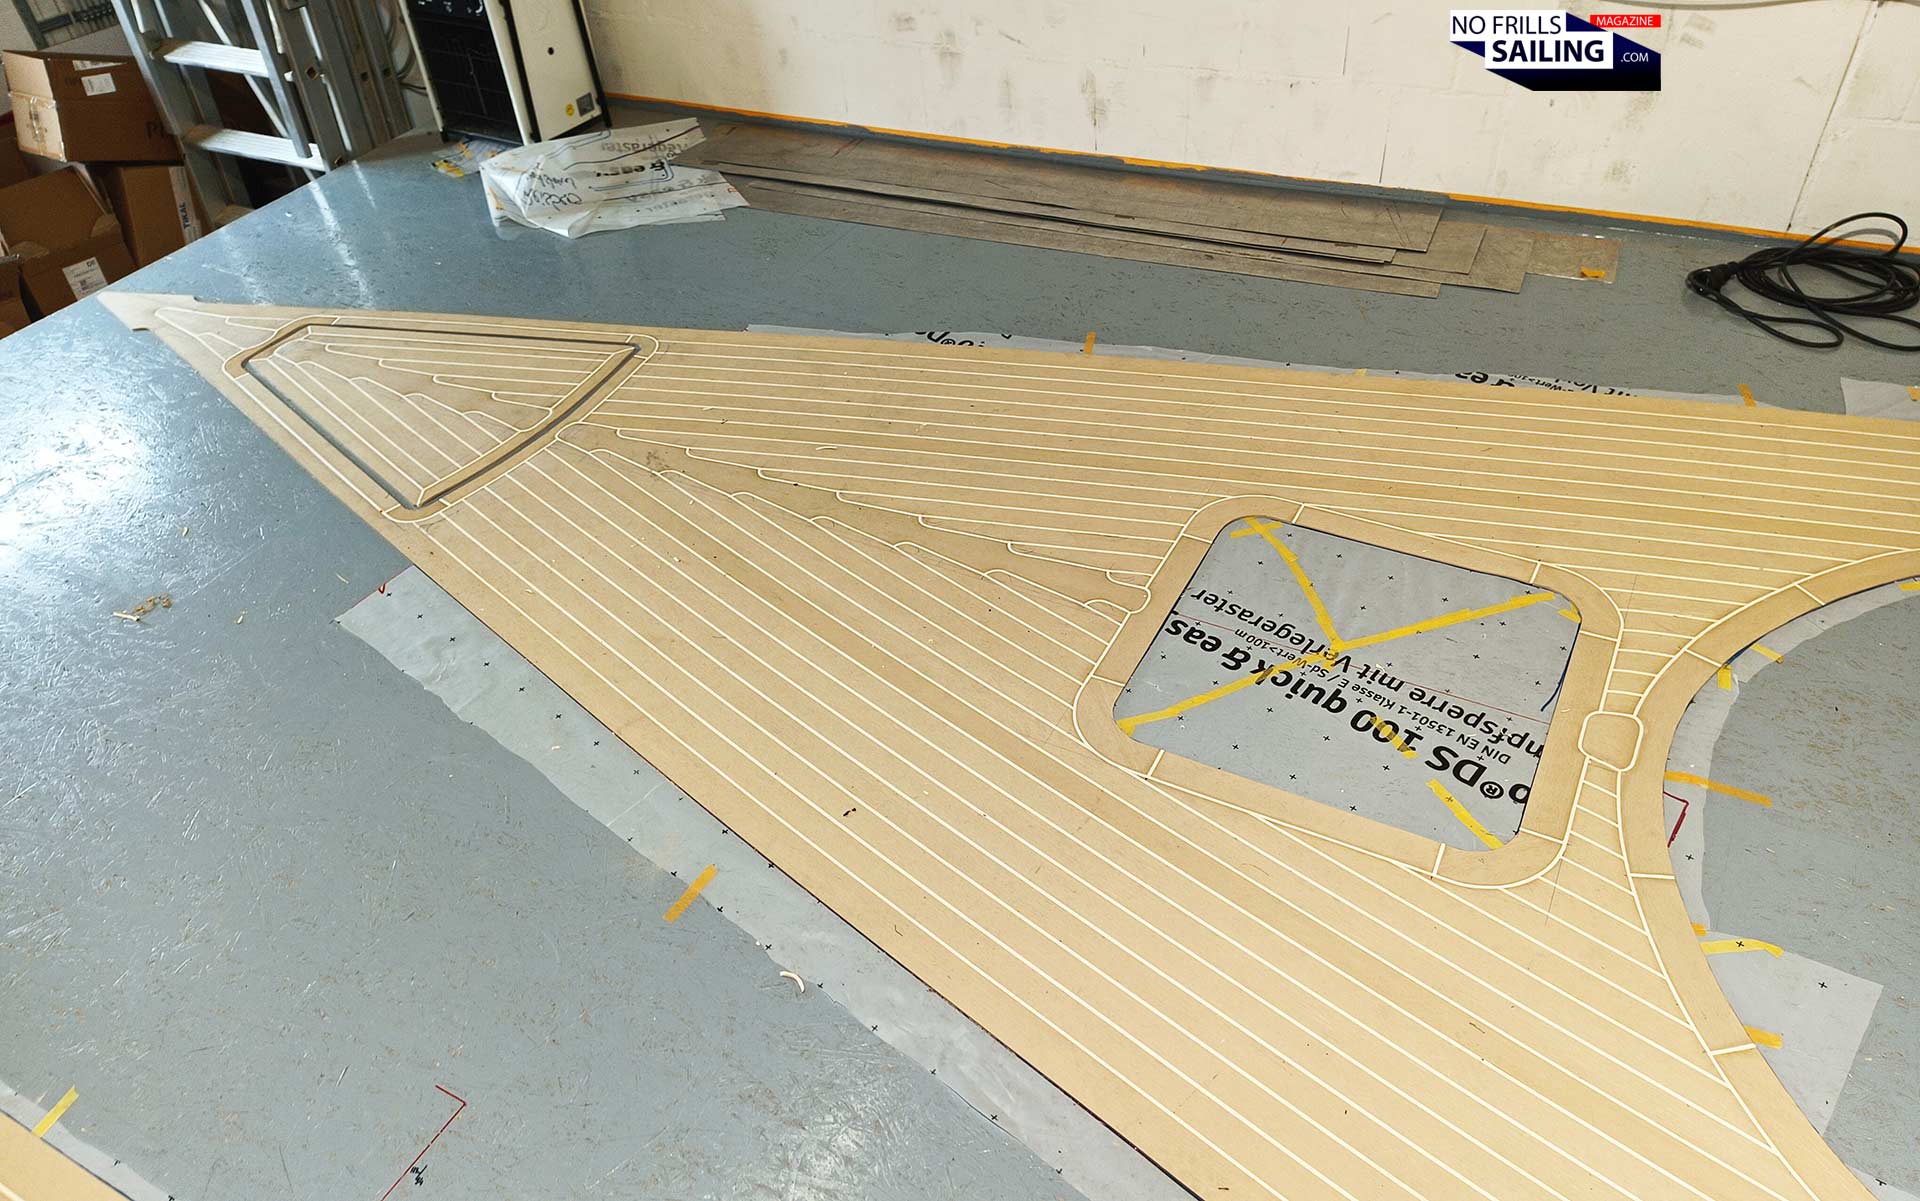
After the bulk of the work has been finished, both the deck and the template are flipped to an upright position. Much of the overlapping material is now cut off and for the first time the deck can be seen in its later appearance. The process of welding together almost 90 percent of my boat´s deck took a two-person team around two days of working time. What comes now is the details – but here, wheat is separated from the chaff. Because what follows now is where the true, capable craftsman and master boatbuilder can distinguish himself from a cheap amateur.
The embrasure, or “margin boards” as boatbuilder call it, are most labor-intensive and time-consuming. Hence, the level of expenditure that goes into making these will greatly influence the budget you will need to pay for it. On “real” ship´s decks, the margin boards aren´t made to make a deck look good, but to insure strong joints and watertight, immovable bonding of the deck planks. Also, these would take on the load bearings much better. In modern yachting, it´s merely a stylistic thing that makes for the “true” looks of a PVC-deck. So you can either scale up or tone down the level of “tradition” for your yacht deck.
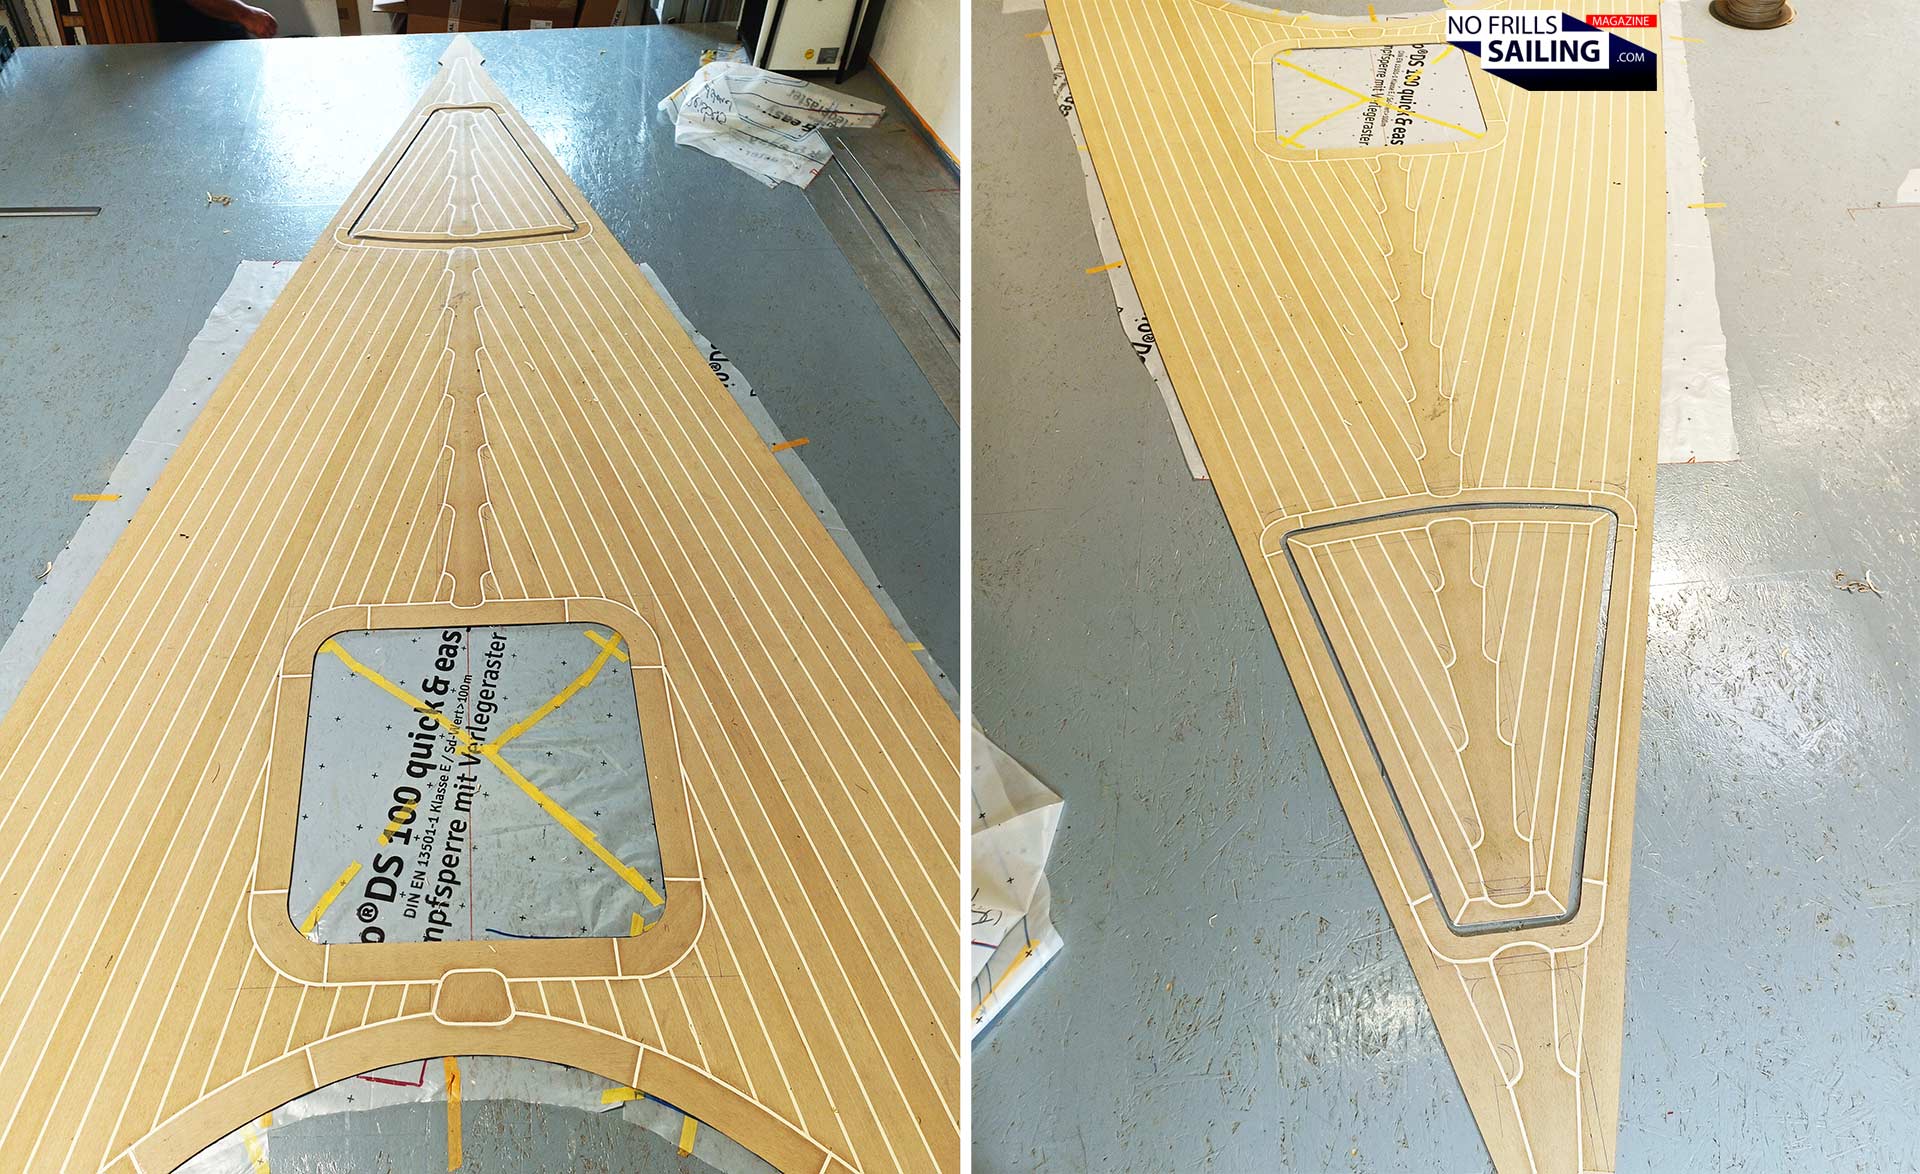
I scaled it up. Because, if not the Omega 42, which boat is a true classic?! This was in fact one of the first things I decided to change after I saw hull #001 which does not have a deck at all and thus really lacks something. The true beauty of these breathtaking Peter Norlin lines – in my eyes – will only appear if you separate visually the his awe-inspiring hull shape from the deck. And since the Omega 42 is an all-time classic, there´s no question that I would go for the full set of margin board-style and even the kingplan, which indeed is the “Cherry on Top” for any good looking boat´s deck, especially in the bow section! You may check out the article showing how the kingplank is made as well here if you haven´t already. I asked the guys to go “all in” for the embrasure-style, and as you can see, they did. I just love the outcome!
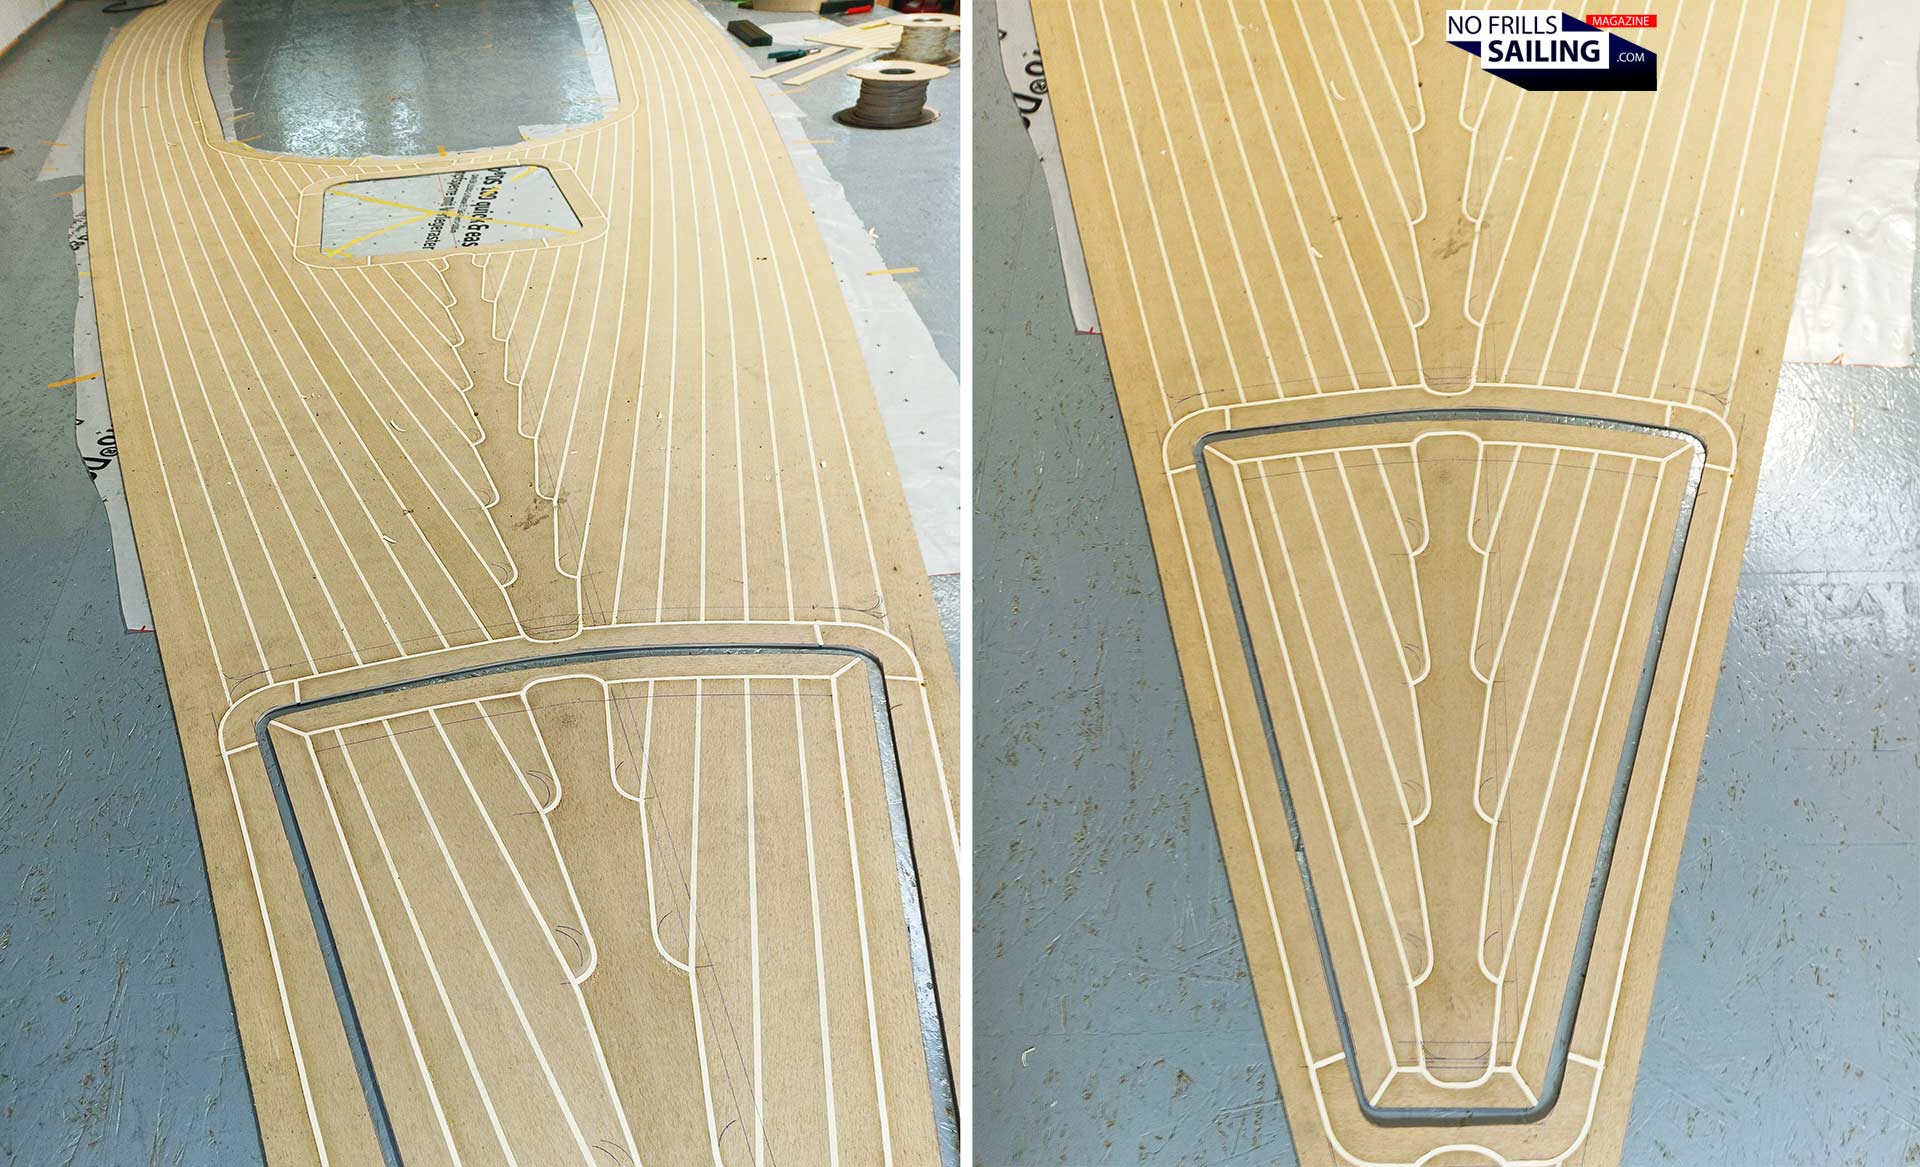
In fact, Zsolt, the craftsman who did most of the work, told me, that my yacht was predestined for this kind of work: The more pointy and elongated a bow of a yacht is, the better looking a kingplank will be. Shorter, “stuffed” and wide boats make for unattractive kingplanks, as they would appear to be somewhat “shrunk” – then it´s better to insert a straight, non-butted central plank.
Before the deck is glued to your boat
So, how do you like the deck design and the outcome? I am really pleased! Sending the raw picks right away to my shipyard, the guys back in the building shed were rejoicing. This feature will truly shape the whole appearance of the ship to a great extend. Together with the custom made coachroof windows which I put a big emphasize on (check them out here), the deck of the Omega 42 will look just awesome, I am sure! But behold, we haven´t been arrived yet …
The deck will now be flipped onto its backside again. Each seam, each weld is thoroughly checked. Offcut is taken away and the deck´s underside is prepared for the last big step of the production: The day when it is glued on top of the boat itself. As Zsolti and Ralph will be working about 300 kilometers away from their workshop, everything must be prepared, everything must work out perfectly well as there is no margin for errors.

Preparations include not only the seams and removing offcut material, but also the smoothing of the complete outline shape of the deck. Utilizing different tools – both handcraft and electric machines – the guys will soften out inconsistencies, variations and small faults. In the end, as you have realized by now, even the PVC-deck is a 100 % handcrafted product. Hand-cut, hand-welded and so forth: It is completely natural that shapes cannot be absolutely flawless nor symmetric. Most if not all of these notes are taken off now as the deck nears its completion.

Can´t wait to see it fitted!
The big part of the deck is finished, after the upside gets a thorough sanding. In this work step, as with a real wooden deck as well, the whole surface will be smoothed out, all the biro-markings will be taken off and a fresh, unison look is achieved. It is after this last procedure that the deck is declared ready to being glued to the boat. I don´t have any pictures showing this process, but I don´t think these are exciting enough to show anyway.
Apart from the biggest single part of the deck, the guys at Rosch Yachts also manufacture the many smaller parts: The decking for the cockpit area has already been made (check here to see it), a few more like the lid of the aft stowage and the cockpit floor are being made right now. All in all, my Omega 42 will receive a total of 14 individual PVC-deck parts. You want to know the price? Well, I would reckon you calculate with (minimum!) 500 to 900 bucks per square meter, if you want to get some decent quality, high-grade materials and true craftsmanship. As for my Omega 42, the deck´s budget matches the one needed for premium laminate cruising sails …
I hope this in-depth article did show and make transparent the efforts which go into a well-made PVC-deck for your yacht. Don´t cut corners here if you plan to freshen up your boat´s appearance by refitting a deck as well – opt for a high-grade supplier, think through thoroughly the color choices and award the job to skillful craftsmen. They will surely produce the best product that will elevate your yacht´s looks and exhilarate you and your guests for many years to come for sure! Next up in this series will be the documentation of how this PVC-deck is professionally fitted to the boat – stay tuned!
You might also want to check out these related articles too:
Parts 1 and 2 of making the Omega 42 PVC-deck
A nice deck-alternative for modern boats: Seadek
Trying to supplant Teak in boatbuilding