What is safety at sea? From my point of view, it comprises two chapters: Active and passive safety measures will add to an overall status of a sailing yacht. Fails or shortcomings in one of them two will result in a loss of safety. Active measures are mainly things which are influenced and done when underway by skipper and crew. Passive factors are basically a question of what the boat offers in terms of safety. It´s a question of the safety equipment itself.
Planning ahead: 33 feet should be as safe as possible
As I am right now in the middle of the refit program of my King´s Cruiser 33 yacht it´s worth thinking about these passive safety measures to include possible changes or enhancements into the process of refurbishing. I am very thankful in finding Alexander Röpnack of A.W. Niemeyer – Germany´s biggest terailer for maritime equipment – who is specialized in product counselling at the Hamburg AWN shop. This article is meant to be an essential guide to an (almost) complete stack of safety- & emergency equipment.
Which Catastrophes can put a Sailing Yacht into Distress?
Advertisement
I want to get a feeling for the risks which my yacht and her crew are prone to. So I do research into statistical data. According to some statistics made public by the BSU (German Office for Investigation of Maritime Accidents), the SAR-organizations or yachting magazines like the all-famous yacht we do have a fortunate trend of a decreasing number of accidents. But an increasing number of deaths at sea. The most frequent reasons for damage, distress, sinking of Maydays by yachts are above all collisions and capsizing (small boats) and of course the feared MOB-incidents. Also fire on board is a big thing as well as material fatigue like engine failure or dismasting. Most of the maritime accidents caused by pleasure craft happen during the season between July and September. Interestingly enough, 93 per cent of the deaths are men aged between 26 and 35 years old. Last year 26 per cent of fatal incidents did take place with sailing yachts, 19 per cent with motorboats and 24 per cent have been anglers. In most of the cases the craft have been boarded by 2 crew members when accident struck.
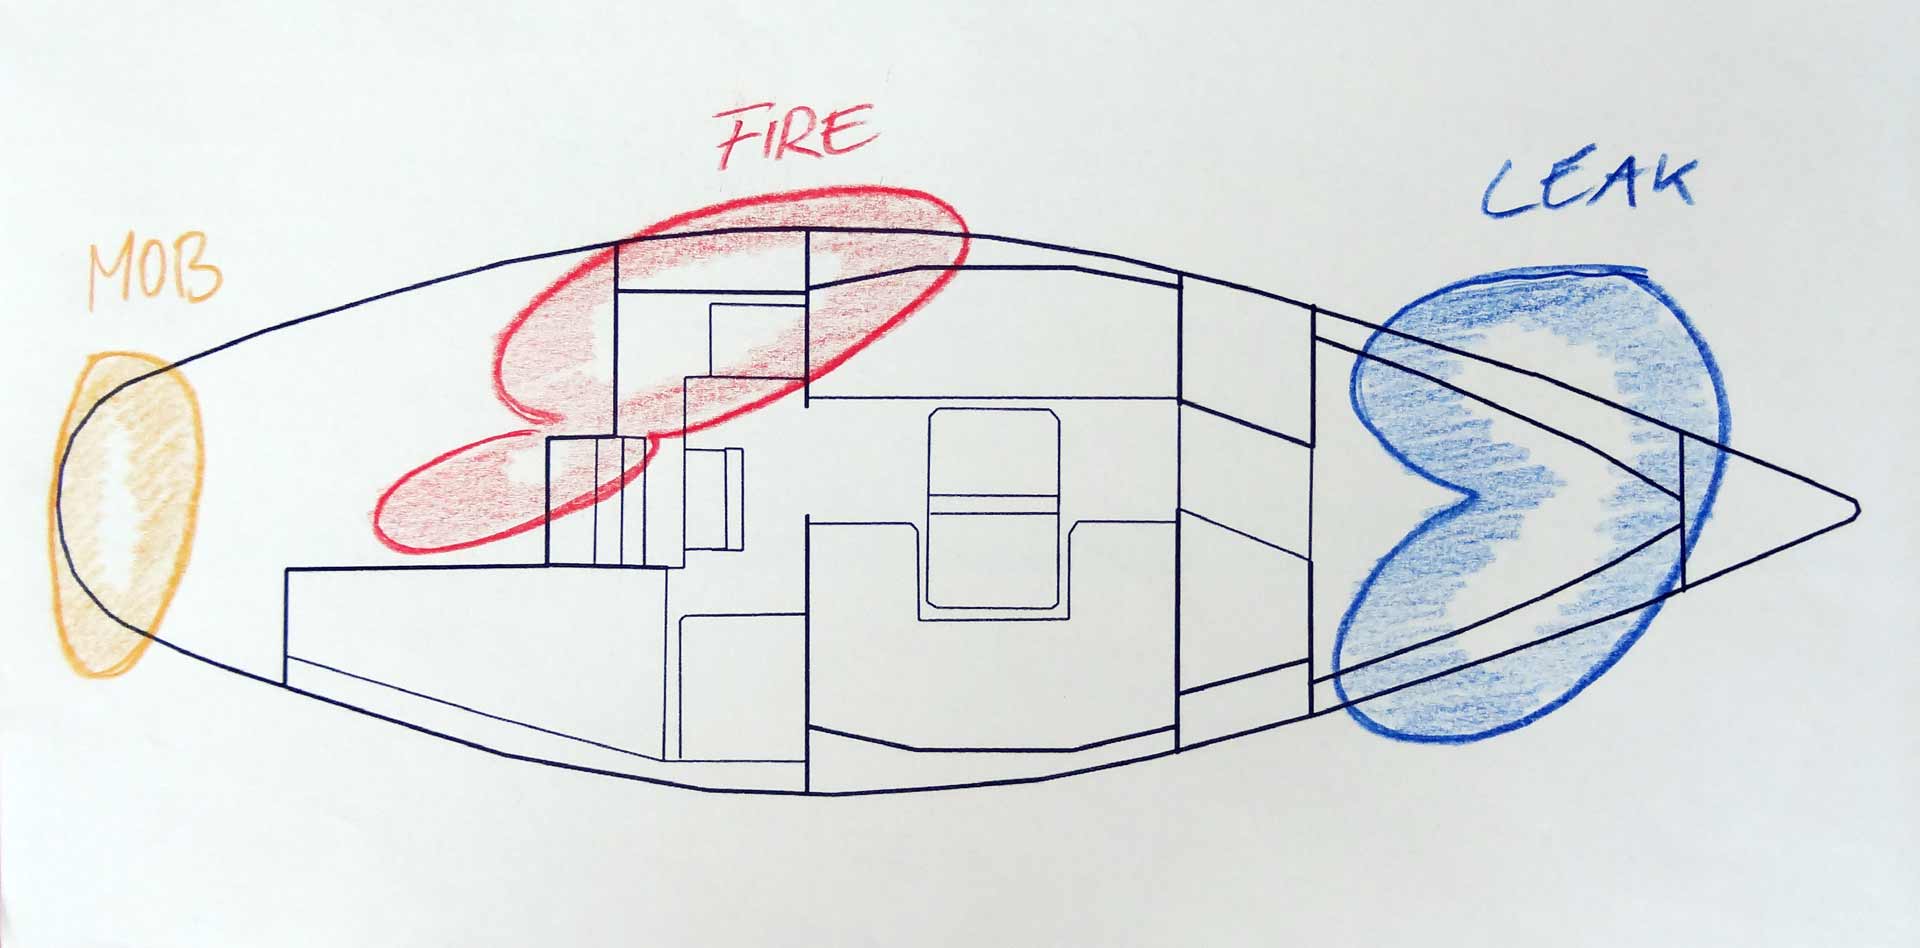
The main risk-areas of my King´s Cruiser 33
What the statistics also told: Human error, injuries of skipper and crew as well as (unnoticed) material fatigue can clearly be linked to the consumption of alcohol. More than 50 per cent of the deceased did have more than 0.8 per mill alcohol in their blood. Worse: 70 per cent of all MOB-fatalities have been boozed! It´s worth noticing that most of the MOBs happen on motorboats and among fishing people, less on sailing yachts. Good seamanship is a huge – but different – topic to be dealt with in successive articles. So first question for me after investigating into facts and figures was essentiall how to define the safety concept of my very own sailing yacht.
Essential Guide to your Yacht´s Safety Concept
No matter if you are the proud owner of a brand new – but merely Spartan equipped – sailing yacht or fulfilling a dream by acquiring a used yacht, it´s really worth investing some time thinking of safety at sea. My approach is a tailored safety concept for my 33 feet ship. First thing I do is to take a look at the plan view of the yacht of which I copy a handful of to to some later sketching. I do ask Alexander Röpnack of AWN if this is a useful step: “To be honest, I´ve never had somebody coming to this shop like you with sketches. Most people buy a boat and just think of live jackets. That´s all. They will return from time to time to substitute equipment step by step. But I find your approach highly interesting and would love to see more skippers investing such an effort in their safety-infrastructure.” When owning a used yacht – having all stuff on board – skippers would complement their stack of equipment over time, owners of new yachts who have invested a load of money upon buying the ships mostly do not think of additional costs in the first place: “They are relying on the thought of …Hey, it´s a new yacht and everything should be fine. Which naturally in most cases isn´t the case at all”, says Alexander.
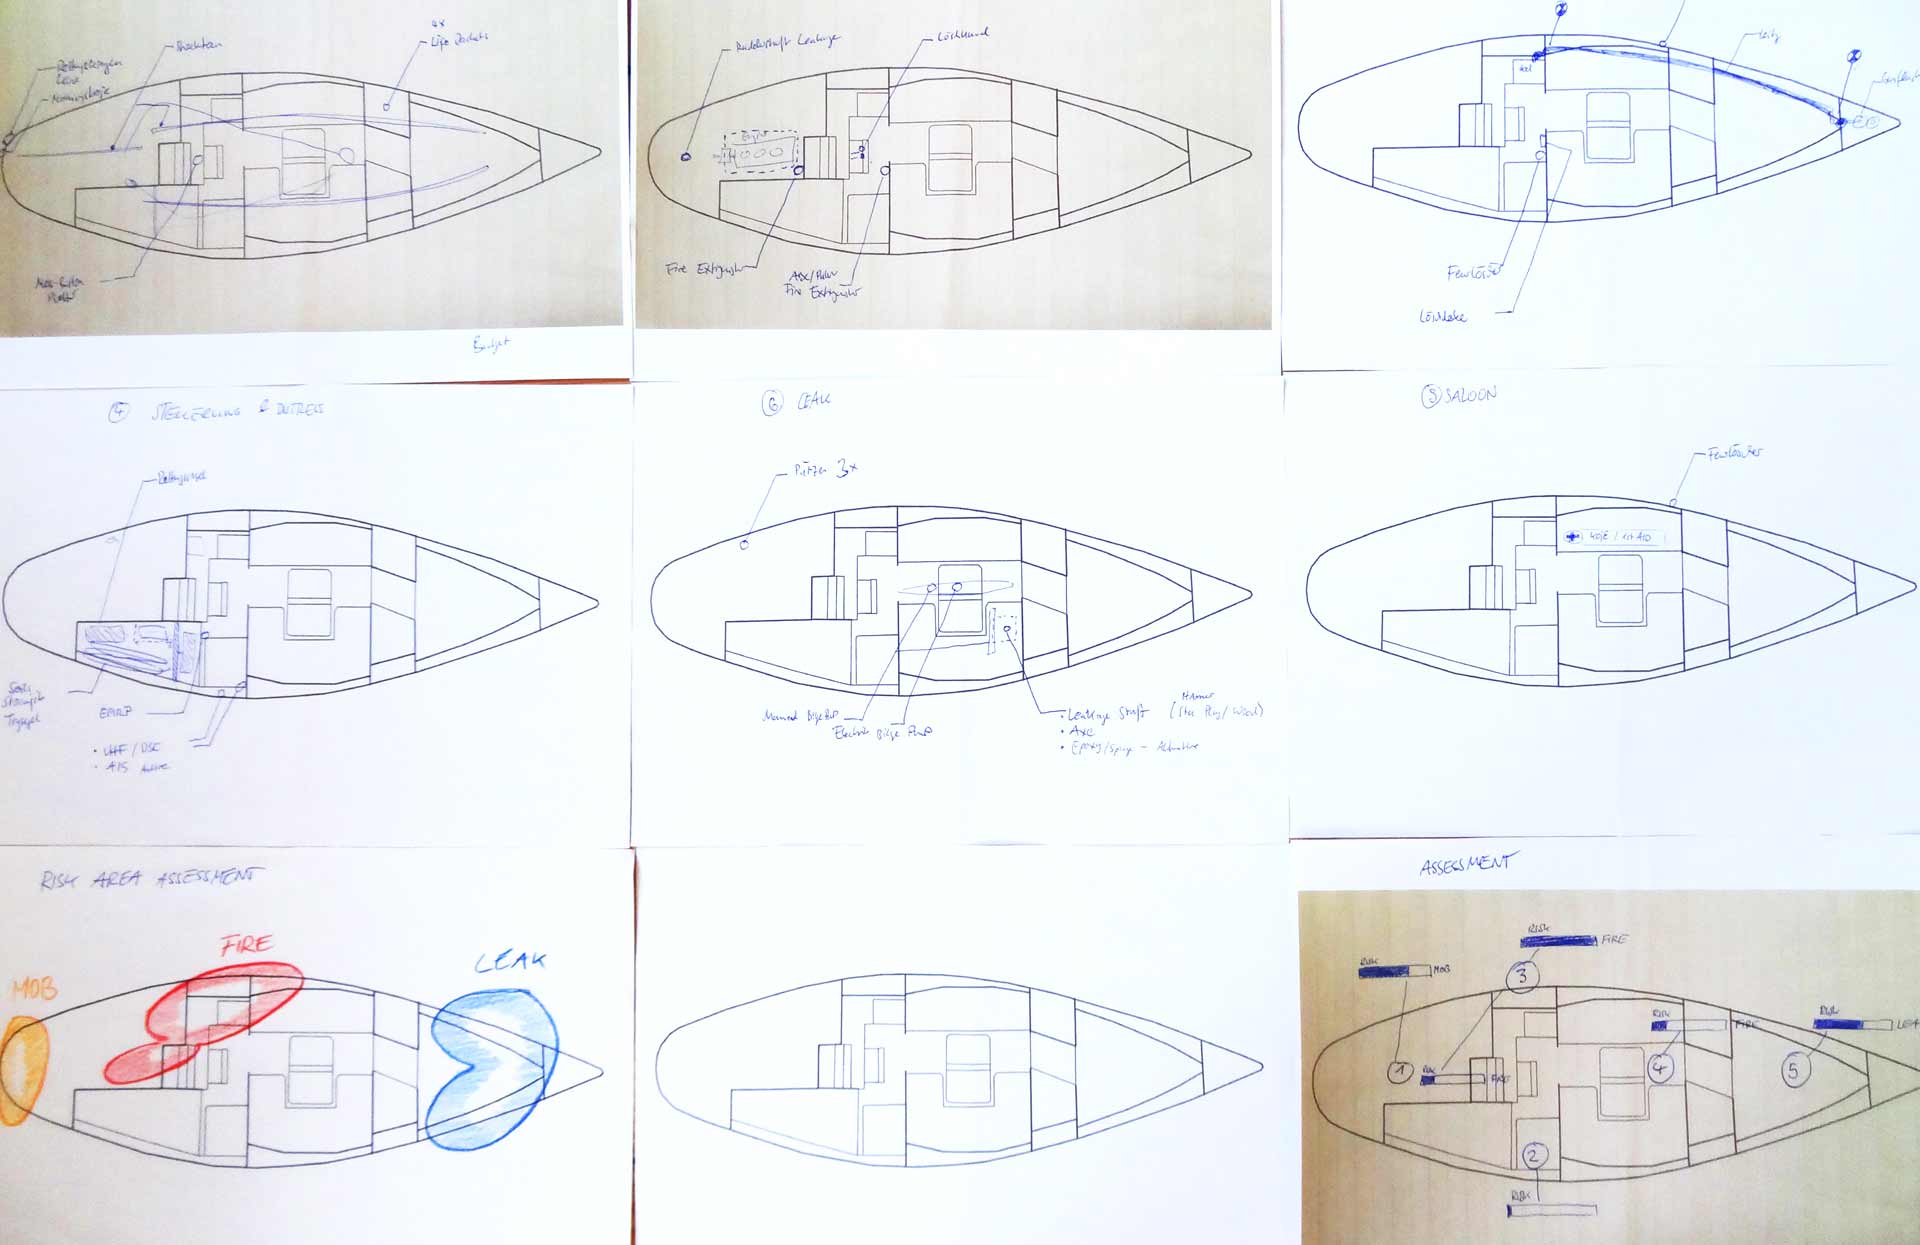
This is my scheme of assessing and planning my sailing yacht´s safety concept:
Assessing and prioritizing the risks: What can happen to my boat and my crew in my respective area of sailing?
Analysis of the on-board conditions: Where are the relevant areas of my yacht? Where is damage or catastrophy to be expected and which constructional factors affect the approach of putting the right equipment at the right central and easily reachable places?
Which equipment do I really need? A list of stuff to be obtained newly, which equipment is at hand and just would have to be maintained in applicable?
Budget: How much money should I invest in the safety equipment and are there any safety-related constructional enhancements to the yacht?
Maybe this check list will help you to asses the risks and potential threats of your own yacht too. Further into this article you will see how I am working myself through this list. The mighty seas are not predictable and a small GRP-yacht will always be inferior to the raw brutality of the waves – but to a certain extend safety is projectable, risks can be minimized. It´s worth thinking this through.
Offshore Risk Management: Assessing my own Sailing Yacht
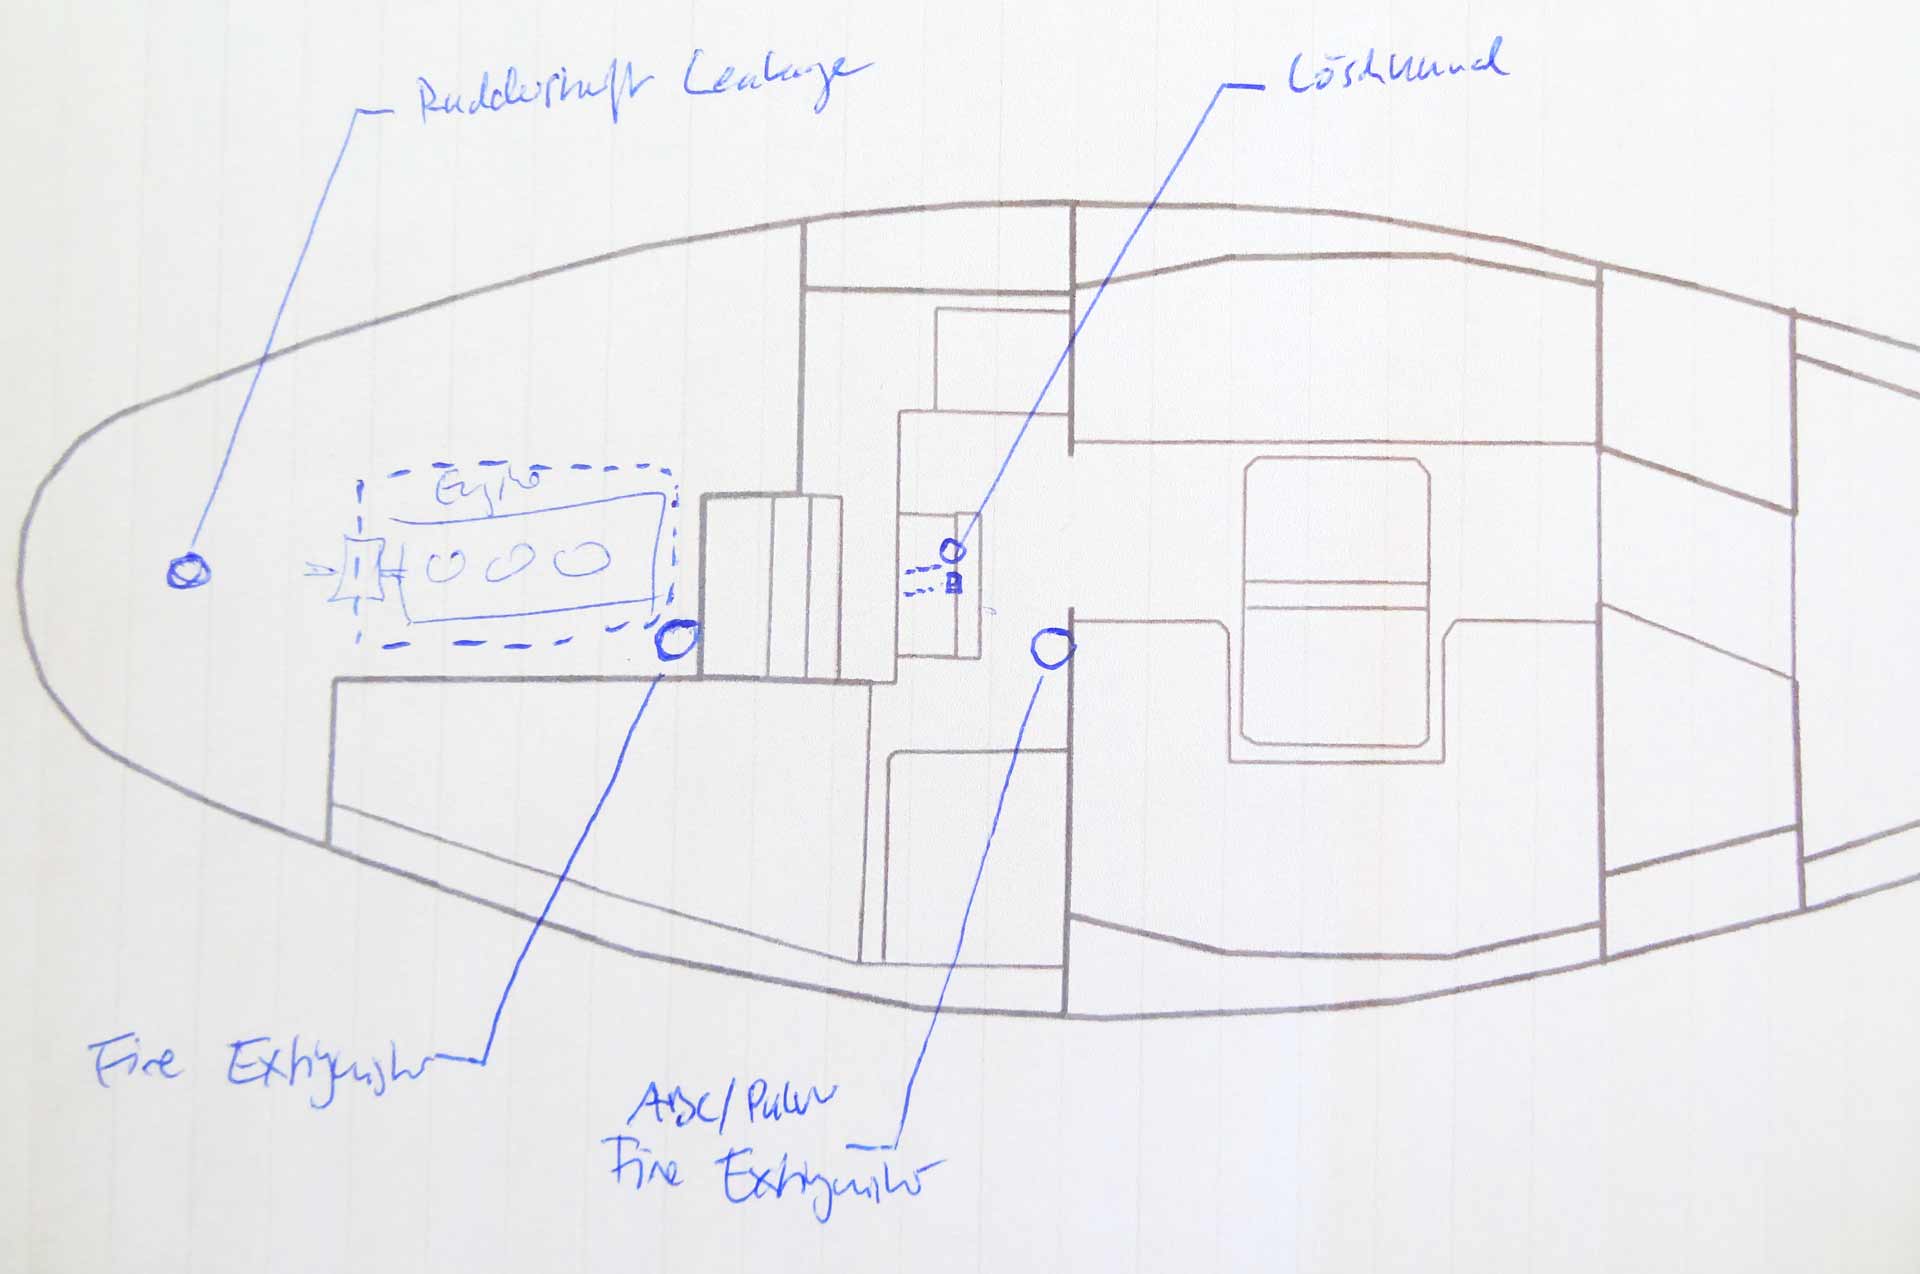
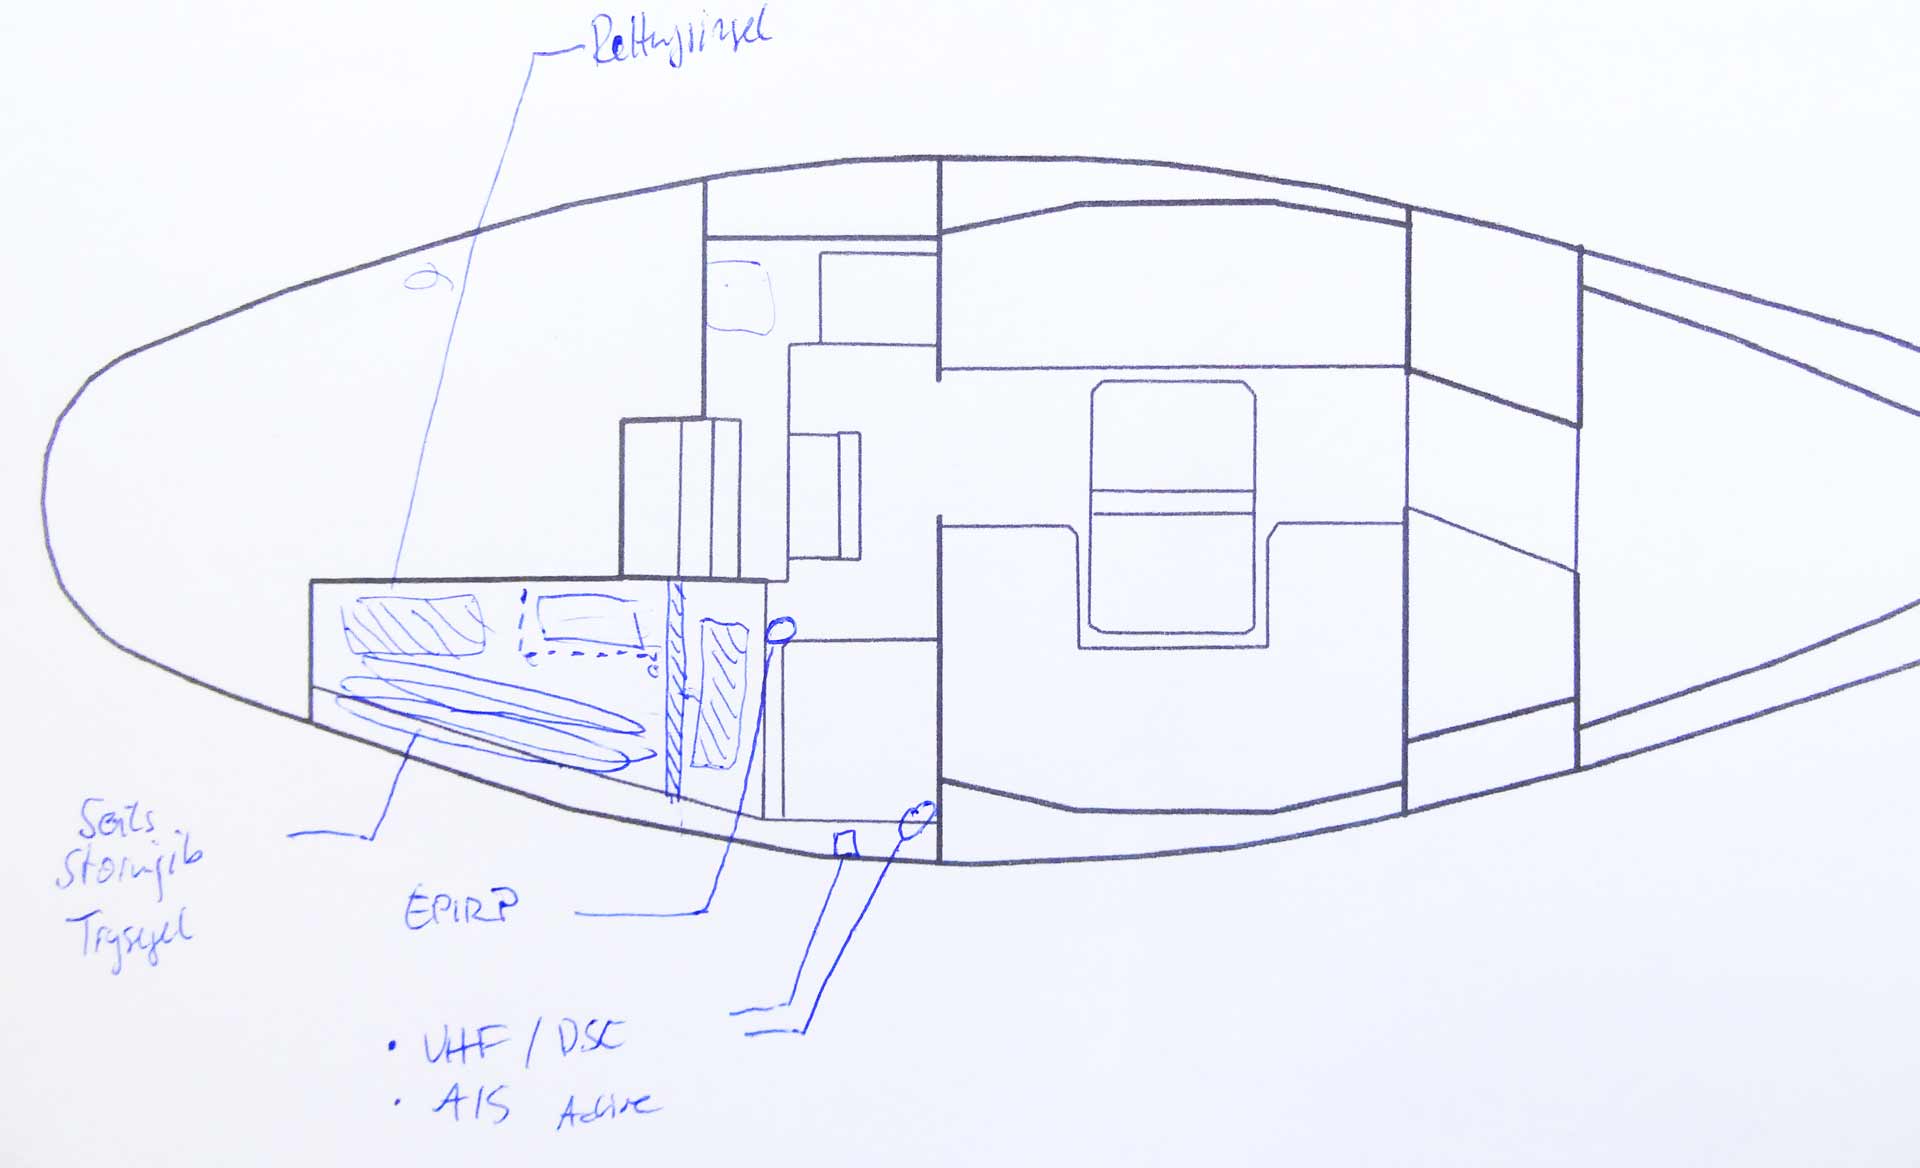
Planning the safety concept is essentially looking at the constructional conditions. With my ship, we are speaking of 10.14 meters length from bow to stern, both above and below deck. By looking at the cross section I am defining areas onboard in which a) emergencies are likely to happen; or b) where it is meaningful to have safety-equipment stowed to have it available as quick as possible.
Area 1, outside, the cockpit. Alexander Röpnack says: “Well, that´s the place where most likely an emergency will take place. May it be an MOB-incident or injury – you´re going to spend most of the time sailing here, so it´s worth to take a closer look at this area.” Besides this fact there´s a large access-hatch to the engine, gear box and rudder mechanism on my Kings´Cruiser 33.
Area 2, inside, “the operational center”: Chart table and main electric panel in the navigational area of my boat. Here´s the “brain” of my yacht rather than neuralgic spots. By concentrating all vital electric things like VHF, DSC and electric panel here I should think of adding other equipment here too at this central place.
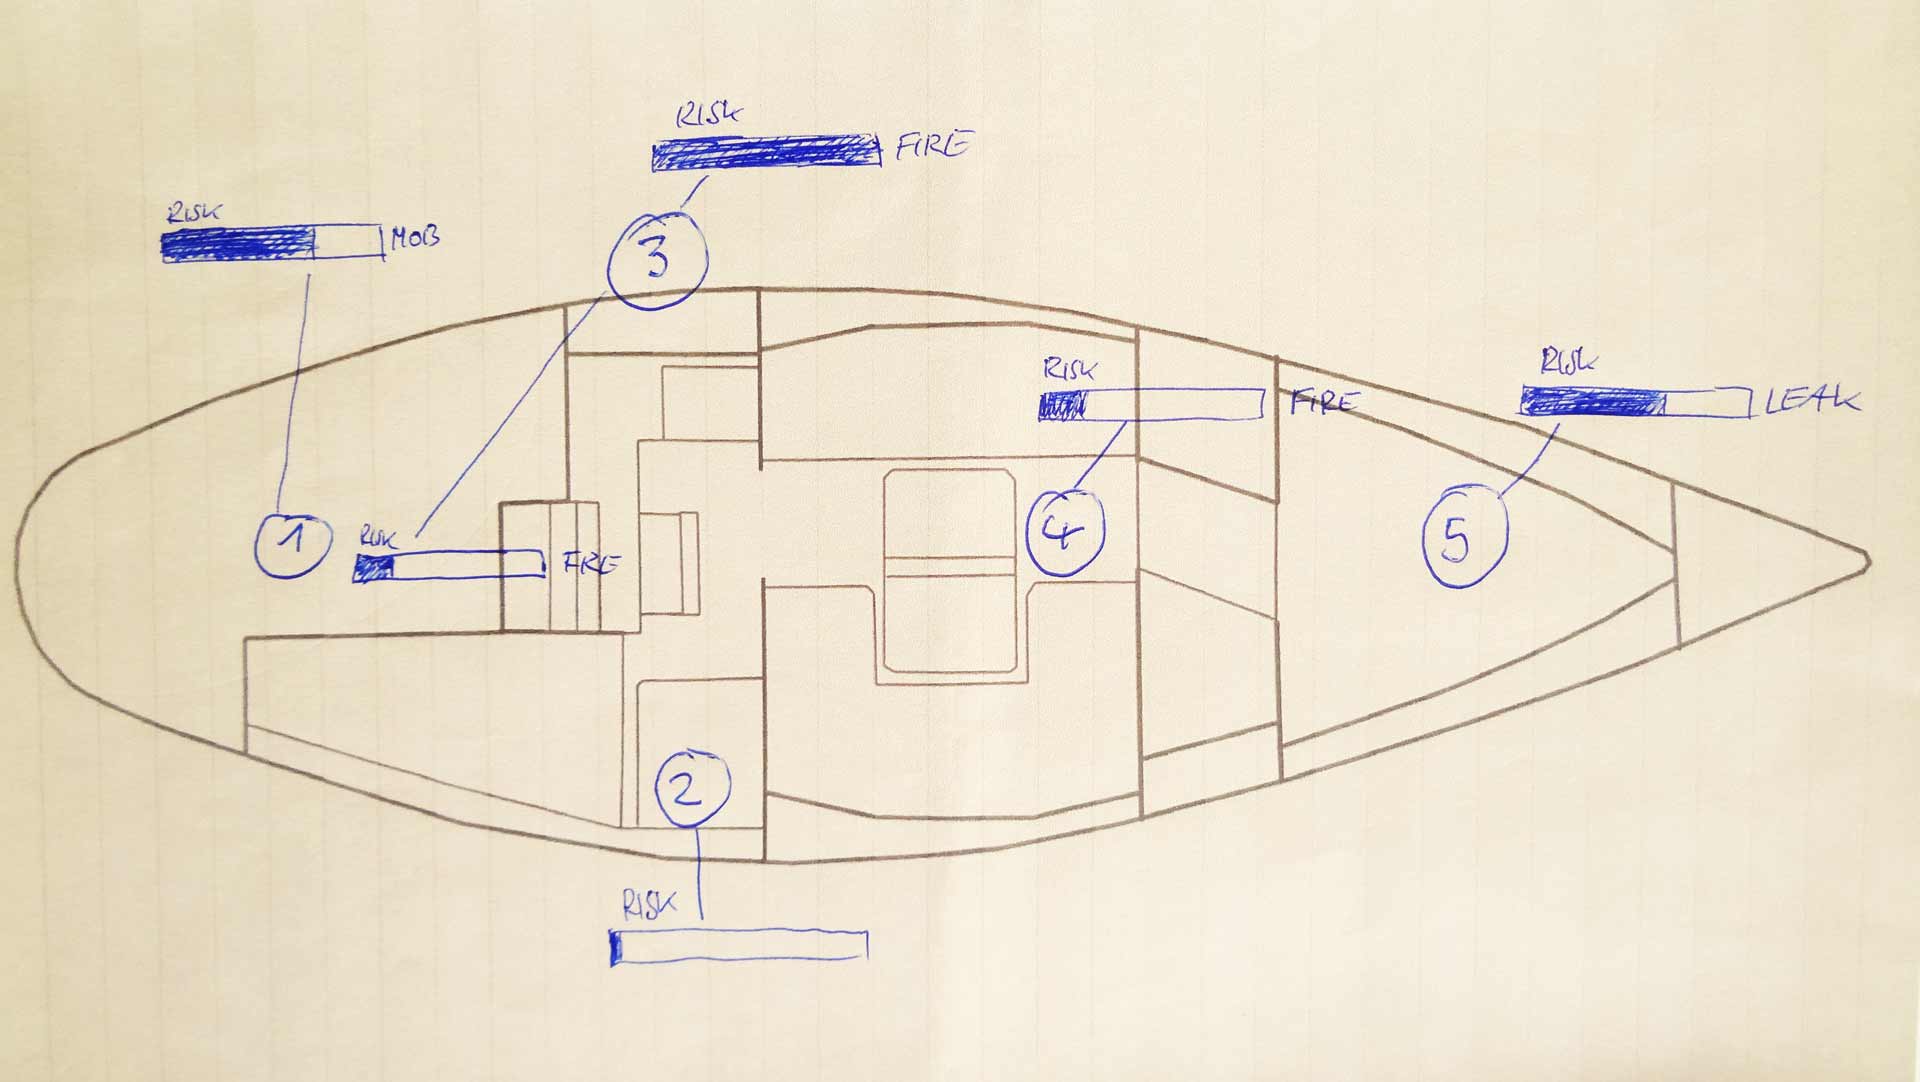
Assessing the probabilities of possible desaster for each risk-area of the vessel
Area 3, inside, saloon: No vital area by itself since we are going to have some berthing taking place here and maybe having dinner when weather should permit sitting outside. But again, some interesting spots are located in this area too safety-wise. Such as the bilge, a very vital part: “Collisions and therefore amounts of seawater entering the ship are by far the most common cause for a yacht to sink”, says Alexander Röpnack: “You should definitely invest a lot of thoughts into that fact.”
Area 4, last but not least, inside, fore cabin: That´s the least frequented spot onboard since crew will only use this cabin for sleeping whilst in harbor. Nevertheless – as collisions are the most likely cause of loss – there´s a high probability of a leak happening somewhere around the bow upon hitting a floating object.
Which safety-areas can you define on your own sailing yacht? After assessing the four main safety-related areas of my boat I am now able to go through each area one by one to assess the risk-potencial first, helping me to plan ahead which equipment would have to be placed where.
A safe Cockpit: Ready for MOB. And worse.
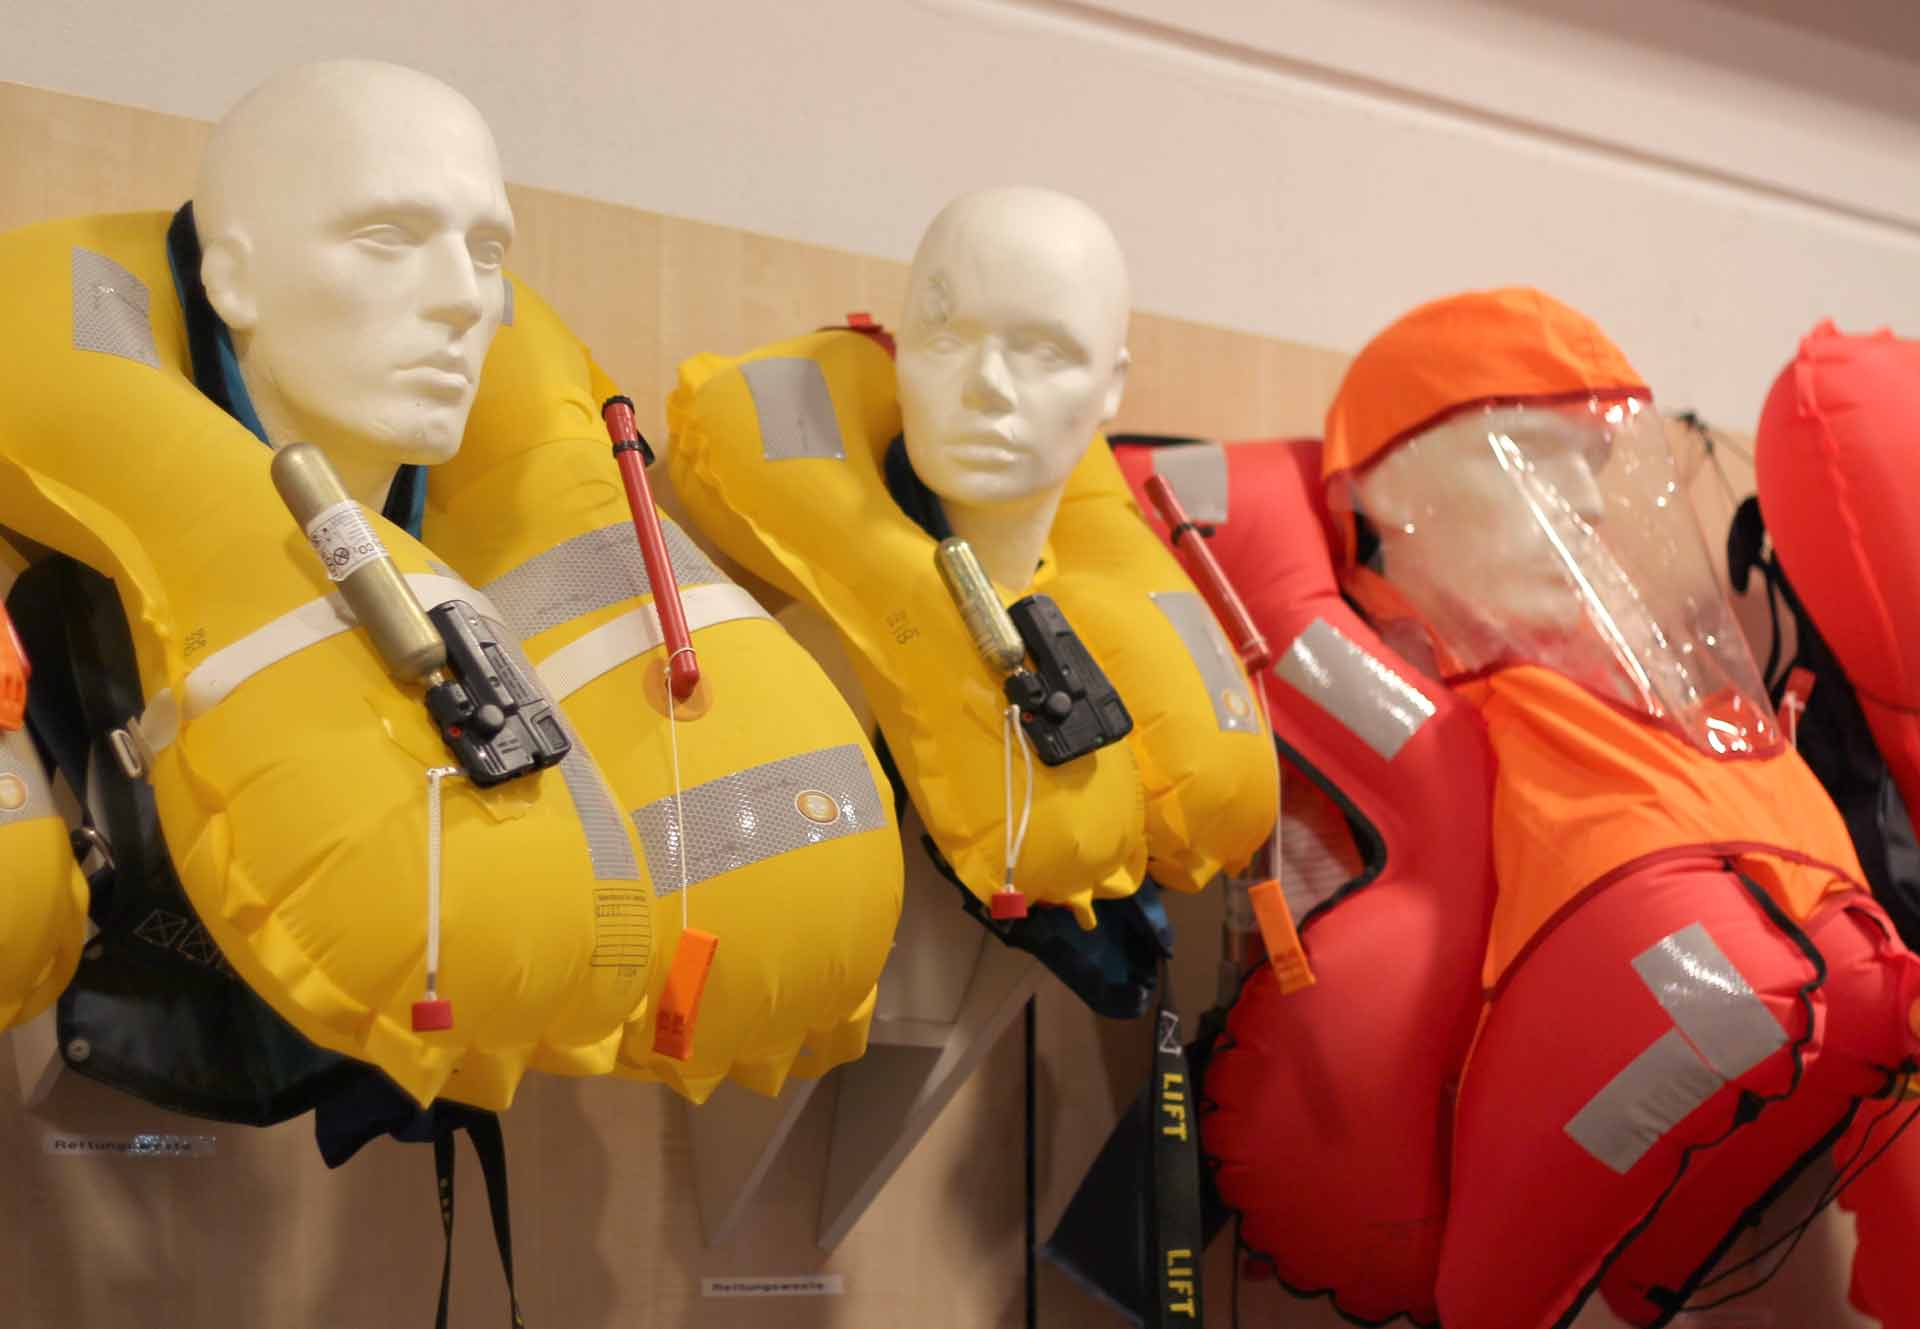
“Well,” says Alexander Röpnack upon looking at my risk-assessment: “I haven´t seen such a chart up until now and I guess it wouldn´t have too much practical value. But nevertheless I think it´s of great help to the newcomer in yachting just to visualize possible risks.” We spent most of the time whilst sailing in the cockpit. Wearing life jackets all the time is something that should be a matter of course, especially when children are on board lifelines are a definitve must. But which equipment do I need in case somebody goes over board? “Standard in a MOB-case? There should be all the utensils on every sailing yacht which are mounted to the aft reeling”, says Alexander Röpnack.
Which essentially are a life-ring or danbuoy that will function as a marker for the MOB-position in the water. “Get one with an at least 2 meter flagstaff and an automatic strobe light for a night MOB”, advises Alexander. Life-rings should be attatched to an at least 40 meter long rope.
“What I really like is the so-called John Buoy.”, says Alexander: “You just simply throw it in the water toward the person. Rest will happen automatically.”
150 N life jackets are minimum
In case of an MOB you can mark the position with that danbuoy and have an effective live-saving-appliance at hand. Depending on water- and air-temperatures, waves and other factors you will have some minutes time to reach the person in the waters with a Figure-8 or Quickstop to have him or her back onbard again. In doing so there is a variety of salvage-gear available such as a Lifesling. It´s up to the skipper if he wants to add such equipment to his tools. Because I am going to be sailing in the Baltic Sea exclusively and this only in nice weather – due to the fact that I will be underway with wife and kids – I am skipping special salvage products trusting the good old bathing ladder. “Be aware that bringing a person in the water back on board is the trickiest thing of all!”, Alexander Röpnack is warning: “You should think about this very thoroughly and above all – practice!”
Lifebelts should be placed somewhere well in reach when underway
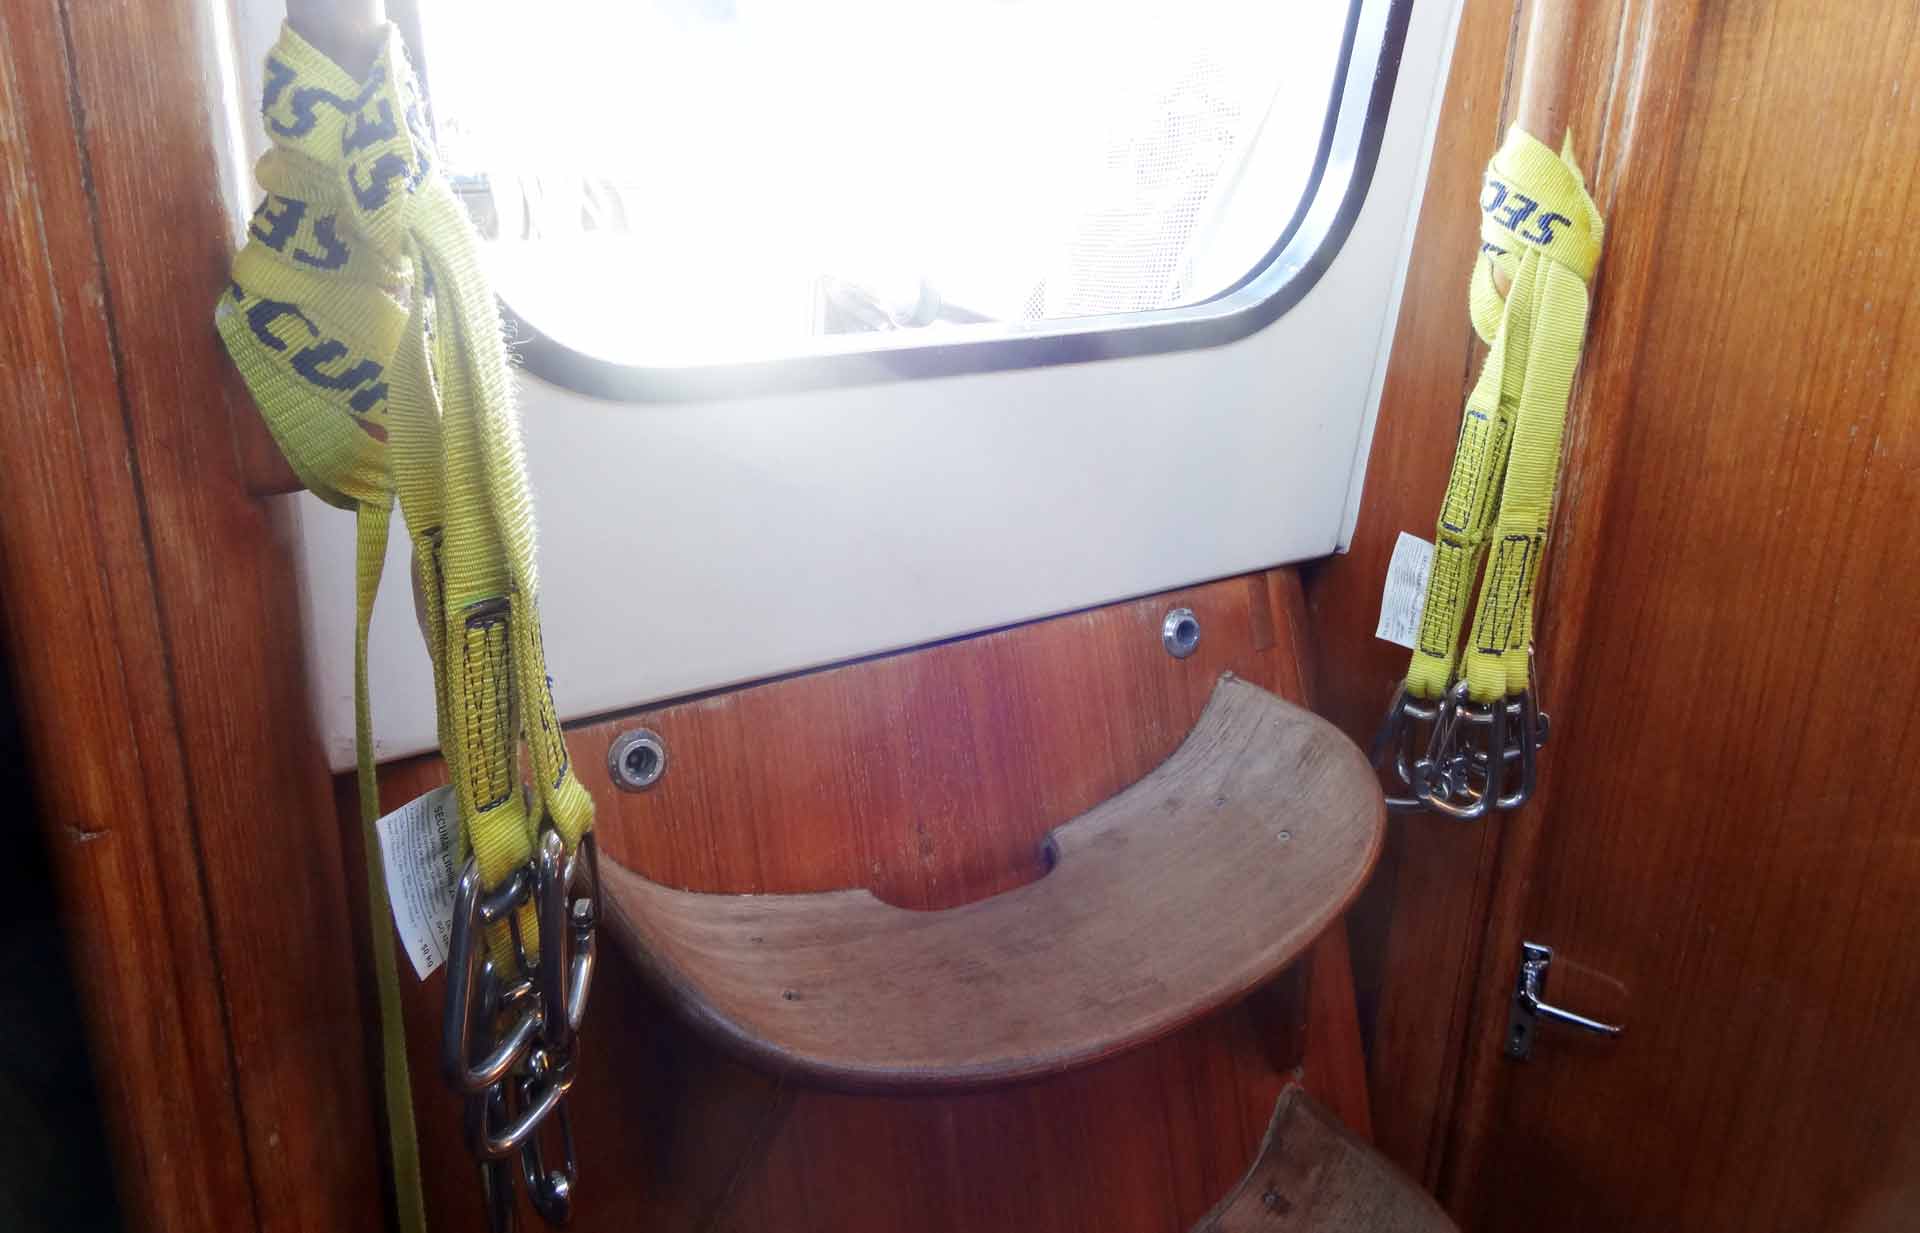
What I am also skipping are jacklines. Oh, why? Alexander Röpnack says: “Permanently bow-taut jacklines have become accepted amongst sailors. It´s simply a strong rope running tightly from bow to stern to which you could attach a lifebelt when weather gets rough.” If somebody has to leave the safe cockpit for the bow, that´s the last resort of safety in case of hard hitting waves or loosing grip on the moving deck. But I think there are some downsides to it: Heavy gates made of steel could do damage to the ship, make scratches and harm the substance. Also I could read about jacklines as hindering freedom of movement all too much so that I´ve come up with a different solution: I will have two jacklines of exactly 6 Meters length attached to the mast-shoe running into the cockpit. In case of need, I could have myself attached to these ropes and work freely. Alexander Röpnack says: “Well, that´s a technique utilized by offshore-racers and in regattas. You won´t find this all too much amongst ordinary cruising-skippers. I would always recommend the bow-taut solution but that´s something each skipper should decide for himself.”
Underrated: Fire & Leakage in the Engine Room!
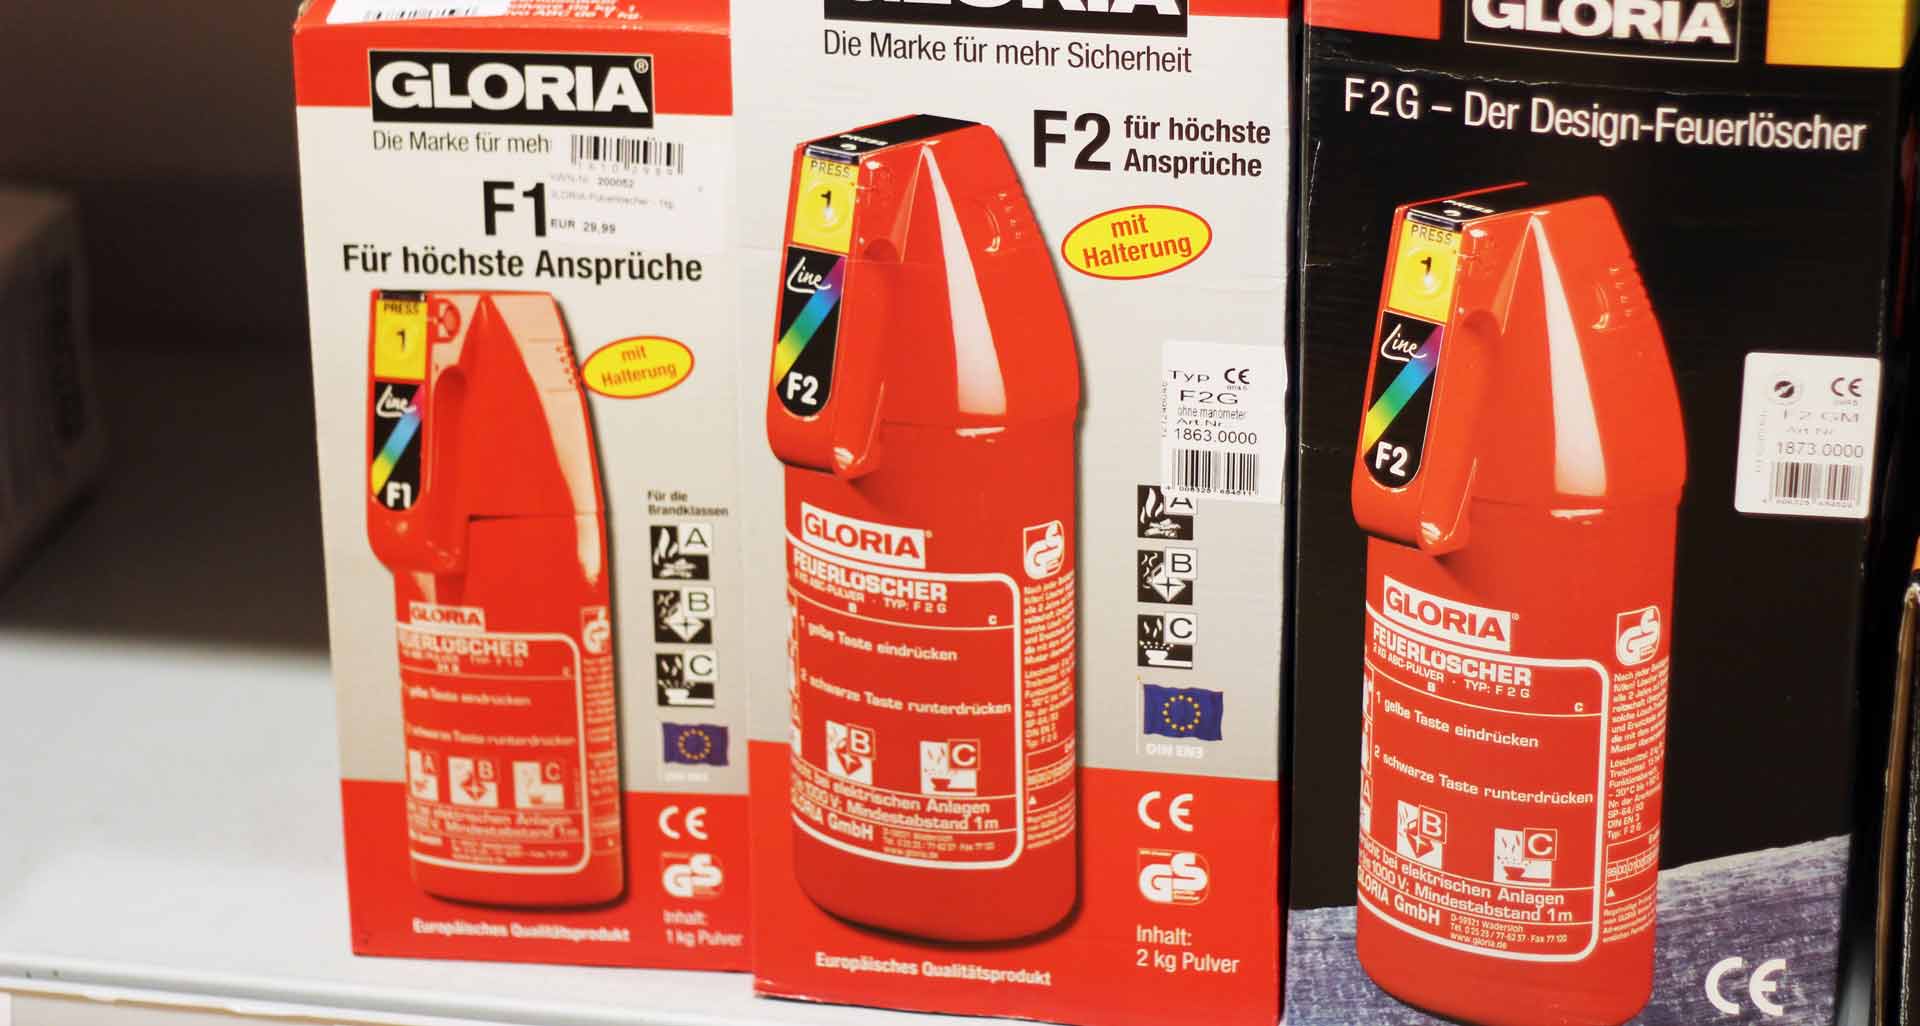
“It´s true that fire is something most skippers won´t point their attention at. From my point of view the problem here is that there are too less and too lazy maintained fire extinguishers on board the boats.”, says Alexander Röpnack. It´s a rare thing but not out of question that the engine room, a gear box or other equipment “down below” can catch fire indeed. As it is the case with my King´s Cruiser 33, I do have access to this area by removing the heavy entryway in the saloon – but that will just open up a way to the front side of the Diesel-engine and is best for normal maintenance. If there´s something wrong with gearbox or the rear side of the engine, there´s an additional large hatch accessible from the cockpit. Here are multiple things which could catch fire: Engine, gear box, the battery-system and – talking of a possible leak – the shaft seal and of course the inlet of the rudder-shaft. In the case of my boat, I will have to make sure that the access hatch can be opened fast and safe. And of course: It should be locked watertight. The batteries should be secured against falling out of the chest in case of a capsizing by strong knuckles.
Checking risks and equipment for the stern-section of my yacht
When it comes to the cockpit of my King´s Cruiser, the pre-owners of my yacht did had a small extinguisher attached at the back of the bulkhead under the instrument-panel. A perfect spot: In case of a fire it´s fast and convenient to utilize the extinguisher, even if there´s a fire down below the entryway interior of the ship. When it comes to an external extinguisher one should bear in mind to have a strong attachment to the boat and have it protected against aggressive salty water. A small 1 kilogram powder extinguisher will cost some 30 Euros. Concerning leaks in the cockpit-area I guess that they would occur extremely seldom because I do have a full sked rudder and thus be well-protected. I skip providing equipment in this area.
From Galley-Fire to Heart Attack and Leakage
Let´s go down below deck and enter the yacht´s interior. Here we have a very high risk-area – the galley – and another area where we have the operational center of the boat – the chart table and navigator´s place. It´s essential zu plan ahead wisely. A closer look to the galley first. Statistics tell: If there is a catastrophe inside a sailing yacht, it is likely to happen here. Horror for every skipper: Fire!
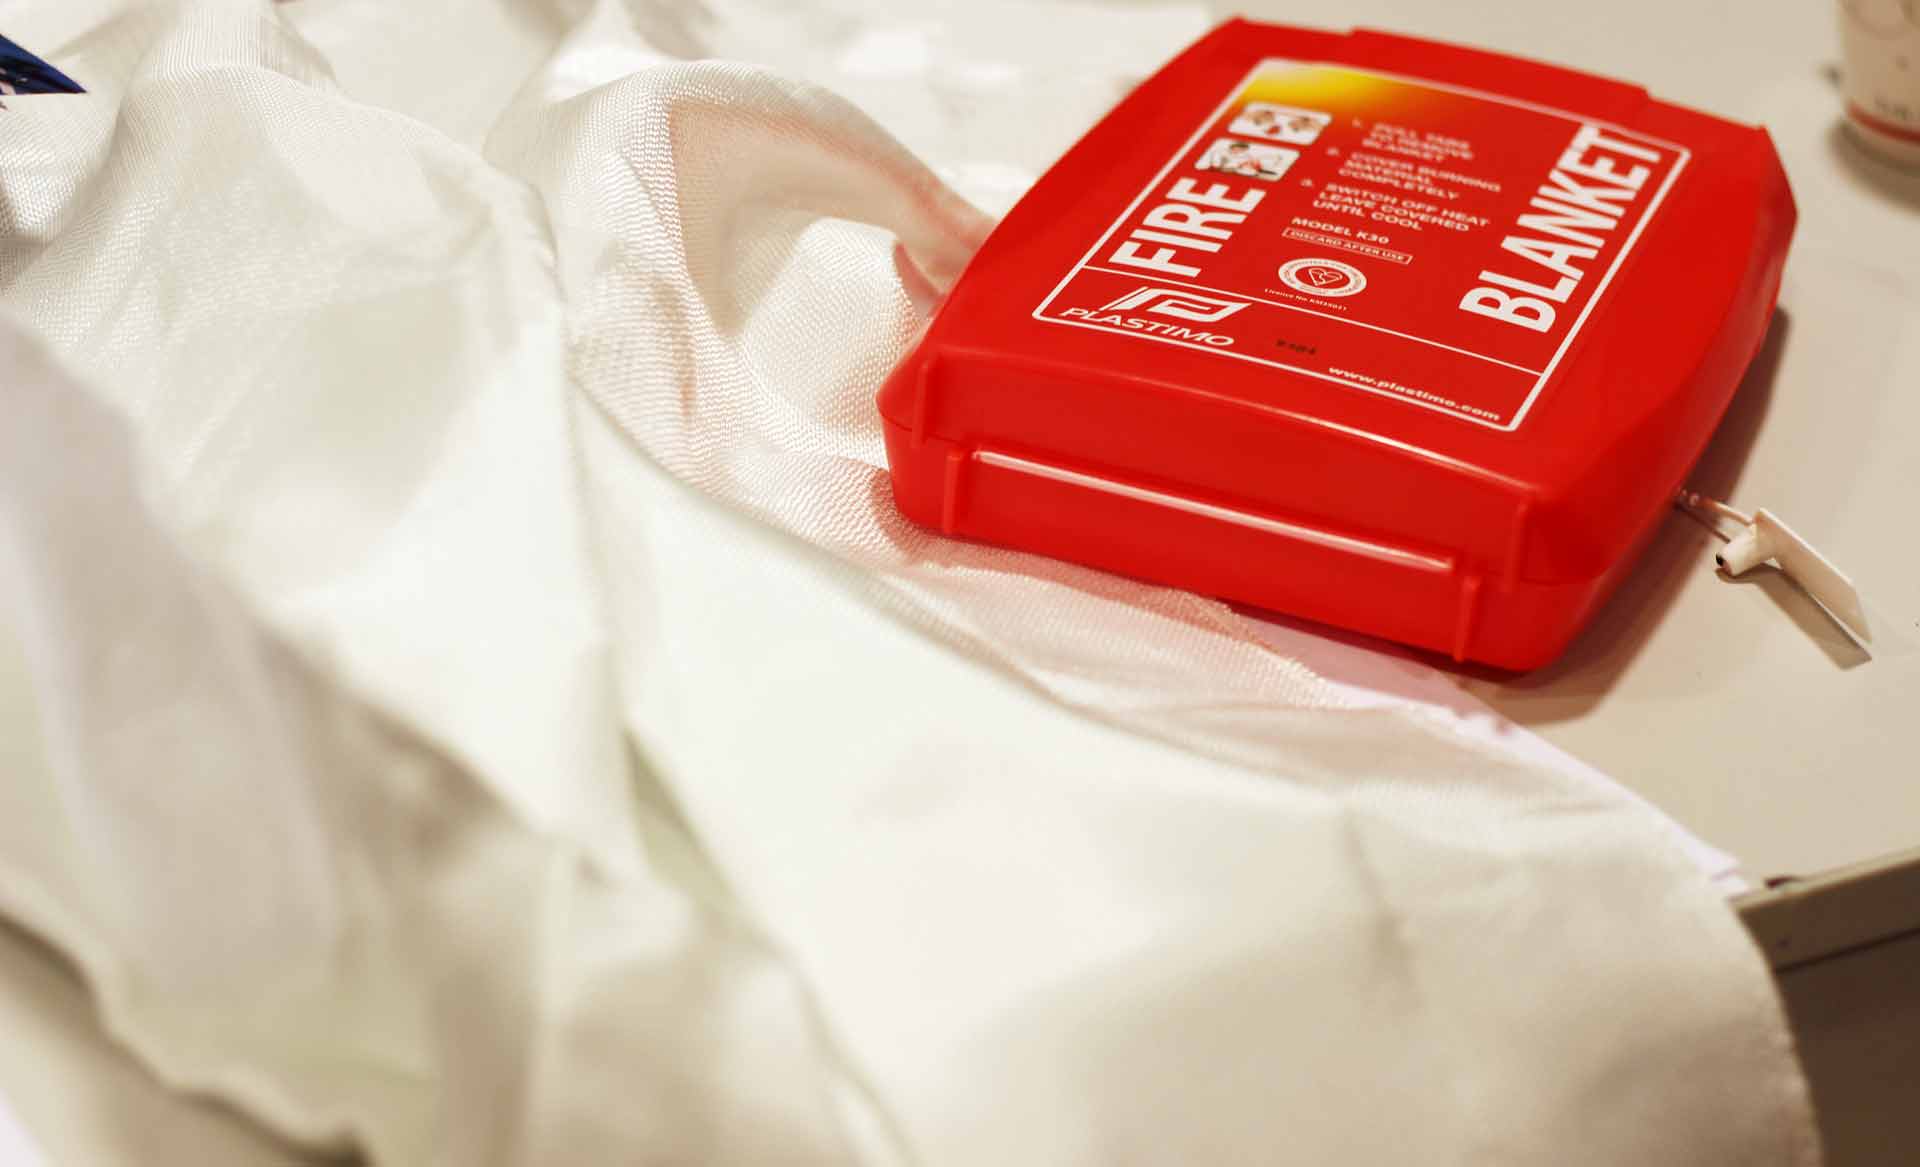
It´s the stove and actions connected to utilization of the gas-propelled stove which are the cause for so many fires. Also, badly maintained installations can be the cause of a fire. Active safety onboard a sailing yacht and good seamanship – for me – comprises therefore apart from a thorough safety briefing including the gas-installation that the safety valve of the stove is to be closed all the time except the stove is in use. That´s a clear thing. But how to react in case of fire here? Alexander Röpnack says: “I would always opt for fire blankets first. They are convenient, ready for use immediately and in most cases will kill the fire very effectively.” First shut down the feeding of gas and throw the blanket over the fire – it is made from thick GRP-garment and will choke the fire. The advantage over the classic extinguisher: No further damage to be done by the extinguishing agent itself. The fire blanket is a central tool for fire abatement and will thus be placed well within reach in my ship.
This is how a fire blanket looks like
I am going to have the blanket installed at the bulkhead separating navigational place from the settee-area in the saloon where additionally another fire extinguisher (powder) will be placed. This fire extinguisher is the central tool for controlling fires in both the saloon, galley and engine room. I guess a 2 kilogramm extinguisher will do here. “It´s essential, when fighting a fire, that you have controlled blows from down below into the center of the fire – don´t push the button to have the extinguisher working continuously. It will last only 30 seconds and be empty before fire is out.”, says Alexander Röpnack.
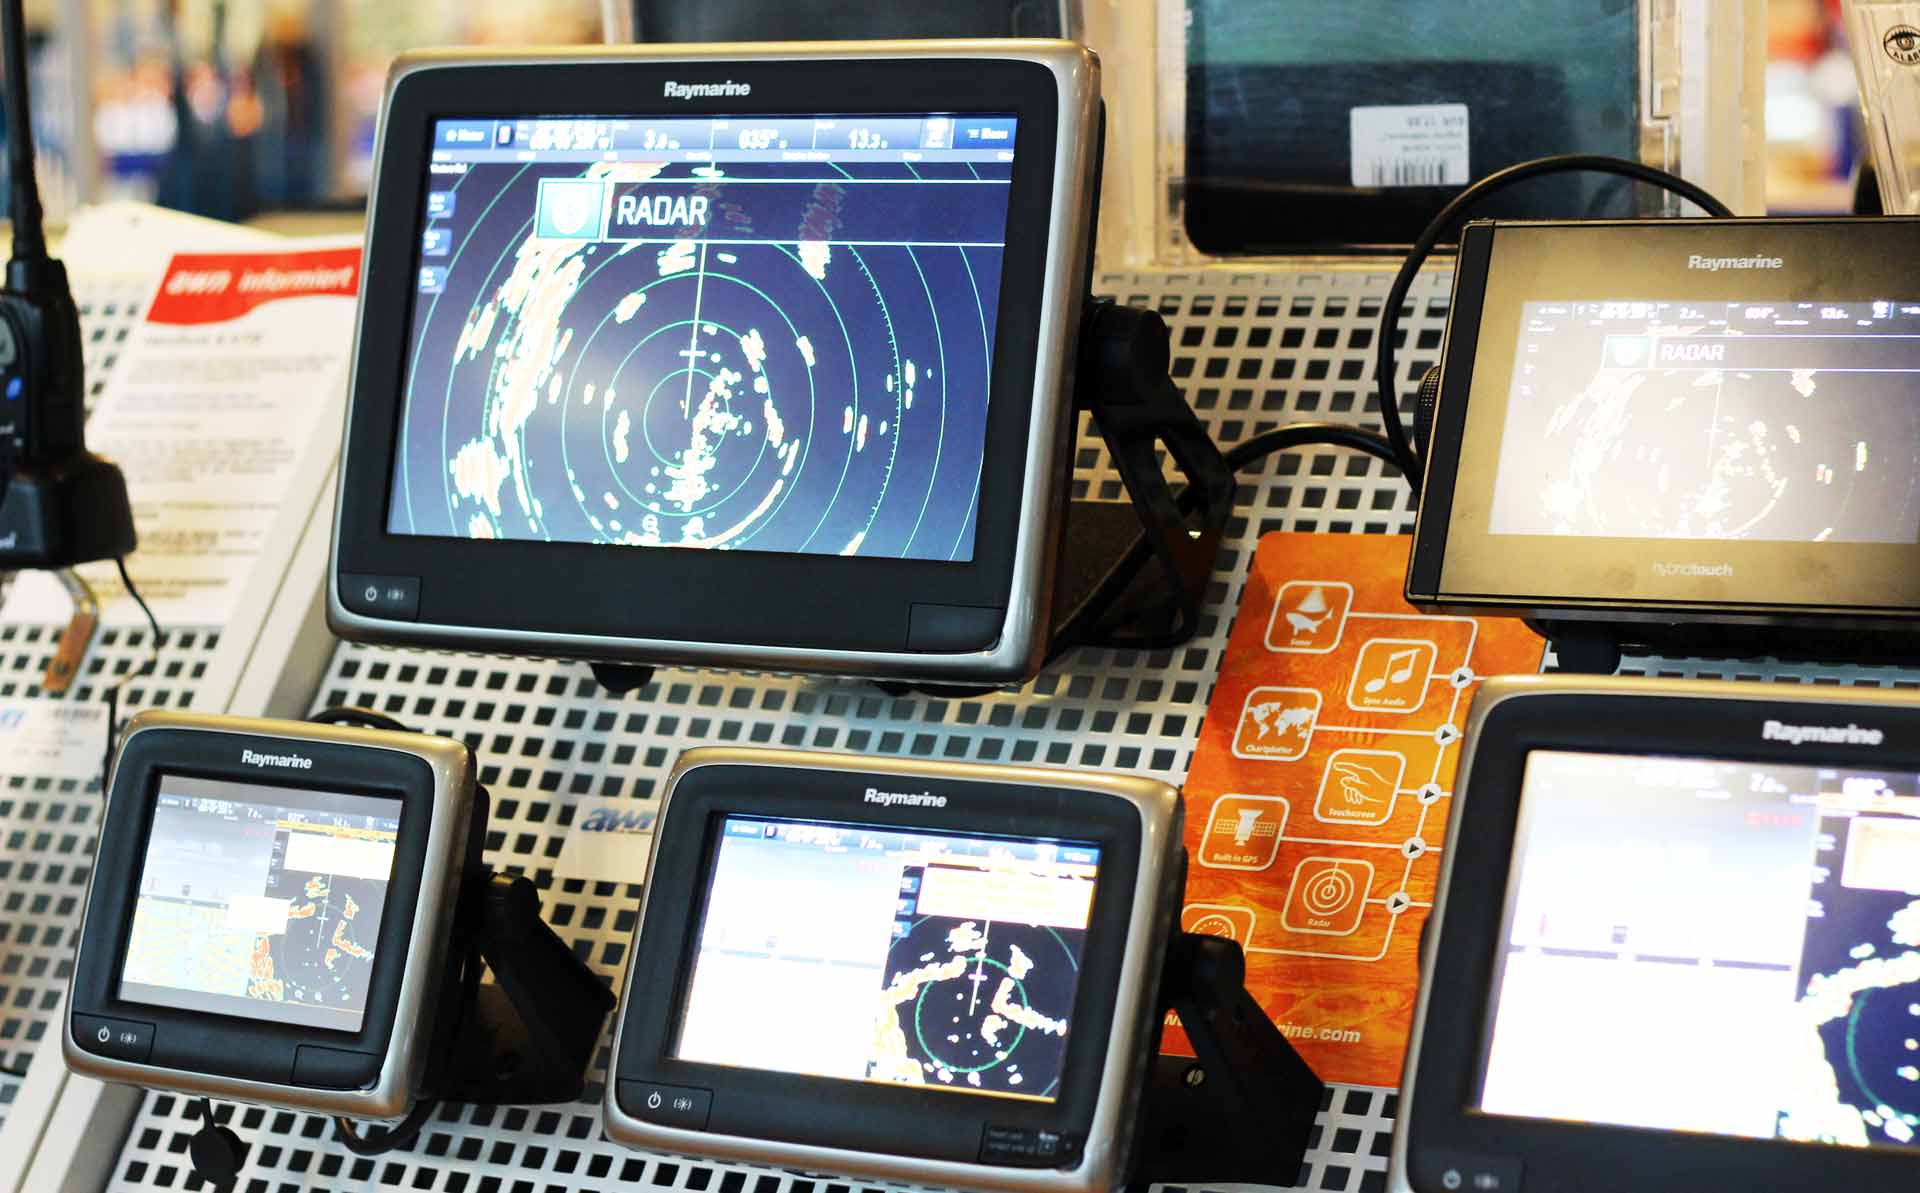
Concerning the “operational center” of my boat, the navigational place, there are too some things to consider when planning safety. First of all: Electronics. Here, right at the chart table, almost all wiring of the boat will come together to end in some way either in the VHF and AIS transceivers, the ordinary radio or the main electric panel for lights, bilge pumps et cetera. (With my Kings Cruiser 33 the main panel for the engine is situated in the entryway right above the main access hatch to the engine)
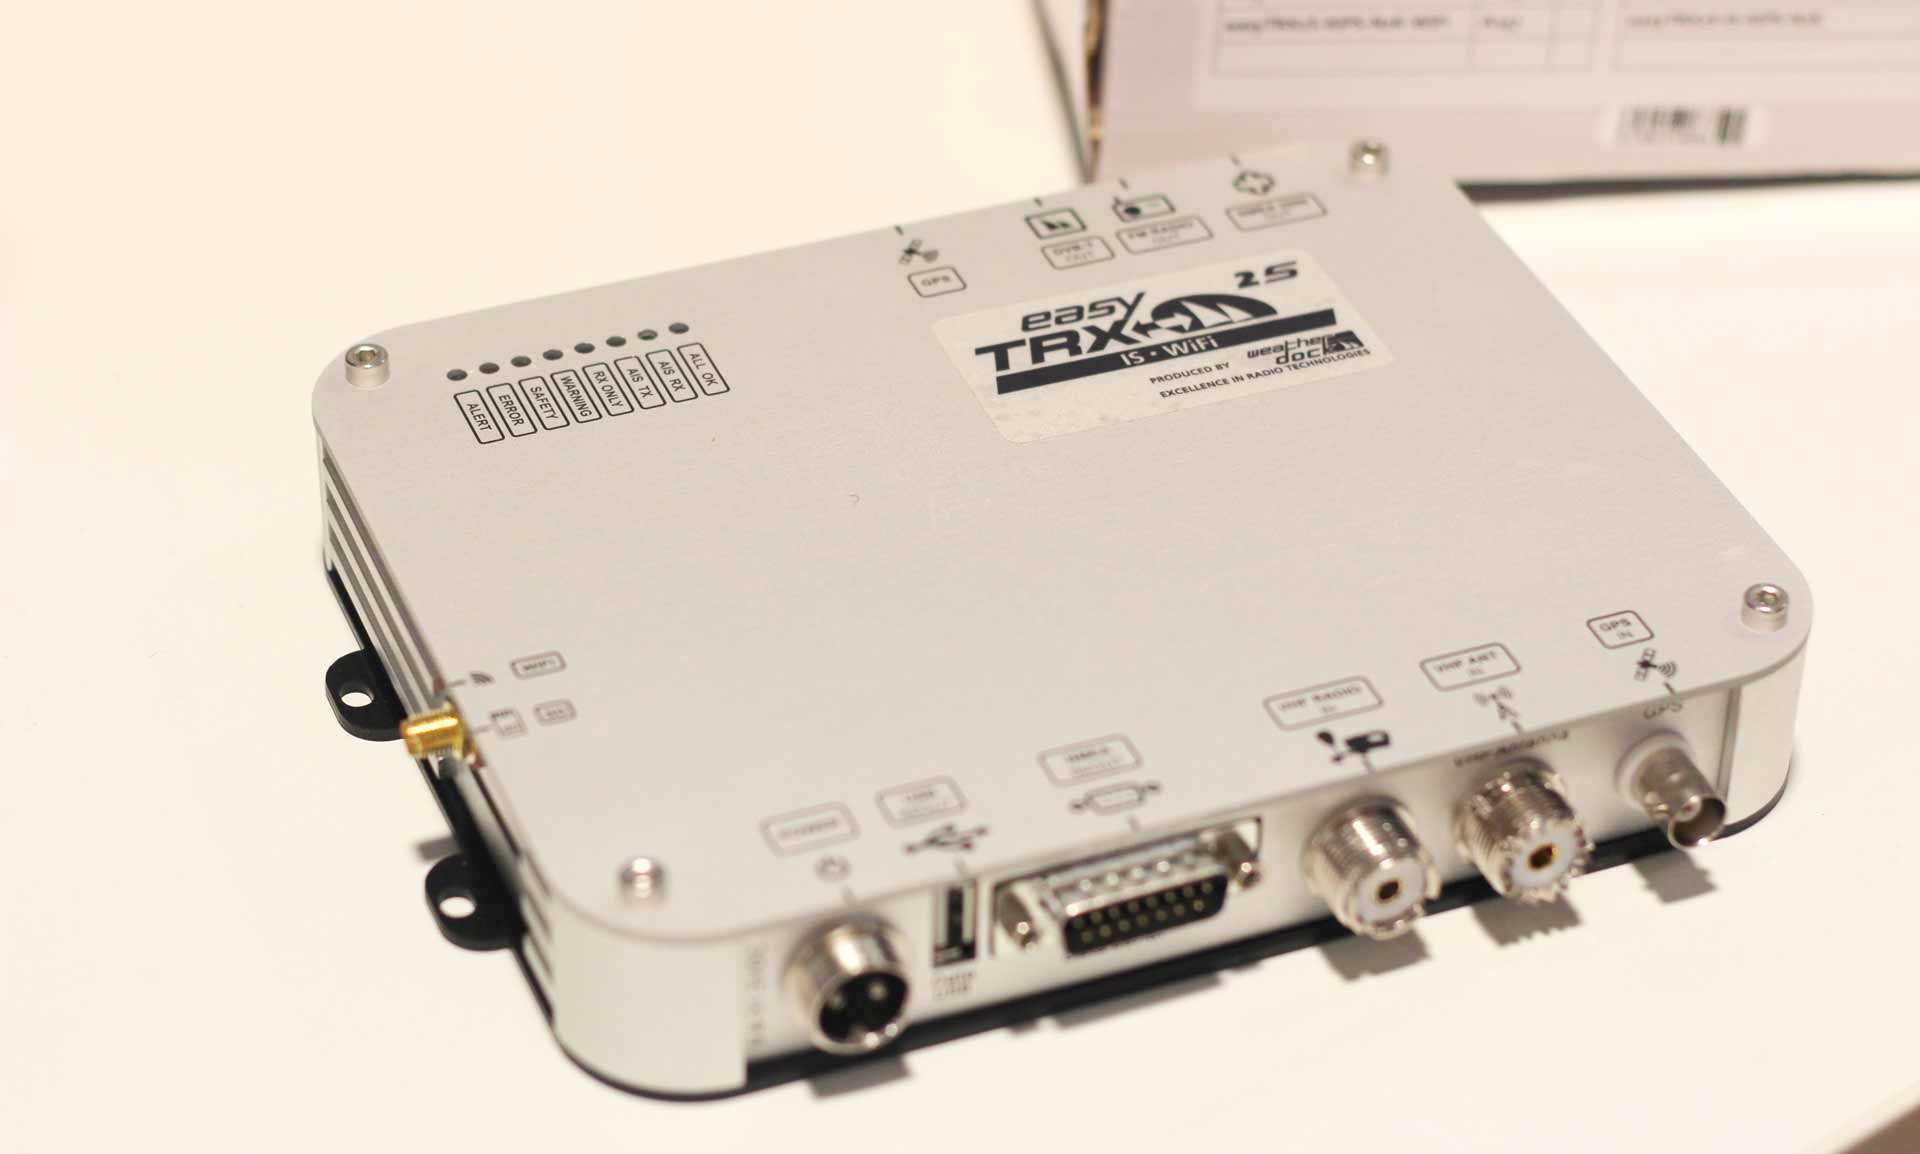
This is an AIS class B transponder
Talking of VHF, I can only urge every responsible skipper to at least go for the Short Range Certificate (SRC) because in getting this certification the whole process is very much connected to learning safety procedures – indispensable for skippers. When it comes to blue water cruising, it could be worthwile to think about the LRC-certification or at least an Iridium satellite phone for communication. In any case, a modern VHF-device with Digital Selective Call (DSC) is a definitive must for every seagoing vessel. DSC offers a range of advantages: One single button for distress-calls, automatic reply of distress calls, automatic transmitting of exact position (when properly connected to a working GPS device). On the other hand, I really love my classic Elna-VHF with a Bakelite analogue telephone receiver …
“When a yacht leaves coastal waters”, says Alexander Röpnack, “I would always recommend to have a modern VHF with DSC onboard. In any case. And I am not talking of offshore cruises or transatlantic voyages. Also, active AIS is essential – even and especially when sailing in traffic crowded coastal waters. AIS class B can save lives!” Being visible for commercial shipping is a definitive plus. Modern AIS-boxes are connected to plotters and will not just show other vessels but can compute collision courses and set off warnings. A crucial tool.
A modern plotter can display AIS-data
So I guess I am going to invest in a new VHF-radio and a separate AIS-transponder. If the Raymarine-plotter I was buying along the used yacht is able to be connected to the AIS is of question right now, maybe that´s another device to buy. Modern VHF transceivers are around 400 Euros. Active AIS-boxes start at some 700 Euros, can go up as high as 2.000 Euros with extra-capabilities like internet WiFi-splitting and stuff. Plotters, able to display AIS-data start with some 800 Euros going up as high as 3.500 Euros combining different services like radar, fish finder and other stuff.
Oh dear bank account …
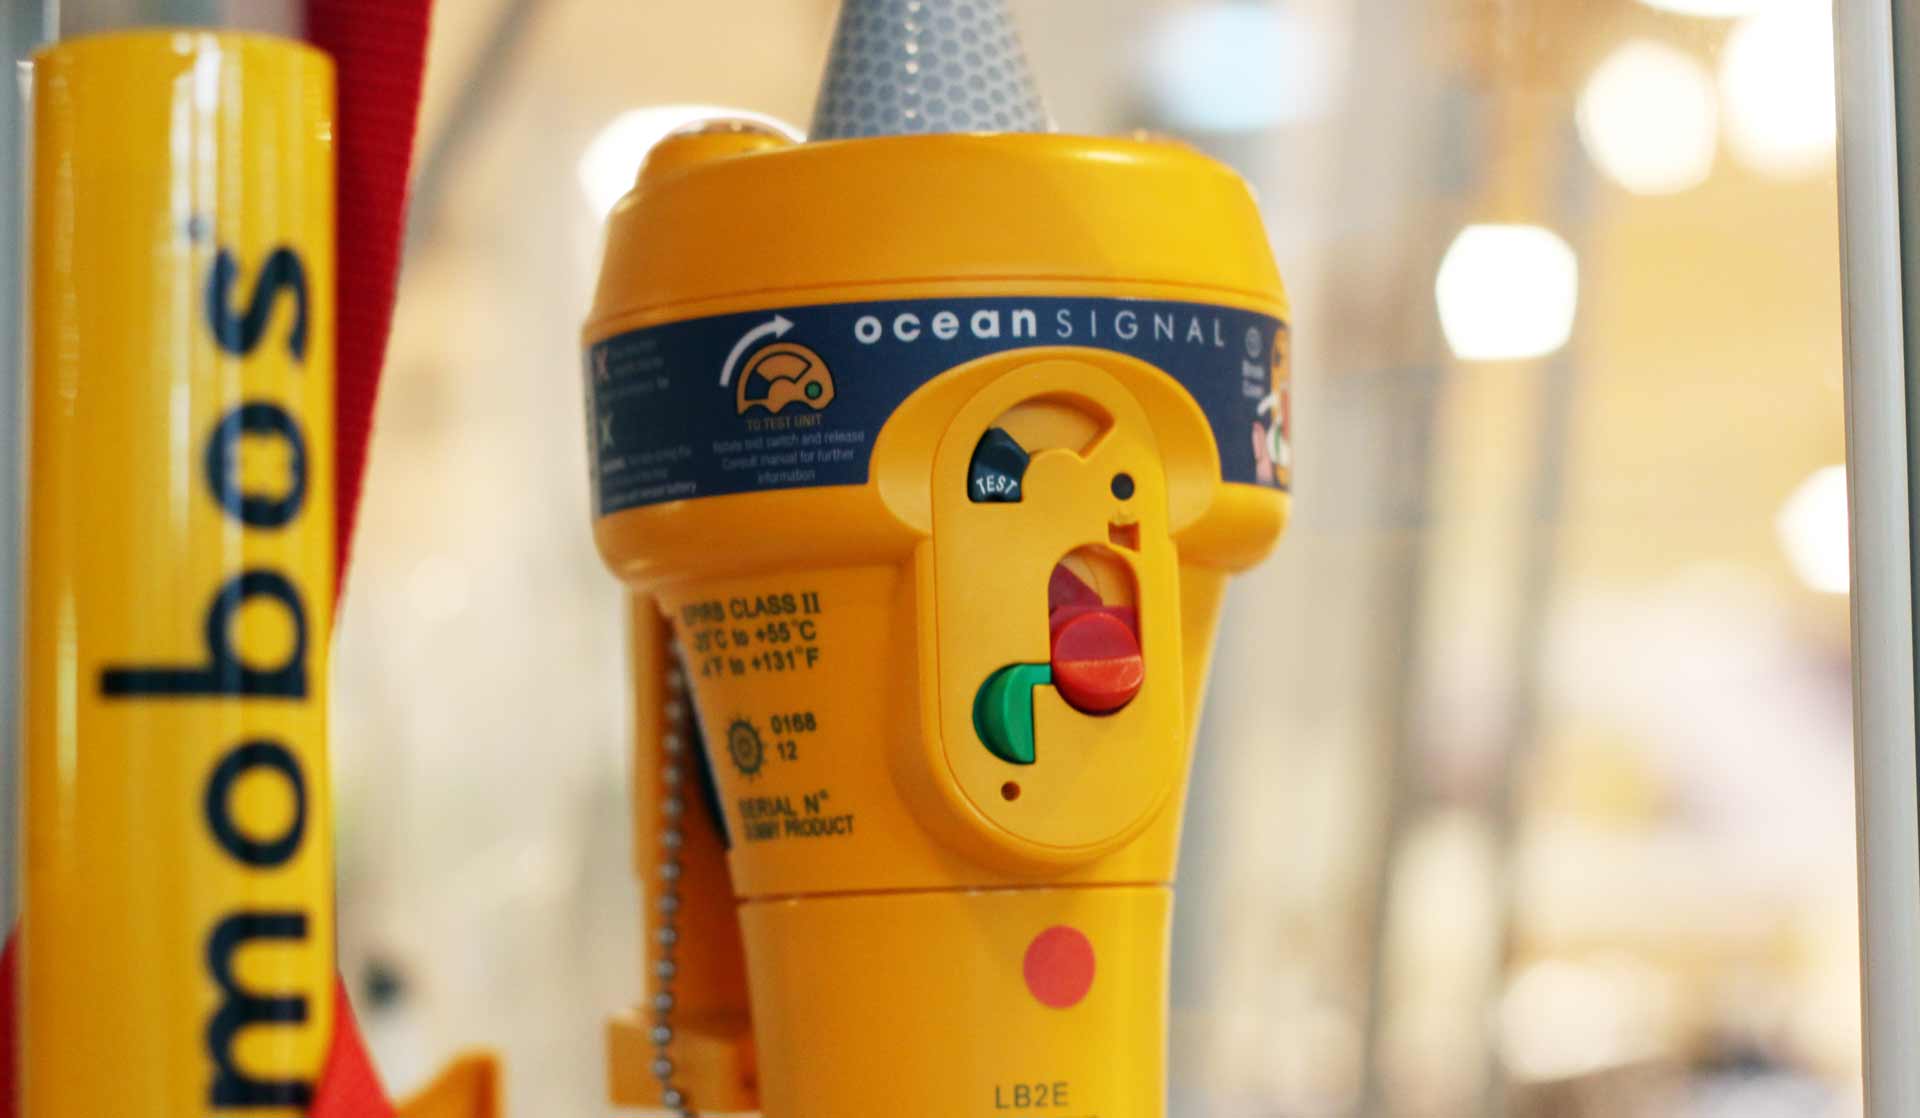
An EPIRB-device is a MUST on every seagoing sailing yacht
Talking of electronic devices important for a yacht´s safety concept, we shouldn´t forget to mention EPIRB. EPIRB stands for Emergency Position Indicating Radio Beacon. It will be set off automatically when in contact with water or started manually. So placing the EPIRB device is crucial: “Don´t put it outside”, says Alexander Röpnack, obviously, but also: “It must be placed well within reach because in case of distress you want to have it activated fast. But behold sailing parents: Children like to pull strings so have it outside the reach of the small crew-members.” I am opting for placing the EPIRB at the starboard rearside of the entryway-bulkhead – just one grab from the entryway-ladder and unreachable for my children.
A new EPIRB comes with a price tag of some 300 to 700 Euros.
Quarter Berth – or not?
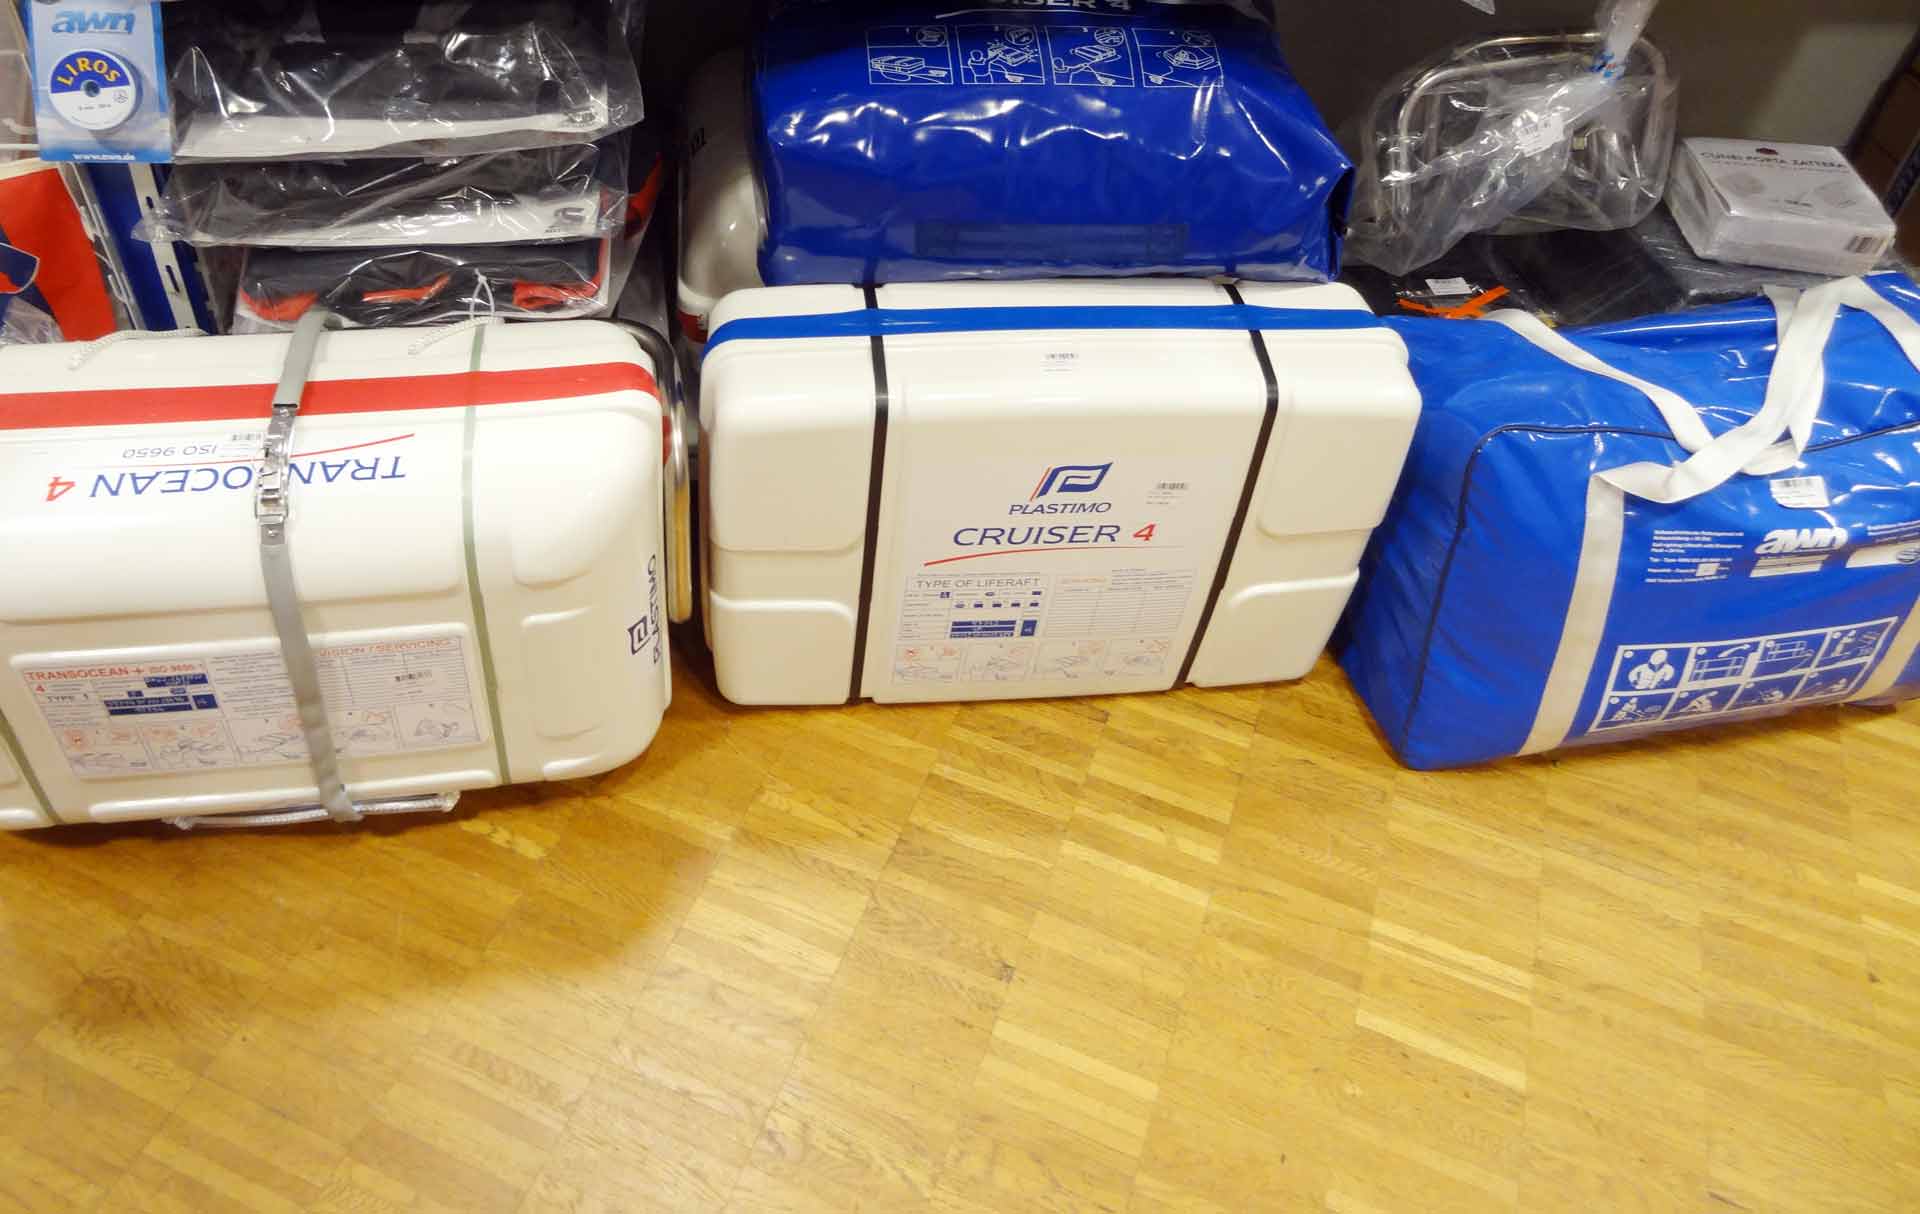
Wich brings me to a neuralgic point of my boat. Not safety-wise, but a spot where I do have the most thoughts about going into – the quarter berth. I am going to post a detailed article on this location later on, but to sum it up: I doubt the fact that I need this sixth berth. So a lot of space could be made available – for safety equipment as well – if I´d seal off this area behind the chart table with a new made bulkhead. So instead of refurbishing the quarter berth to house another berth, I am playing with a different idea: Using this area as stowage for spare sails (which I would store here anyway), for an alternative fridge (the old one in the galley will be removed) and for the life raft. Alexander Röpnack says: “I would always prefer to have the life raft positioned outside. Why? When you really have to leave the ship it is better to have the raft ready to go: Maybe at the stern reeling or on the cabin roof near the mast. In any case this is the better solution.” Because, Alexander states, many people forget to have the life raft connected with the boat: “Now they do throw it in the water, the raft unfolds and is ready to be boarded – but drifts away because there is no attachement to the ship. A tragedy!”
Should I convert the quarter berth in such a way?
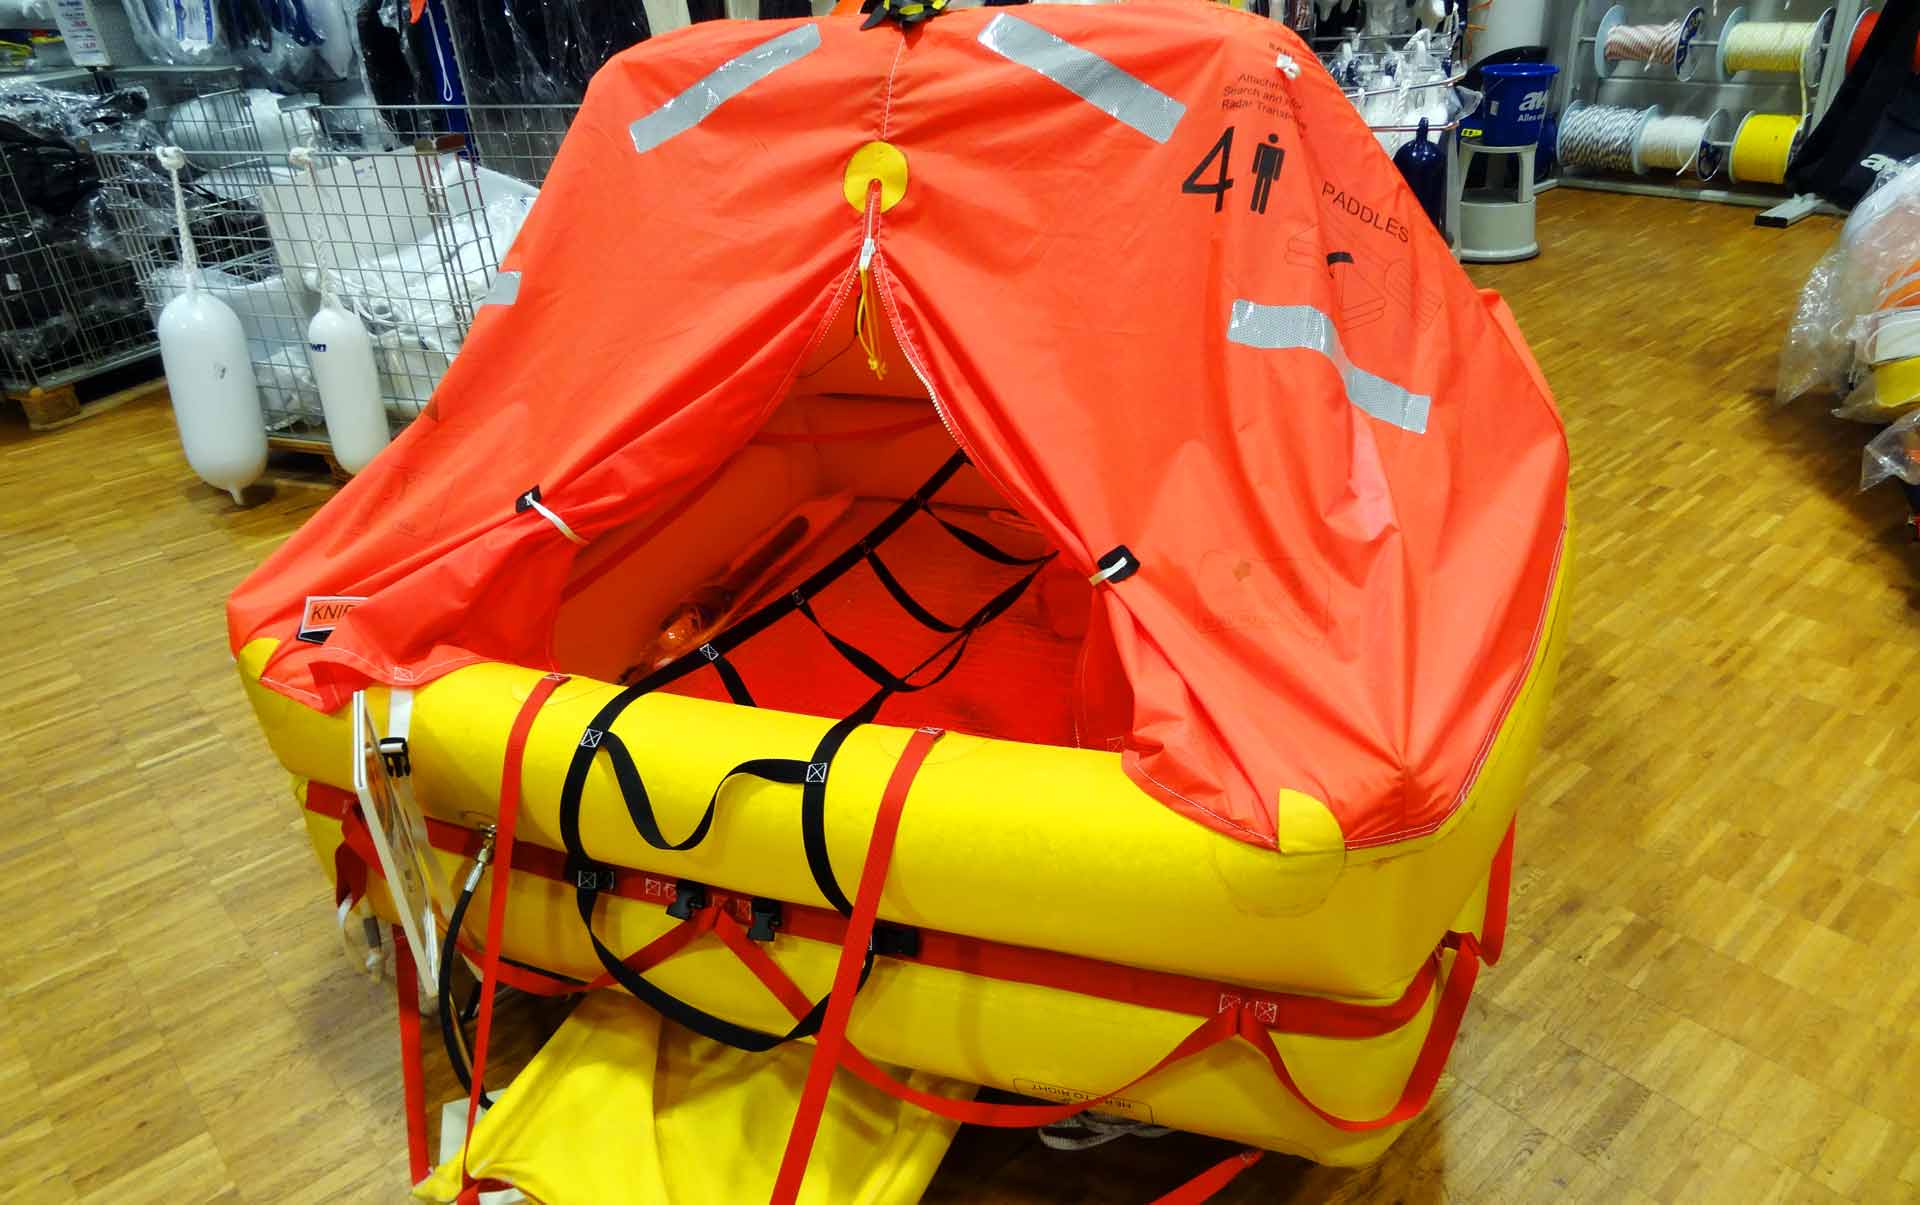
A life raft for 4 persons (which is the maximum I am going to have onboard with OLIVIA) will come in starting at some 800 Euros. If I am turning the quarter berth into stowage then I am going to store the raft down under the cockpit because, contrary to Alexander Röpnack´s opinion, I doubt that in case of a heavy distress there are only seconds left to leave a ship: The only case I could imagine is the loss of a keel and that really is a matter of seconds. If the crew is sleeping down below, in such a case it´s lost anyway, no matter where the raft is stored. I would rather think – like in Fastnet 1979 – that under “normal” conditions the decision to abandon ship is a chain of decisions to be made with minutes if not hours passing by. Enough time to hoist the raft up on deck. In any case, no matter where a raft is stored, it belongs on every seagoing vessel as a matter of course.
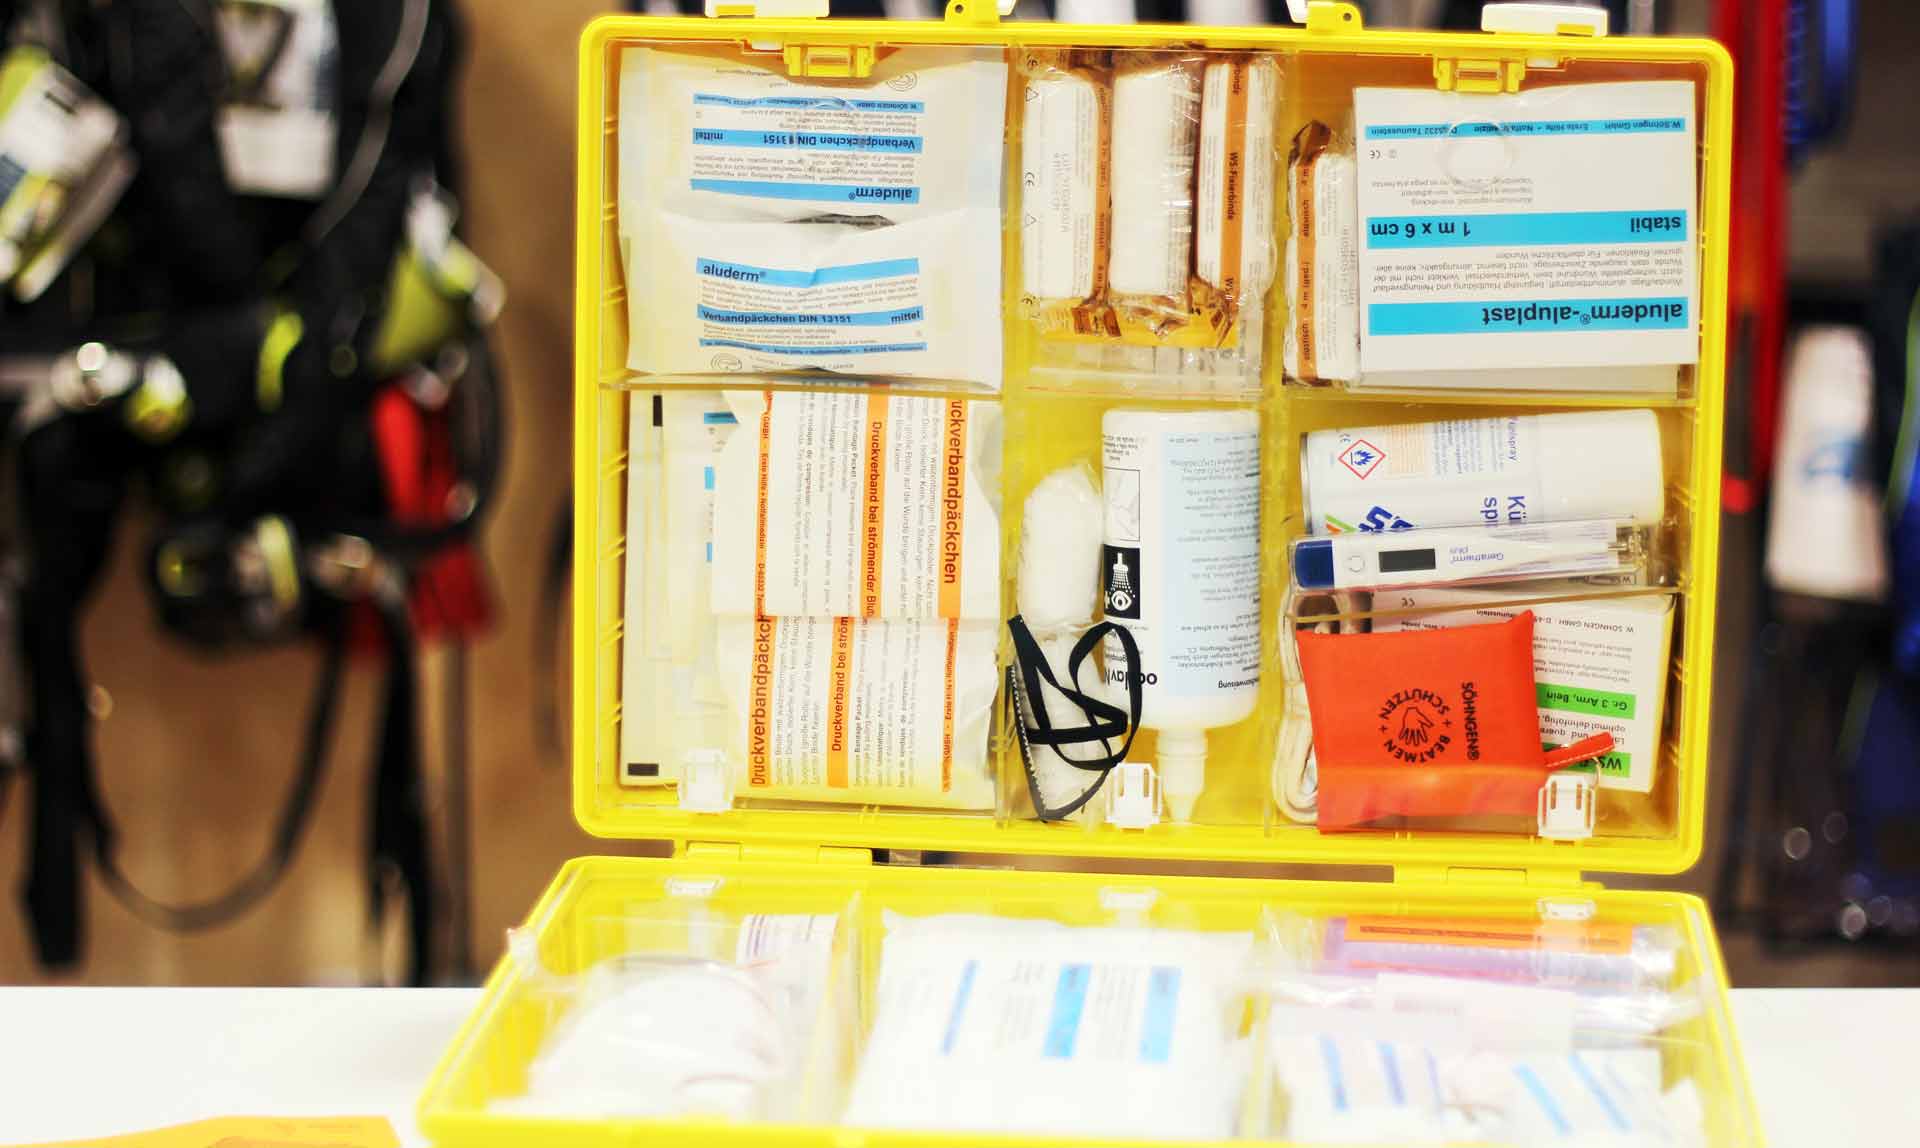
Also to be stored in the new “safety corner” of the refurbished ex-quarter berth: A big, strong bolt-clipper in case of a dismasting, signals like distress-rockets, torches and smoke-pots along with a proper first-aid trunk. A complete stack of distress signals will have a price tag of some 150 Euros, a good stainless clipper around 100 Euros and the first aid-set will start at 200 Euros.
Life rafts: Solid boxes for storing outside or in lighter cases for storing under deck
I know, replacing the quarter berth would be a serious change of the King´s Cruiser concept, apart from the fact that it´s not an uncomplicated task. But doing so doesn´t go wthout logic: I know that I am never going to sleep there and from talking to other skippers who own a classic GRP-sailing yacht with a quarter berth it´s a matter of fact that this area is used for storing sails and different stuff anyway. So why preparing a berth when I know that there´s stowage going to happen?
I am stil sketching around here …
Saloon at Night: Red Wine and Candlelight-Dinner …
The saloon is the central place of a sailing yacht when it comes to socializing and spending time apart from the cockpit. Most time whilst mooring in harbors will be spent here: If it is finding a good night´s sleep, having a dinner with one or two bottles of good red wine or just having a cozy warm and dry spot to weather a storm: The saloon is important. With my King´s Cruiser, there´s a large U-shaped settee on starboard and a seaberth settee on port side of the boat, arranged around a large folding table. That´s adding up to a very classic shiplike atmosphere – I love the saloon! I am going to retrofit the whole lighting concept of my yacht to LED lights but I know that most of the intimate dinners will be lighted by candles or one or two of those great brazen petroleum-lamps. So that means open fire …
Always opt for ABC power extinguishers
Which also is the greatest of risks for the saloon. Having all in all two fire extinguishers well within reach here is mandatory: One will be situated near the galley at the stern end of the saloon, another one on port side after the chain plates at the bow end of the saloon.
Another thing with the saloon is to deal with injured or sick persons. So it´s worth thinking about having one of the berths ready for dealing with such incidents. The port side settee is perfect in this matter: It´s accessable from all ends, I do have a lot of stowage underneath (for material) and theres a studding sail made of massive wood that can be raised in heavy weather to secure the sick or injured person.
A well equipped first aid suitcase
But the saloon is far more important when it comes to the general safety concept of my yacht, because the highest risk of damage or distress of a sailing yacht can turn this area into a messy place indeed …
Measures against Leakage
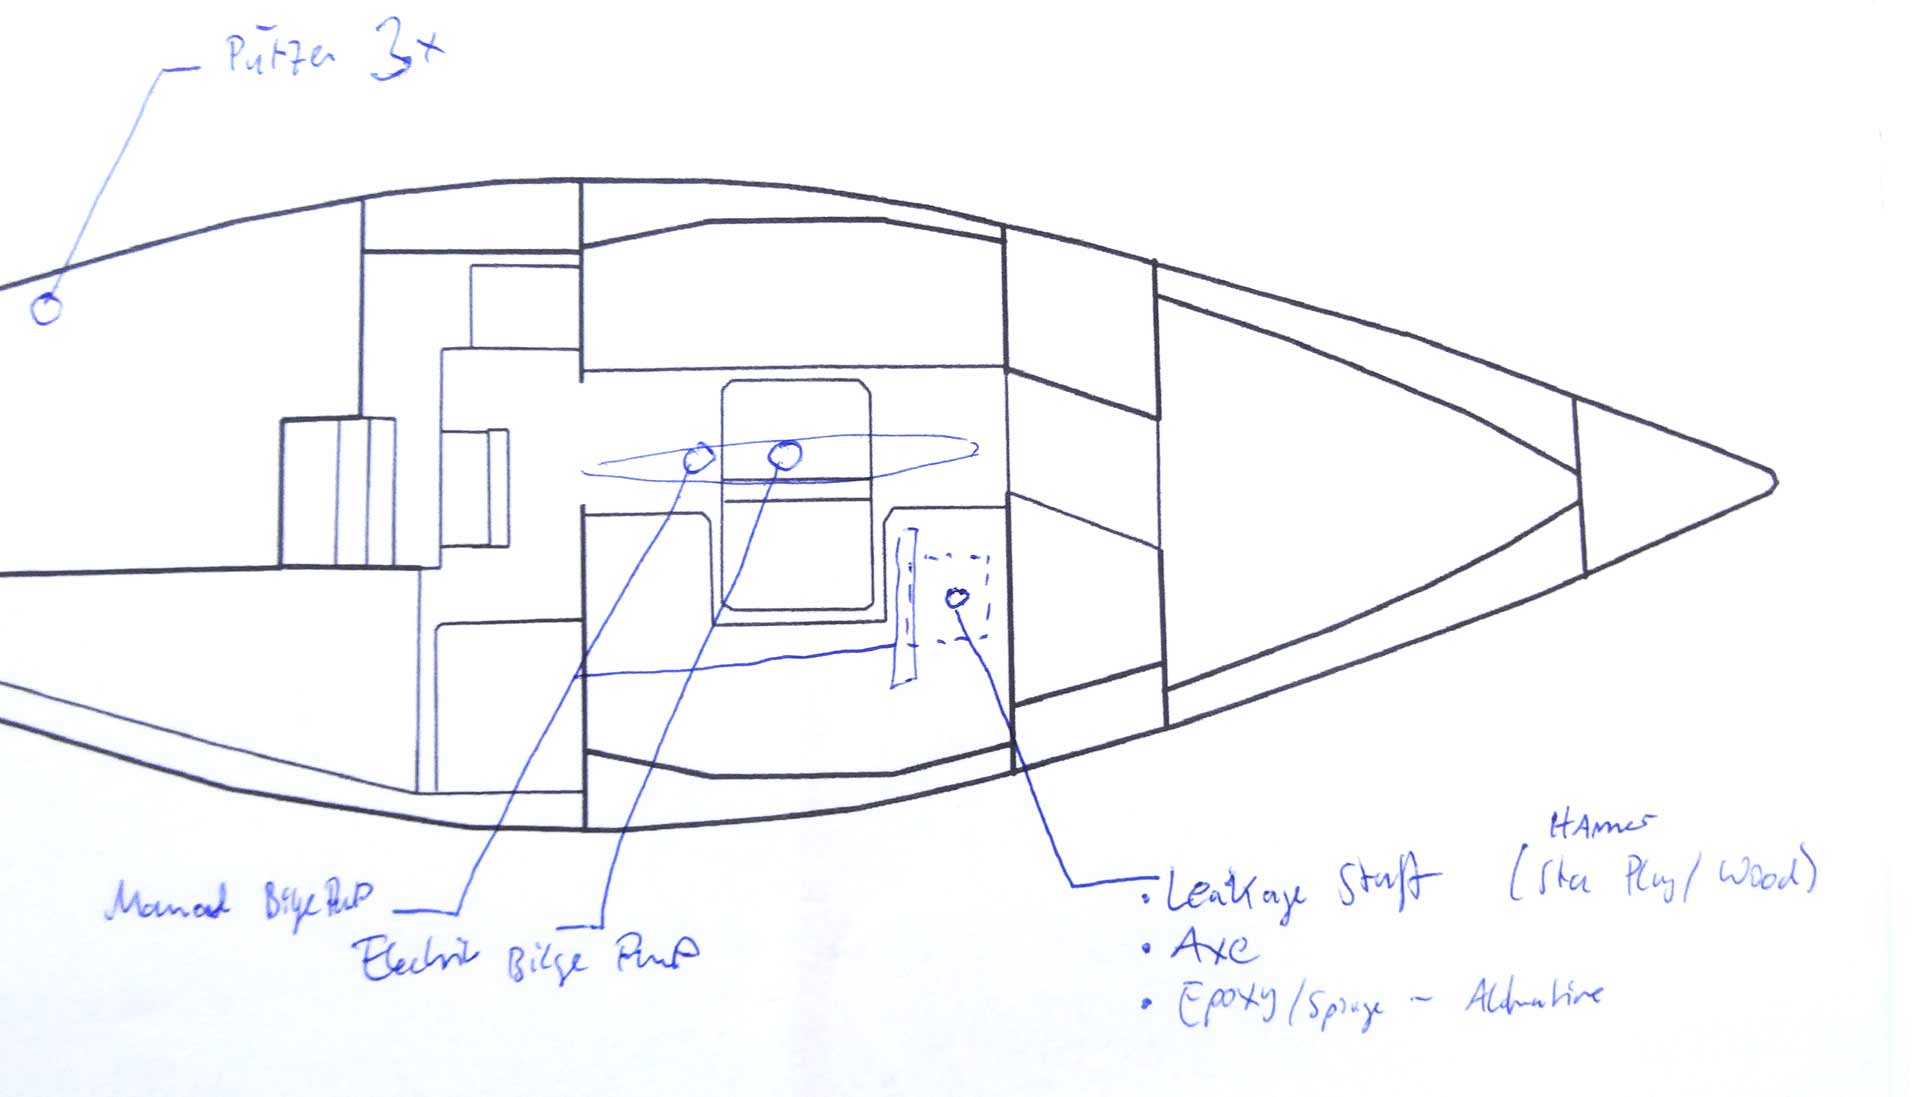
When a sailing yacht – no matter why – suffers from a leak and water enters the hull, it will undoubtly find its way to the lowermost part of the ship: The bilge. I must enter the bilge because there we have means to get it outboard again. For the bilge we have one rule: This is no stowage! I am aware that a lot of skippers – especially when on long haul – love to have cans, bottles and other provisions stored here. That´s a no go because we need this space to be clean. The bilge of my yacht has been elaborately refurbished and houses the electric pump. The pump will be activated from the main electric panel and can be run in automatic mode. A float lever will activate the pump when water levels have risen to 1.5 centimeters.
Checking risks and placing equipment for the saloon & midship section
The Johnson pump I am using has a maximum output of 2.700 liters per hour, which I think is a sufficient performance. On bigger yachts and more delivery height one should think of buying stronger pumps. 2.700 liters per hour sounds too much? Let´s see: That´s some 42 liters every minute. And guess which diameter you need to have to have such a seapage in your boat? Some 7.5 millimeters! That´s a really tiny hole in the hull. When I think of hitting a container with 7.5 knots, I guess the hole will be sufficiently bigger … “This is why you should have at least two buckets available”, says Alexander Röpnack, “because nothing is faster that a sailor with a bucket on a leaking ship.” When electricity fails the even best pump will die, so a manual pumping system is also mandatory on seagoing yachts. Most modern yachts do have a pre-installed system but there are very interesting, light and cheap solutions available – starting with some 20 Euros sucha manual pump can deliver up to one liter per pass. A high quality electric bilge pump will come in starting at 50 Euros.
So, pumping water outboard is done – let´s switch to the next item. Blanking off the leak. Generally speaking there is a moment when pumping turn irrelevant, namely when the influx of leaking water is constantly bigger than the output and the leak is too big to be plugged. In such a situation a responsible skipper should better have his distress call and MAYDAY sent and his crew prepared to get into the life raft to abandon ship. But let´s assume we didn´t hit an iceberg off Greenland, lucky us, the leak isn’t that big.
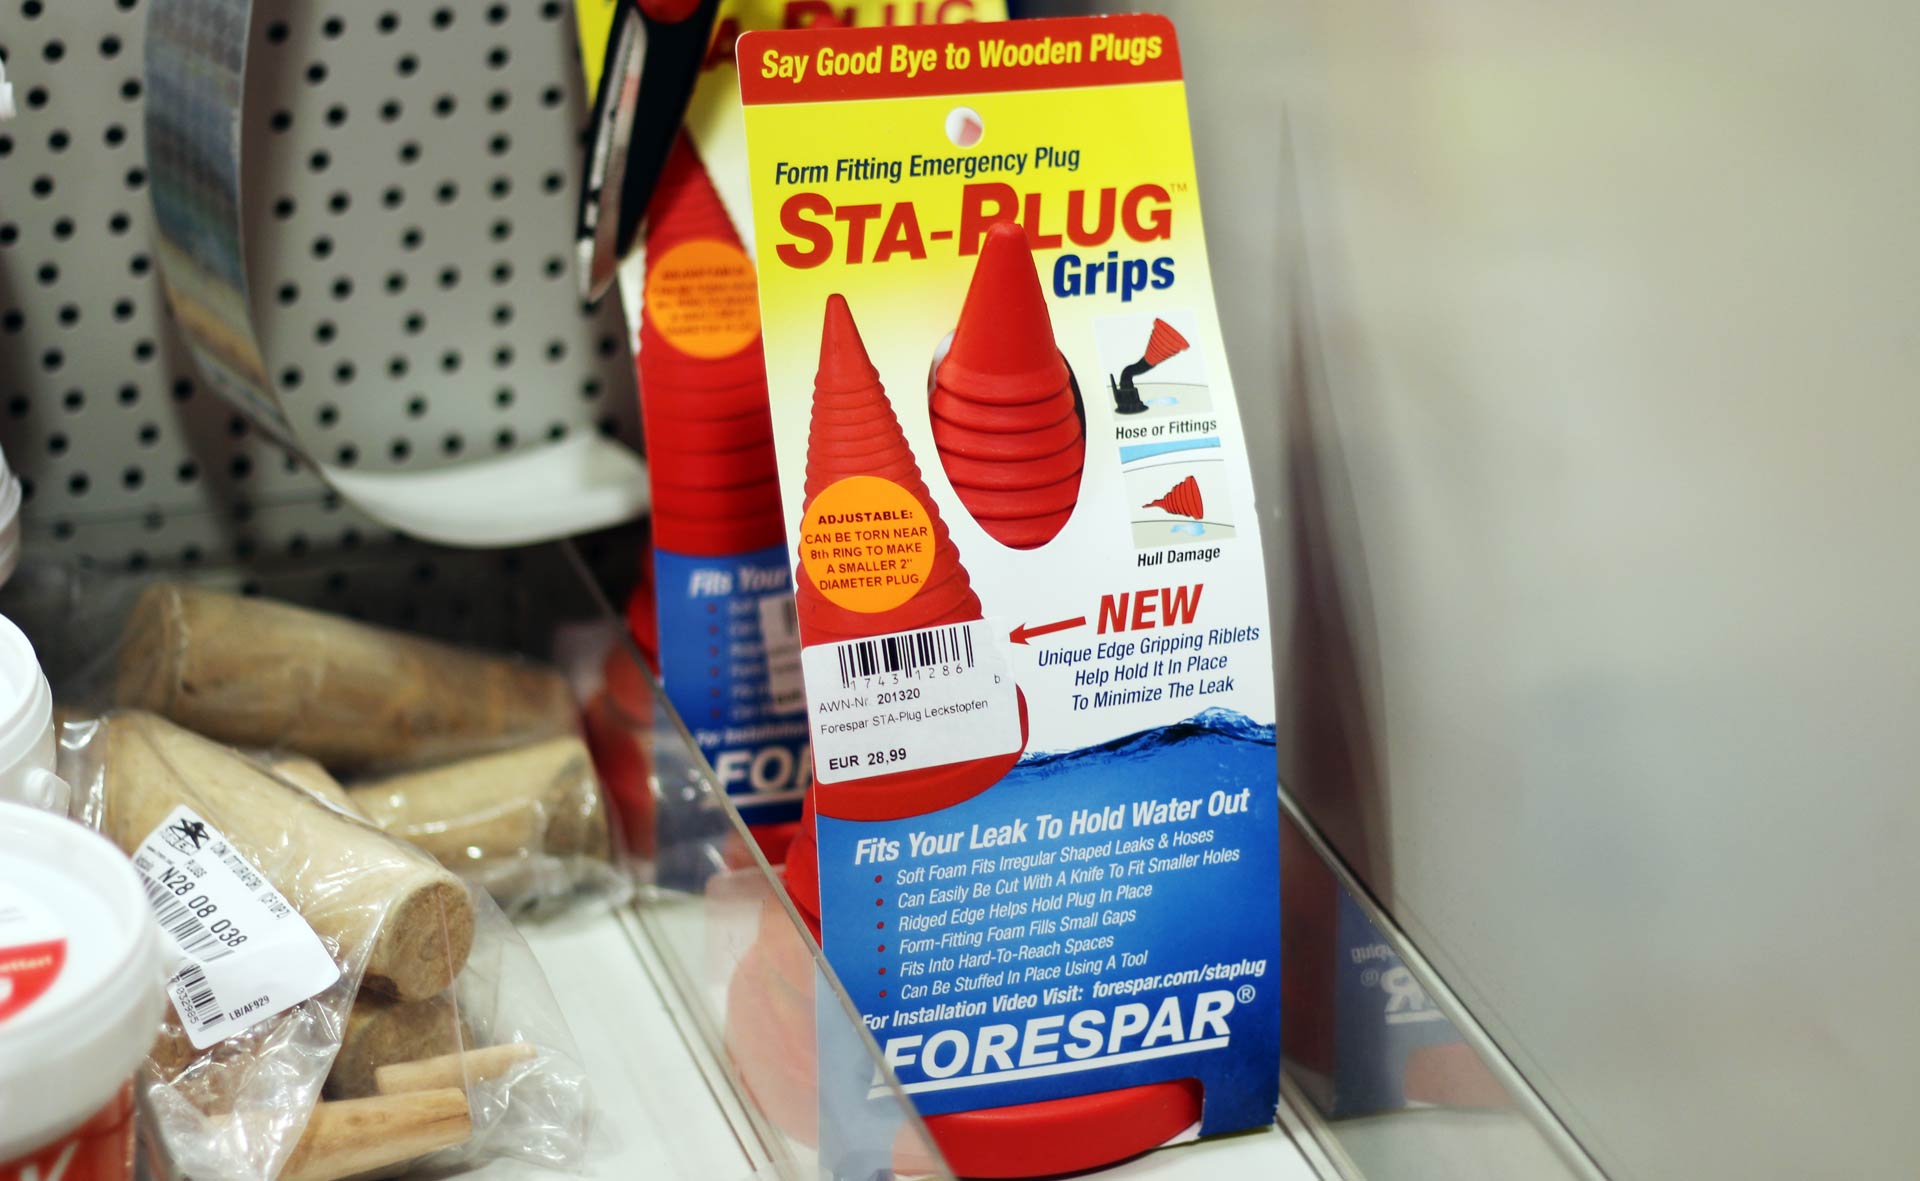
The better choice when it comes to plugging a leak
Smaller leaks should be plugged – at least jury-rigged – to stop the intake of water or slow down the rate. There are numerous concepts and techniques of which the oldes is to have wooden plugs of different sizes at hande and cramming them into the holes. “50 per cent of the skippers I know swear by wooden plugs and won´t switch to anything else”, says Alexander Röpnack. Wooden plugs of different sizes will cost some 10 Euros, but there´s a clever alternative: “That´s the Sta-Plug by Forespar”, says Alexander Röpnack. “It´s a flexible plug that can be utilized to fit in nearly all kinds of leaks – no matter the size (up to a certain point). The best thing: Instead of just offering a circular diameter like the wooden plugs, this one is made of a flexible rubber-like material and will fit in all forms and shapes of leaks.” An Sta-Plug comes with a 30 Euro price tag. No matter which you opt for – don´t forget to have a wooden hammer well within reach.
Ramming and Object – Leak in the Fore Cabin!
That´s truly a nightmare for every skipper: Nightly cruise, poor visibility, a gusty Beaufort 7. That´s hard to sail even during daytime. Wife and kids are trying to find a sleep under deck until … a loud bang rips through the night, a sharp stop and you suddenly realize: Something hit the boat. Even when sailing a slow speeds there´s enough inertia within the boat to have the fragile GRP hull ripped apart by an even more massive floating object like a container. A leak is inevitable. When hit with the bow this leak is farthest away to be reached. Now, every second counts.
Leak management tools should be well within quick reach. And because my risk assessment shows that a leak is to be expected to happen in the forepeak I am going to store plugs, hammer and an axe (to quickly remove wooden fittings) here in one of the large chambers underneath the cushion.
Since I am going to have the forepeak furnished with Teak or Mahogany ceiling I guess I will have to rip off this ceiling first. So the axe is a tool needed, though a smaller one will do.
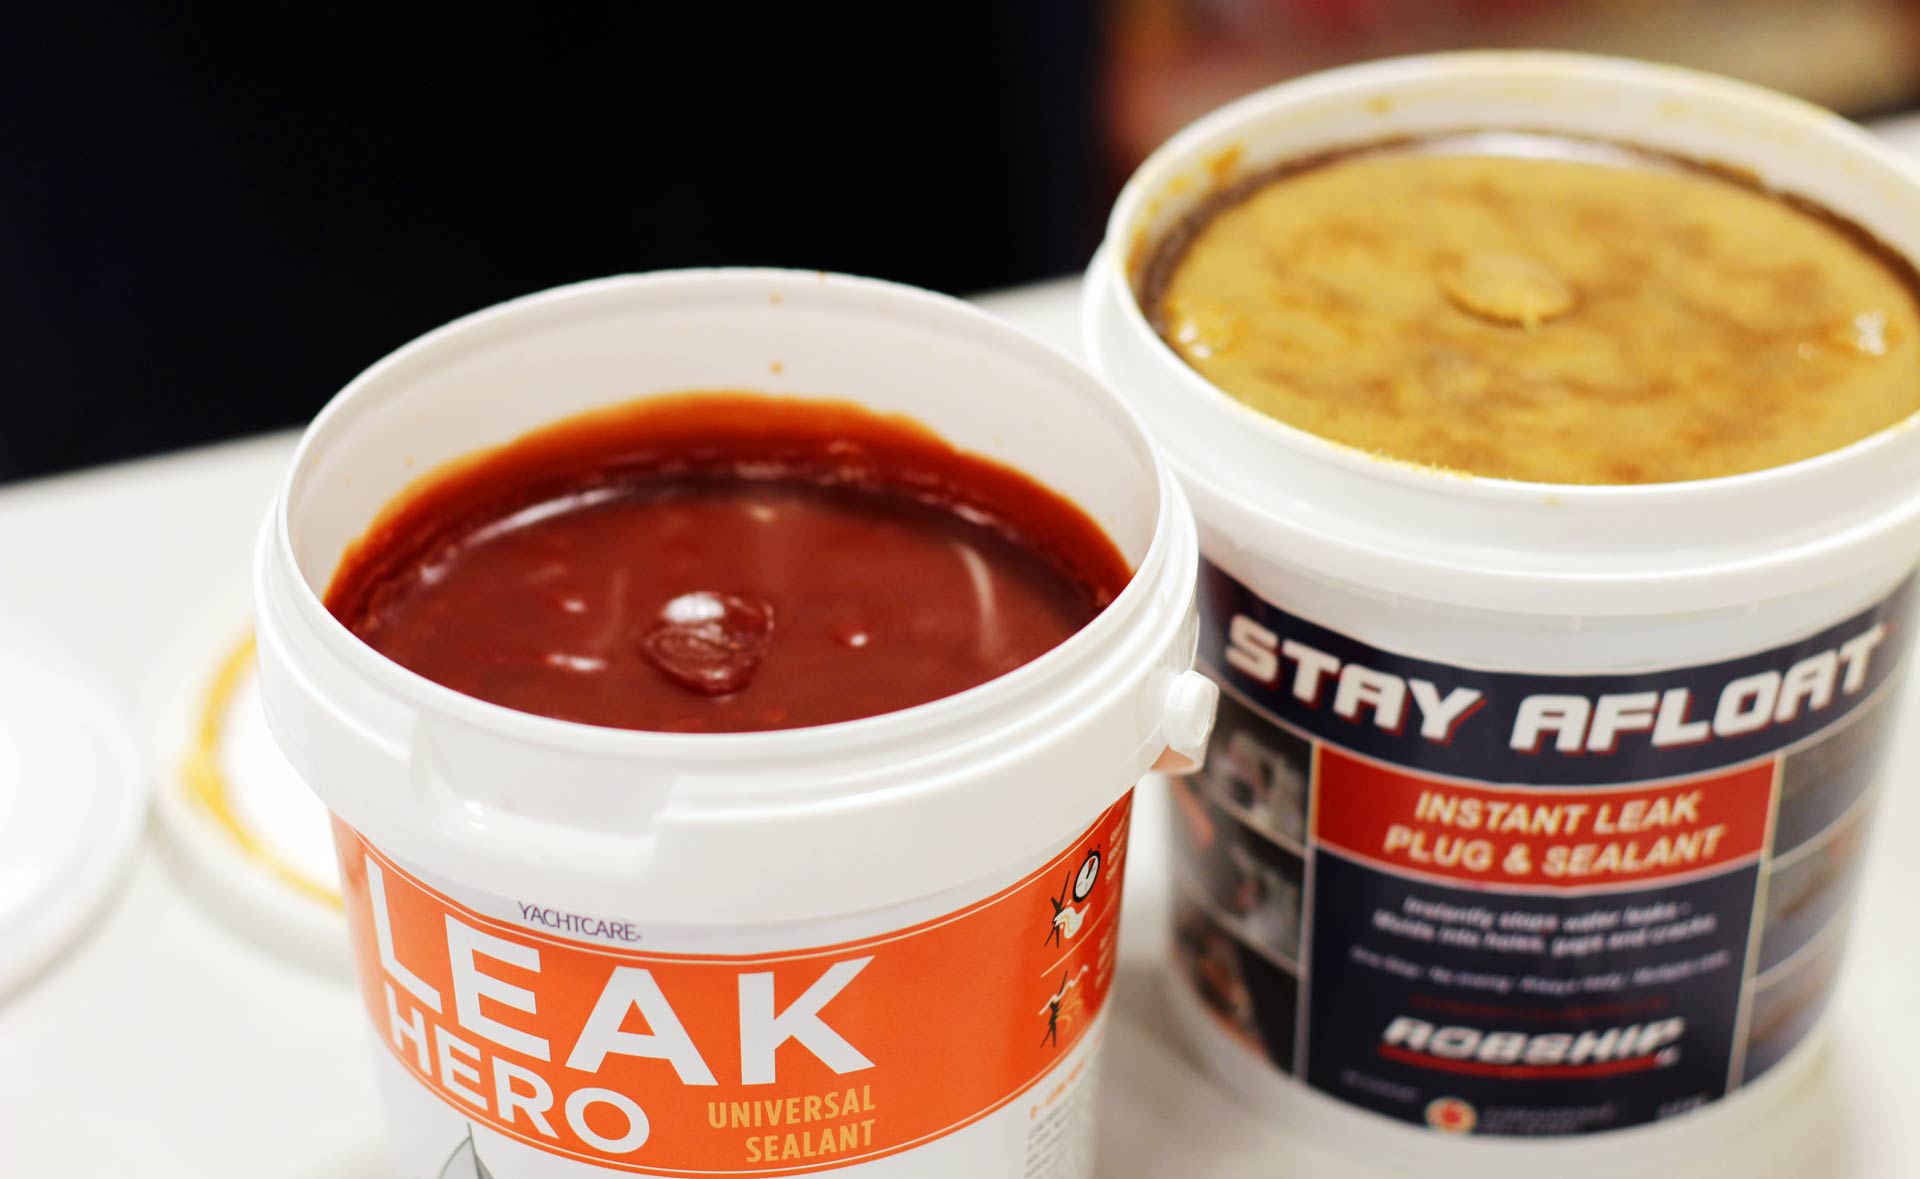
Leak Hero and Stay Afloat for permanent sealing a leak
As I´ve read in some blogs in the internet there´s a well-tried “household remedy” to plug leaks: With Epoxy resin and an ordinary big sponge. The trick is to have the mixing ratio changed in a way that there´s way more hardener than usual causing the resin to dry through even under water and fast. Very fast. Then a sponge should be soaked in this resin, put into the leak and would hearden immediately. Alexander Röpnack says: “Oh, let´s be honest, that´s not very practical. I would always opt for ready made products like the Leak Hero which is way more convenient to use. Just heat up the stuff and pour it onto the leak.” I do agree. “Don´t forget to have a pilot lamp, even when it´s a small one, at least in the fore cabin, if not one additionally in the saloon in case of electric shutdown.”
The Safety Concept of my Kingscruiser 33
“100 per cent safety is not possible”, says Alexander Röpnack: “But you can constantly learn and improve your knowledge. What is most important – for me – is that the skipper is aware of his responsabilities and tries to meet certain standards and demands. There´s certainly a must-have when it comes to equipment: The rest is up to the individual sense of security.” I am sure that I will have a good starting base for the safety equipment of my King´s Cruiser 33 and will be able to professionally react to the most common forms of critical situations.
In the end we do have answered – hopefully all – safety-related questions connected with our sailing yachts. We have assessed risks, have pinpointed areas of interest, prioritized the hazards and finally chosen the right equipment to being prepared of launching counter measures. Summing up all this I can produce an overall safety concept and equipment plan of my ship, hosting all “layers” of safety.
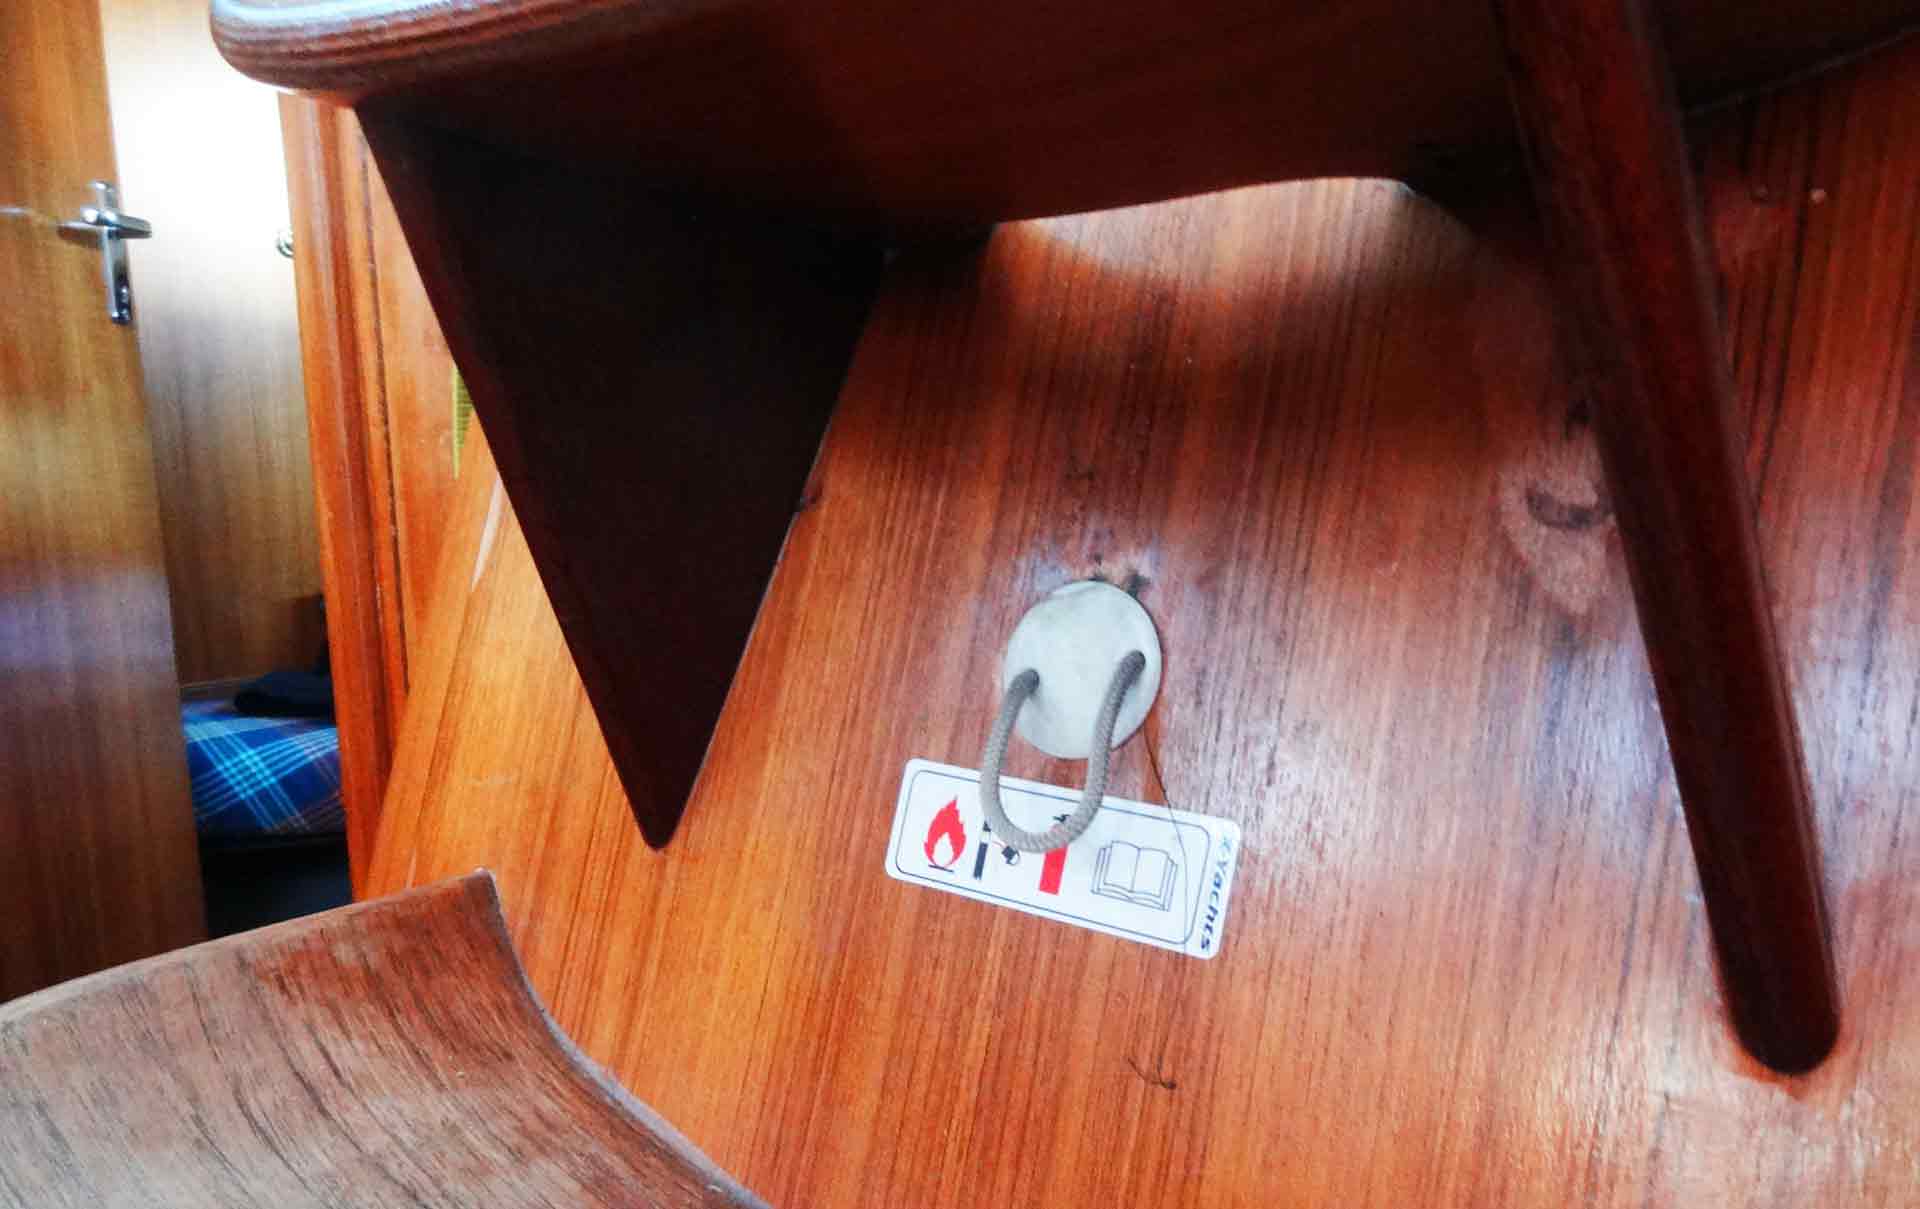
A plug in the entryway: Essential for fighting a fire effectively
Best thing is, I am now presiding over a fixed system of standards in my boat enabling me as a skipper to have my safety-briefings structured accordingly. Everything is situated at it´s own fixed place – so briefing guests and crew is made easier. Which also contributes to the factors of active safety of course. Along with distinct and clearly visible stickers indicating the various parts of the equipment and one waterproof laminated plan showing all material will be part of the project.
Advertisement
The Price of Offshore Safety
Apart from more or less bigger reconstruction works which can be made during the overall refit project of my ship I am adding up all numbers and calculate a budget of some 2.500 Euros all in all for the shown equipment and parts. That´s the price of safety I guess. And it´s a lot of money. But is it really this lot of money?
What´s the safety of my family, my kids, guests onboard my ship and the safety of thers worth? That´s a question I am not willing to discuss: Although I won´t reach full safety ever, it´s really not the topic to talk about saving money. Instead, I would rather go for less fancy fabric for the cushion or have varnished plywood instead of real Teak but I won´t save money on safety. Never. Ever.
That´s a 4 person life raft
I hope this article was of some practical interest. I think my approach and the concept itself is transferable onto every other yacht of every size no matter if brand new or used, helping every skipper to design a very own safety concept individually.
You have contributions or different approaches? Ideas or tips for better equipment? I am looking forward to your comments.
Next article on safety I will be discussing active safety and the practical aspect of refurbishing my King´s Cruiser 33 to fit to my safety plans. Taking part in an official ISAF-class is also planned, along with an interview with the German DGzRS, our national SAR-service.
Thanks to Alexander Röpnack of AWN for answering all my questions and showing me all the fantastic products.
Here´s an article on how a live jacket is made at SECUMAR.
Another interview with Dr. Hillebrand on basic life support measures when sailing with children.